


Most growers who lose a batch to contamination describe it the same way: they saw something off, hoped it would resolve, and two days later the substrate was a loss. The failure usually isn’t the contamination itself — it’s not recognising what it is, where it came from, or how early it was detectable.
This guide covers the visual signs of contamination, how timing and location narrow the diagnosis, and what the pattern is actually telling you about your process.
What contamination looks like
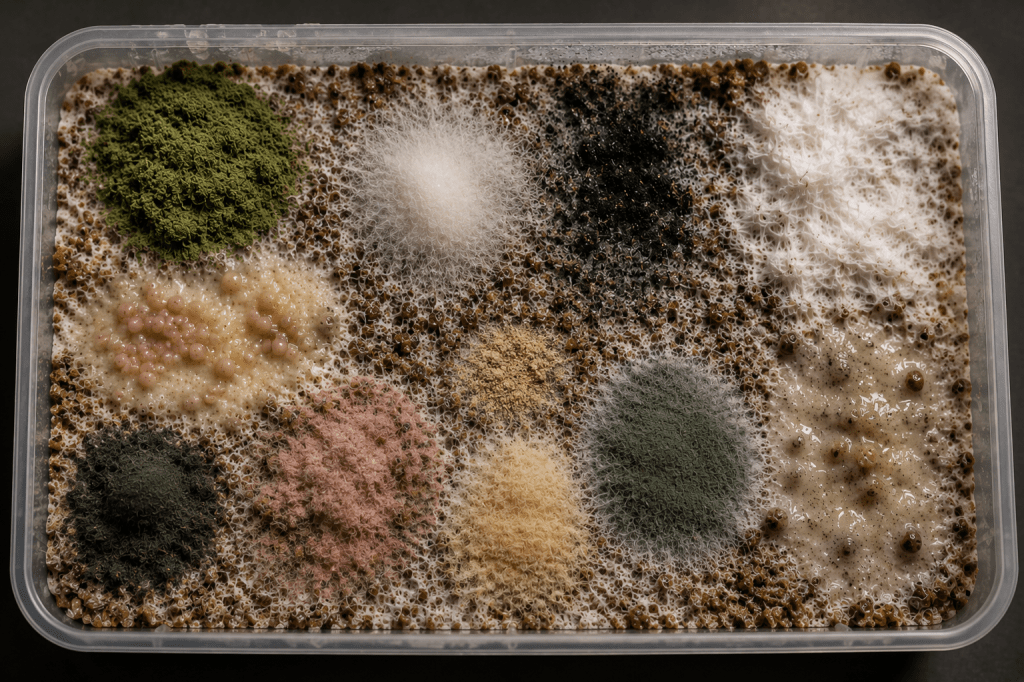
Contamination in mushroom cultivation almost always has a visible signature. Colour and texture are the two primary indicators.
Colour
Green or blue-green growth is the most common and most recognisable sign. This is typically Trichoderma — a fast-spreading mould that produces characteristic green spores. It spreads quickly and visibly, often appearing as a concentrated patch that expands outward.
Black or dark grey growth usually indicates Aspergillus or similar moulds. These tend to appear as small, powdery spots.
Pink or red discolouration is often bacterial contamination — Bacillus species are a frequent cause. Bacterial contamination tends to produce a wet, slimy texture rather than a dry mould surface.
Yellow or orange patches can indicate several things: certain bacterial contaminants, metabolic byproducts from the mycelium under stress, or early-stage mould. Colour alone is not always conclusive — texture provides the second data point.
Texture
Healthy mycelium is white, dry, and branching. Its surface has a fibrous, aerial quality. Contamination typically looks different in one of two ways: either it produces a powdery or fuzzy surface texture distinct from mycelium, or it produces a wet, slimy, or discoloured patch.
Cobweb mould (Cladobotryum) is a common source of confusion. It resembles healthy mycelium — white, fine, filamentous. The distinguishing characteristic is density and response to humidity: cobweb mould forms loose, irregular webs that collapse visibly when misted. Healthy mycelium does not collapse. [See: Trichoderma vs Cobweb Mold — how to tell the difference.]
Smell
Contaminated substrate frequently smells sour, ammonia-like, or like rotting organic matter. Healthy colonising mycelium has a clean, slightly mushroom-like or earthy smell. If a container smells wrong before you open it, that information is diagnostic — trust it.
Timing as a diagnostic variable
When the contamination appears matters as much as what it looks like. Timing narrows down the probable entry point significantly.
Day 0–7 after inoculation
Contamination appearing in the first week almost always points to one of two causes: the sterilisation or pasteurisation process failed, or the inoculation itself introduced contaminants.
Widespread contamination across the substrate in the first week is particularly indicative of sterilisation failure — the substrate was not fully sterilised before inoculation, and contaminants that survived are now competing with the mycelium. This is not bad luck. It is a process variable.
Localised contamination in the first week, particularly near the inoculation point, points to the inoculation process: a contaminated syringe, liquid culture, or grain spawn.
Day 7–21
Contamination appearing during active colonisation usually indicates a physical breach — a small tear in a bag, a gap in a lid, a poorly-sealed port. Condensation dripping onto the substrate surface from an unsterile source is another common cause at this stage.
Fruiting stage
Contamination appearing after pins form typically involves different variables: inadequate fresh air exchange, surface moisture accumulation, or hygiene during harvest. At the fruiting stage, the substrate is more vulnerable — the canopy is broken, moisture is actively managed, and physical contact occurs. [See: Common Monotub Contamination Mistakes for fruiting-stage specific failures.]
Location as a diagnostic variable
Where contamination appears provides a second axis of diagnosis.
Localised surface spots
A single spot or a small cluster on the surface points to a localised entry — an inoculation point, a physical breach, a condensation drip. The contamination hasn’t spread from a widespread source; something entered at that specific point.
Widespread across the substrate
Contamination distributed throughout the substrate, or appearing in multiple disconnected locations simultaneously, is a stronger indicator of sterilisation failure. The contamination was already present in the substrate when inoculation occurred.
At or near pins and fruiting bodies
Contamination concentrated at developing pins or on the surface of fruiting bodies indicates post-colonisation entry. FAE management, surface humidity, and harvest hygiene are the primary variables here.
The timing × location matrix
Combining these two variables — timing and location — produces a reliable diagnostic framework. The contamination pattern matrix maps nine combinations of timing (early / mid / fruiting) and location (surface / widespread / pins and fruit) to their most probable entry points and corrective actions.
The full matrix is included in the Environmental Calibration Sheet, a printable reference that consolidates this and four other diagnostic frameworks on a single page. [Get the Environmental Calibration Sheet →]
What to do when you find it
Isolate immediately. A contaminated container should be removed from the growing environment without opening it. Trichoderma in particular produces spores that disperse easily and can colonise other containers in the same space.
Diagnose before discarding. Before binning the substrate, look at it. When did contamination appear? Where is it located? Is it widespread or localised? This information directly informs what to adjust in your next run. A contaminated batch you learn nothing from is wasted twice.
Do not try to salvage. At the first sign of green mould, the batch is a loss. Removing visible contamination does not remove the underlying mycelium of the contaminant — it will return.
Audit your process against the timing. [See: Why Your Substrate Keeps Contaminating — a systematic look at process variables by contamination stage.]
Recurring contamination
If contamination is appearing consistently across multiple batches, it is not random. Recurring contamination has a cause that is repeatable — which means it also has a fix that is findable.
The most common sources of recurring contamination are: inadequate sterilisation time or pressure, contaminated spawn or inoculation tools, and physical breaches in the growing environment that are not being identified or addressed.
[See: Why Your Substrate Keeps Contaminating — process variables behind recurring failures.]
[See: Contamination Timing Chart — batch-level diagnostic reference.]
Summary
Identifying contamination accurately requires three data points: what it looks like (colour and texture), when it appeared (timing relative to inoculation), and where it appeared (location in or on the substrate).
Each combination points toward a specific failure mode in the cultivation process. Contamination is not random — it is a pattern with an entry point. Identifying that entry point is how batches improve over time.
The Environmental Calibration Sheet includes the full Contamination Pattern Recognition matrix alongside four additional diagnostic frameworks. Free with newsletter subscription. Get the sheet →

Leave a comment