


Most contamination in grain-based mushroom cultivation traces back to one of two sources: the sterilisation process, or the inoculation process. Between them, sterilisation failure is responsible for more recurring batch losses — and it is also the one most frequently overlooked, because growers assume the process worked and look elsewhere for the cause.
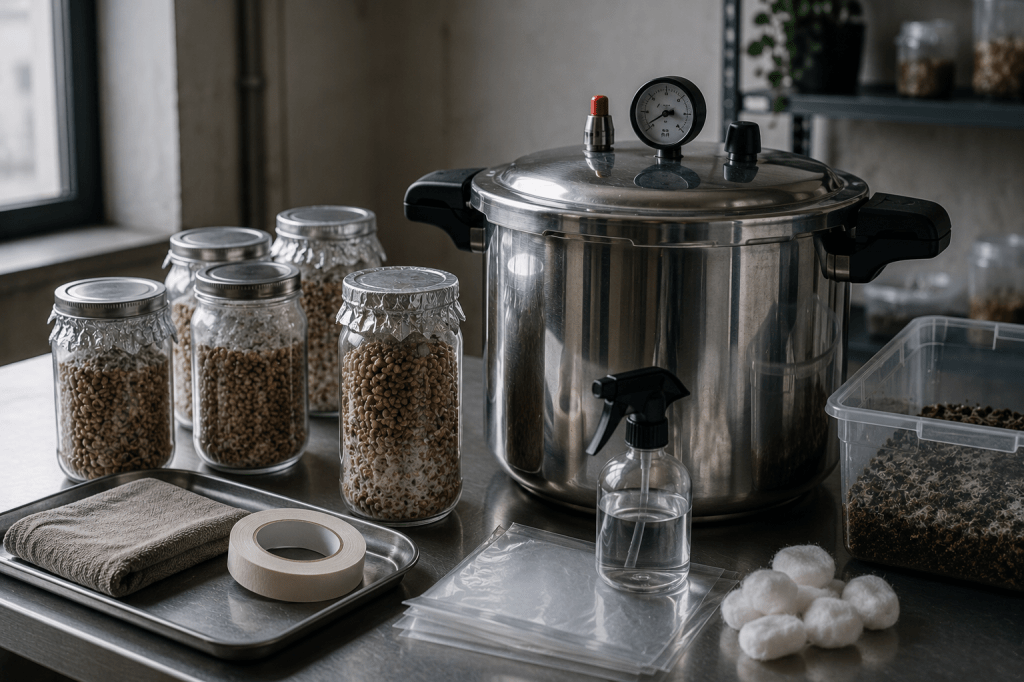
The pressure cooker is the piece of equipment that makes grain sterilisation viable at small scale. Choosing and using one correctly is not complicated, but the margin for error in the sterilisation step is narrow — and the consequences of getting it wrong are visible only ten to fourteen days later, when contamination spreads across a colonising substrate.
This guide covers what the pressure cooker is actually doing during sterilisation, what to look for when selecting one for cultivation use, EU-available options at different capacity levels, and the operating parameters that separate successful sterilisation from the appearance of successful sterilisation.
What sterilisation is doing
Boiling water reaches 100°C at sea level. At that temperature, many organisms die — but not all. Bacterial endospores, which are the primary contamination risk in grain substrate, are highly resistant to heat. Bacillus and Clostridium species form endospores that survive extended boiling. Endospores in grain substrate that survive heat treatment will germinate after inoculation, producing contamination that appears widespread and early — typically before day seven.
Pressure increases the boiling point of water. At 15 PSI above atmospheric pressure (approximately 1 bar gauge, 2 bar absolute), water boils at 121°C. This temperature destroys endospores within a defined exposure period. The target in grain sterilisation is sustained temperature throughout the entire substrate mass — not just at the surface, but at the centre of every container in the load.
This is the reason sterilisation time matters and why load size affects outcomes. The centre of a large grain jar is the last point to reach 121°C, and it is the last point where it is maintained. A 2.5-hour standard sterilisation time for grain accounts for heat penetration to the centre of a standard quart-size container. Larger containers require longer times; overloaded pressure cookers heat unevenly and may not achieve full sterilisation throughout the load.
Pressure cooker vs pressure canner vs autoclave
These terms describe equipment along a spectrum of sterilisation capacity. Laboratory autoclaves operate at precisely controlled pressure, temperature, and time, with validated cycles and calibrated instrumentation. They are the reference standard — and outside the reach of most small-scale cultivators.
Pressure canners are designed for food preservation at home scale. American models from brands like All American and Presto are frequently referenced in cultivation communities, primarily because they were available at scale in the US market and have been used successfully for grain sterilisation for decades. They operate at 15 PSI and are available in large capacities.
Consumer pressure cookers are kitchen appliances designed for cooking under pressure. Most European models operate at 0.8–1 bar gauge (approximately 12–15 PSI), which is sufficient for grain sterilisation provided time parameters are respected. The distinction between a pressure cooker and a pressure canner is primarily one of design intent and capacity, not achievable temperature — at the pressures most EU models reach, the sterilisation temperature is adequate.
Electric multi-cookers (Instant Pot and similar) are a separate category. They typically reach lower maximum pressure than stovetop models and are not well-suited to grain sterilisation — the pressure is insufficient and time parameters are not reliably verified.
Selection criteria
Capacity
This is the primary decision variable. Capacity determines how many containers fit per sterilisation run, which determines throughput. The tradeoff is between vessel size, burner compatibility, and cost.
A 6–7L pressure cooker is the minimum practical size for cultivation use. At this capacity, a typical run holds two to four standard grain jars (750ml–1L). This is workable for small-scale operations where batch size is limited by space, not throughput.
A 10–12L pressure cooker increases per-run capacity to five to eight containers. This is the range where throughput begins to align with a weekly production schedule. A single sterilisation session can produce enough grain for multiple fruiting setups without requiring consecutive runs.
Large-format options (15L+) provide commercial-grade throughput. These require a heavy-duty burner and a stable surface. At this scale, weight becomes a handling consideration — a full 15L pressure cooker is not easily manipulated by one person.
Pressure rating
The working pressure of a pressure cooker determines the sterilisation temperature achievable. For grain sterilisation, you need a model that reaches at least 0.8 bar gauge (approximately 12 PSI). Most EU models rated for high-pressure cooking meet this threshold.
Check the manufacturer specification, not the marketing description. The relevant figure is maximum working pressure, listed in bar or PSI. Models specifying 0.8–1 bar at the high pressure setting are in the acceptable range. Models only reaching 0.45 bar (the low setting on many dual-pressure cookers) are not sufficient.
Gauge vs weight-regulated
American-style pressure canners typically include a dial gauge that displays current pressure continuously. This allows real-time monitoring and confirmation that the cooker is at pressure during the sterilisation period.
Most European pressure cookers are weight-regulated — pressure is controlled by a valve or indicator that rocks, hisses, or rises when pressure is reached, rather than displaying a numerical reading. This is a simpler mechanism that is reliable under normal conditions but provides less information. When the pressure indicator activates, you know the cooker has reached its design pressure; you do not have a live readout.
Weight-regulated EU models work well for grain sterilisation. The tradeoff is that gauge drift — a significant concern in older American dial-gauge models — is less of an issue, but you also have less visibility into whether pressure is being maintained consistently during the run.
Material and build quality
Stainless steel is the appropriate material for this application. Aluminium pressure cookers are available and cheaper but have shorter service lives under repeated sterilisation use. A cultivation pressure cooker runs frequently and at sustained high temperatures — build quality affects longevity directly.
Lid seal condition determines whether pressure holds reliably. Seals degrade over time and require periodic inspection and replacement. For models from established brands, replacement seals are available; for off-brand or unfamiliar models, this should be verified before purchase.
EU-available options
The cultivation community’s frame of reference for pressure cookers has historically been US-centric — Presto, All American, and similar brands feature prominently in English-language guides. Many of these models are not readily available in Europe or carry significant import premiums. The following covers EU-accessible options.
Entry level: 6–7L
T-fal / Tefal Clipso — Available across the EU on Amazon.de and in major retailers. The Clipso line uses a one-hand locking mechanism and reaches the standard European high-pressure setting (~0.9 bar). The 6L version handles two standard grain jars comfortably. A practical entry point for growers running small batches. Build quality is adequate for regular cultivation use, though not in the same tier as German brands. Search Tefal Clipso on Amazon.de →
WMF Perfect Plus 6.5L — A step up in build quality. WMF is a well-established German brand with broad EU availability and a long service life. The Perfect Plus line uses a colour-coded pressure indicator and reaches 0.9 bar at the high setting. The 6.5L capacity offers slightly more room than the Tefal equivalent. Replacement seals and parts are widely available. For growers running consistent weekly sterilisation, the build quality difference from entry-level options is material over time. Search WMF Perfect Plus 6.5L on Amazon.de →
Mid-range: 10–12L
WMF Perfect Plus 10L — The most straightforward recommendation for growers who expect regular production. The 10L capacity fits five to six standard grain jars. WMF build quality means the lid seal and pressure mechanism remain reliable under frequent use. This is the range where a single sterilisation session covers a full week’s grain preparation. Search WMF Perfect Plus 10L on Amazon.de →
Fissler Vitaquick 8L — Fissler is the other major German brand in this category. The Vitaquick line is well-regarded for build precision. The 8L sits between the 6.5L and 10L WMF options in capacity. At a comparable price point, the choice between Fissler and WMF is largely one of preference — both perform reliably and have good parts availability across Europe. Search Fissler Vitaquick 8L on Amazon.de →
High-capacity: 12L+
WMF Perfect 12L — For growers running larger or more frequent batches. The 12L version is physically large and requires a burner capable of handling the weight and base diameter. At this capacity, a single run can sterilise grain for an entire cluster of fruiting setups. Worth considering if the limiting factor in your operation is sterilisation throughput. Search WMF Perfect 12L on Amazon.de →
All-American pressure canners — The reference standard in cultivation communities. Available on Amazon.de via import, with the 921 (21-quart / ~20L) and 930 (30-quart / ~28L) being the most referenced sizes. The metal-to-metal seal design, dial gauge, and large capacity make them well-suited to cultivation use. The tradeoff is price — they carry a significant premium in the EU market versus buying locally in the US. For growers who have the budget and want American-style dial gauge visibility, they are worth considering. Search All-American pressure canners on Amazon.de →
Operating parameters
The variables that determine whether sterilisation succeeds are pressure, time, load size, and substrate moisture. Each one affects the others.
Pressure
Always use the maximum pressure setting. For EU pressure cookers, this is typically the high setting, producing 0.8–1 bar gauge. This is the setting that achieves the 121°C target. Operating at a lower pressure extends sterilisation time significantly — not proportionally — and introduces uncertainty about whether endospore destruction has occurred.
Time parameters
Sterilisation time begins when the pressure cooker reaches full pressure — not when it is placed on the heat. Allow 15–25 minutes for the cooker to reach operating pressure before starting the timer. On a typical 10L load, this ramp time is significant.
Standard minimums for grain substrates:
- 750ml–1L grain jars: 2.5 hours at full pressure
- Quart-size jars, densely packed: 2.5–3 hours
- Larger containers (1.5L+): 3–3.5 hours
- Grain bags (1–2kg): 3–4 hours, depending on density and bag diameter
These figures are minimums. Running longer does not harm the substrate. Running shorter introduces contamination risk that is not immediately visible — it appears 7–14 days after inoculation as widespread early colonisation failure. Contamination that appears before day seven and is widespread across the substrate is the diagnostic signature of sterilisation failure.
Load size and jar arrangement
Containers must not be packed so tightly that steam cannot circulate between them. Steam circulation is the mechanism through which heat reaches the outer surface of each container — if containers are in direct contact across a large area, heat transfer to those contact zones is limited. Leave space between jars; do not double-stack without a rack between layers.
A pressure cooker rack (most models include one) keeps containers off the base and allows steam circulation underneath. If the rack is missing, improvised spacers — stainless steel rings, folded foil — maintain the gap.
Substrate moisture
Dry grain does not conduct heat evenly. The sterilisation process depends on steam penetrating through and around the substrate. Grain at field capacity moisture — where a firmly squeezed handful releases only a few drops — sterilises more reliably than over-dry grain. Excessively wet grain creates clumping and uneven density, which creates the same problem from the other direction.
Common sterilisation mistakes
Starting the timer before full pressure is reached. The most common source of inadequate sterilisation time. The two-hour timer means two hours at operating pressure, not two hours on the heat. Ramp time is separate.
Gauge inaccuracy. On older dial-gauge models, gauges drift over time. A gauge reading 15 PSI may be producing less. This is a known failure mode in older American pressure canners used for cultivation — the contamination rate increases gradually as the gauge drifts, and growers attribute it to other causes. Verifying a dial gauge periodically with a reference instrument, or replacing it, is standard maintenance for heavy-use cultivation equipment.
Inoculating hot substrate. Substrate removed from the pressure cooker is still above ambient temperature. Inoculating before the jars have fully cooled to room temperature stresses the culture and creates condensation inside the container. Standard practice is to allow overnight cooling before inoculation.
Reusing compromised lids or seals. A lid seal that does not form a complete seal produces a cooker that cannot reach or maintain pressure. If the pressure indicator takes unusually long to activate, or if pressure drops during the run, the seal is the first thing to inspect. Replacement seals are inexpensive; a failed sterilisation run is not.
Overloading the cooker. More containers per run reduces per-run time investment but compromises sterilisation if containers are packed too densely. The minimum water level requirement (most models specify at least 500ml of water) must be maintained regardless of load. Steam requires space to circulate.
Sterilisation in the context of contamination
Sterilisation is one process variable in contamination control — the one that addresses what is already in the substrate at inoculation. It does not control what enters during or after inoculation. A perfectly sterilised substrate can still contaminate if inoculation introduces contaminants, or if a physical breach occurs during colonisation.
The contamination timing matrix is the tool for diagnosing which process variable is responsible. Widespread, early contamination (before day seven) points to sterilisation. Localised contamination near inoculation points in the first week points to the inoculation process. Mid-colonisation contamination points to a physical breach. The full timing chart maps all three phases to their diagnostic signatures and corrective variables.
Growers experiencing recurring contamination who have already adjusted inoculation technique and environment, and who are still seeing early widespread contamination, almost always have a sterilisation variable that has not been corrected: insufficient time, a faulty gauge, an overloaded run, or a substrate moisture problem. A systematic approach to diagnosing recurring contamination by phase is here.
Summary
The pressure cooker performs one specific function in cultivation: destroying heat-resistant endospores in grain substrate by sustaining 121°C throughout the load for long enough to ensure complete sterilisation. Everything else — selection, capacity choice, operating procedure — is in service of that function.
For most EU-based cultivators, a WMF Perfect Plus (6.5L for small batches, 10L for regular production) or a Fissler Vitaquick provides the pressure rating, build quality, and parts availability needed for reliable cultivation use. The T-fal Clipso is a functional budget option for growers starting out with smaller batch sizes.
The most common sterilisation failures — insufficient time at pressure, faulty gauge, overloaded load — are correctable once identified. They are also the most commonly overlooked cause of contamination, because the failure appears 10–14 days later and is attributed to other variables. Accurate contamination identification requires timing and location data.
The Environmental Calibration Sheet includes the contamination pattern recognition matrix, sterilisation time reference, and substrate moisture guide. Free with newsletter subscription. Get the sheet →

Leave a comment