

Timing is one of the two most diagnostic variables in contamination analysis. When contamination becomes visible — relative to inoculation — indicates where in the cultivation process something failed. Combined with location, timing narrows the cause to a specific process variable.
This reference maps contamination timing across three phases to their most probable causes, what to look for, and what to adjust.
How to use timing as a diagnostic tool
The logic is straightforward: contamination can only enter through an existing pathway. Those pathways are finite and correspond to specific stages. Sterilisation failure produces evidence early and throughout the substrate. Inoculation contamination produces evidence early at localised points. Physical breach produces evidence mid-colonisation. Environmental and hygiene factors produce evidence at the fruiting stage.
If the timing is known, the list of probable causes is short.
Phase 1: Days 0–7 (Early colonisation)
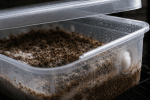
Pattern A: Widespread contamination across the substrate
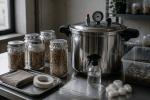
Most probable cause: Sterilisation or pasteurisation failure.
The substrate contained viable contaminant spores when inoculation occurred. Contaminants that survived the sterilisation process are now colonising at the same time as the desired mycelium, or outcompeting it.
What to check:
- Pressure cooker time and pressure (15 PSI, minimum 2.5 hours for grain)
- Gauge accuracy — gauges drift over time and may read incorrectly
- Load size — overloaded pressure cookers heat unevenly
- Container size — large jars require longer sterilisation than smaller ones
- Substrate moisture content — too dry means uneven heat distribution
Corrective action: Extend sterilisation time. Verify gauge accuracy with a second gauge. Reduce load size per run. Do not proceed with inoculation until sterilisation variables are confirmed.
Pattern B: Localised contamination near inoculation points
Most probable cause: Inoculation contamination — syringe, liquid culture, or grain spawn.
Contamination introduced directly into the substrate at inoculation, or through the inoculation environment.
What to check:
- Syringe or liquid culture quality — test on agar before using on grain
- Still air box or flow hood condition and technique
- Needle sterilisation between inoculation points
- Port seal integrity
Corrective action: Test inoculum on agar plates before the next run. Review inoculation environment. Flame-sterilise needles between points.
Phase 2: Days 7–21 (Active colonisation)
Most probable cause: Physical breach — something entered from outside the growing environment.
The substrate was clean after inoculation but something created an entry point during the colonisation period.
What to check:
- Bag integrity — micro-tears at fold points and along the base
- Filter patch condition — wet filters lose filtration properties
- Jar lid and port seal — fully tightened, polyfill packed firmly
- Condensation drip pathways — condensation from lid or walls dripping onto substrate
- Contamination at a specific, repeated location across batches — indicates a consistent physical breach at that point
Corrective action: Inspect containers at the point of contamination. Replace bags or jars with compromised seals. Address condensation pathways. If the same location contaminates across multiple batches, that specific point is the entry.
Note on timing overlap: Contamination that appears at days 10–14 from sterilisation failure that was minor (not complete failure) can overlap with physical breach timing. Location disambiguates: widespread distribution points back to sterilisation; localised points to breach.
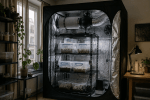
Phase 3: Fruiting stage (after pinset)
Pattern A: Surface contamination or cobweb growth during fruiting
Most probable cause: FAE imbalance — insufficient fresh air exchange, high CO₂, surface humidity accumulation.
What to check:
- FAE frequency and duration
- Surface moisture — water pooling on substrate or pins
- Condensation drip from lid
- Internal CO₂ levels (indirect: elongated stems, lack of pinning, aborted pins)
Corrective action: Increase FAE. Reduce misting. Address lid condensation. [See: Trichoderma vs Cobweb Mold — identifying which is present and how to respond.]
Pattern B: Contamination on or near pins and fruiting bodies
Most probable cause: Contact contamination — harvest hygiene, water splash, spent pin material.
What to check:
- Harvest technique — gloves, sanitised tools
- Spent substrate cleared between flushes
- Misting method — direct misting onto developing pins vs walls and floor of the fruiting chamber
Corrective action: Remove spent pins and abort sites between flushes. Use gloves for harvest. Avoid direct misting onto fruiting bodies.
The contamination timing matrix
| Phase | Timing | Location | Probable Entry Point |
|---|---|---|---|
| Early | 0–7 days | Widespread | Sterilisation failure |
| Early | 0–7 days | At inoculation point | Syringe/spawn contamination |
| Mid | 7–21 days | Localised surface | Physical breach |
| Mid | 7–21 days | Widespread | Sterilisation (delayed) |
| Fruiting | Post-pinset | Surface/cobweb | FAE imbalance |
| Fruiting | Post-pinset | On pins/fruit | Contact contamination |
The full contamination pattern recognition matrix — with entry points, corrective actions, and all nine timing/location combinations — is included in the Environmental Calibration Sheet. Get the sheet →
Using this chart across batches
A single contaminated batch is a data point. Multiple contaminated batches with consistent timing and location are a pattern — and patterns have identifiable causes.
Record the following for each batch: date of inoculation, date contamination was first visible, location of contamination, and substrate/spawn source. Three batches with this data is enough to identify a recurring variable.
[See: Why Your Substrate Keeps Contaminating — systematic approach to recurring contamination.]
[See: How to Identify Mushroom Contamination — visual identification and full diagnostic framework.]
The Environmental Calibration Sheet includes the full contamination pattern recognition matrix alongside four other cultivation diagnostic frameworks. Get the sheet →

Leave a comment