

Apartment cultivation has different constraints than a dedicated grow space, and those constraints shape which equipment is worth buying and in what order. Space is limited, discretion matters, and there is no infrastructure to lean on — no dedicated electrical circuits, no drain, no ventilation system. The equipment needs to be minimal, functional, and physically small enough to live in a wardrobe.
This guide organises the essential equipment by cultivation phase rather than by price or popularity. The goal is a clear picture of what each item does, when you need it, and what the EU-accessible options are at small scale. For context on how apartment constraints affect the grow environment itself, see Growing Mushrooms in a Small Apartment.
Phase 1: Sterilisation
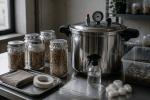
Pressure cooker
The piece of equipment with the highest impact on contamination outcomes. Grain substrate contains bacterial endospores that survive boiling — only sustained pressure at 121°C destroys them. Without a pressure cooker, sterilisation is incomplete, and contamination rates reflect that directly.
For apartment cultivation, a 6.5–10L model is the practical range. Large enough for a meaningful batch, small enough to store in a cabinet and use on a standard hob. The WMF Perfect Plus 6.5L handles two to three standard grain jars per run and fits easily in a kitchen cupboard. The WMF Perfect Plus 10L is the step up for growers running weekly batches — five to six jars per run. Search WMF Perfect Plus on Amazon.de →
For a full breakdown of selection criteria, EU options across all capacity tiers, and operating parameters, see the pressure cooker guide for mushroom cultivation.
Grain jars
Standard wide-mouth mason jars (750ml–1L) are the most practical grain container for apartment scale. They withstand repeated sterilisation, seal cleanly with a polyfill port in the lid, and stack in modest storage space. Jar equivalents are available across EU markets — Weck-style and Kilner jars work equally well provided the lid system allows for a polyfill port.
Grain bags (filter patch poly bags) are an alternative for larger batches. They take more prep but allow larger substrate volumes and are disposable after use — useful for growers who prefer not to maintain a cleaning routine for reused jars. For apartment scale, jars are usually the simpler option. Search wide-mouth jars on Amazon.de →
Phase 2: Inoculation environment
Still air box
Inoculating grain in open apartment air exposes the substrate to the highest ambient contamination load in the space — particularly if a kitchen is nearby. A still air box (SAB) creates a low-turbulence microenvironment that reduces airborne contamination exposure during inoculation.
A SAB is not a piece of equipment you buy — it is a large clear storage box with two arm-holes cut into one side. Any clear plastic storage box in the 50–80L range works: the larger the interior volume, the longer the still air window before turbulence re-establishes. Total build cost is approximately €10–15. Search large clear storage boxes on Amazon.de →
For apartment growers, the SAB provides a meaningful contamination reduction without requiring a laminar flow hood (which costs €300–600+ and occupies significant desk space). At small batch size, the SAB is adequate. For growers running regular high-volume grain work, a flow hood is worth considering — but at apartment scale it is rarely necessary.
Nitrile gloves and isopropyl alcohol
Gloves prevent skin contamination from the hands during inoculation and harvest. Nitrile is preferred over latex for durability and for growers with latex sensitivity. Powder-free is standard for cultivation use — powder introduces particulate into the inoculation environment. Search powder-free nitrile gloves on Amazon.de →
Isopropyl alcohol at 70% concentration is the standard surface sterilant. 99% IPA is not preferable — 70% kills more reliably because the water content extends contact time on surfaces. Used for wiping down the SAB interior, gloves, and any tool that enters the inoculation zone. Search isopropyl 70% on Amazon.de →
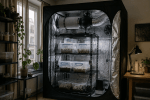
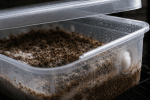
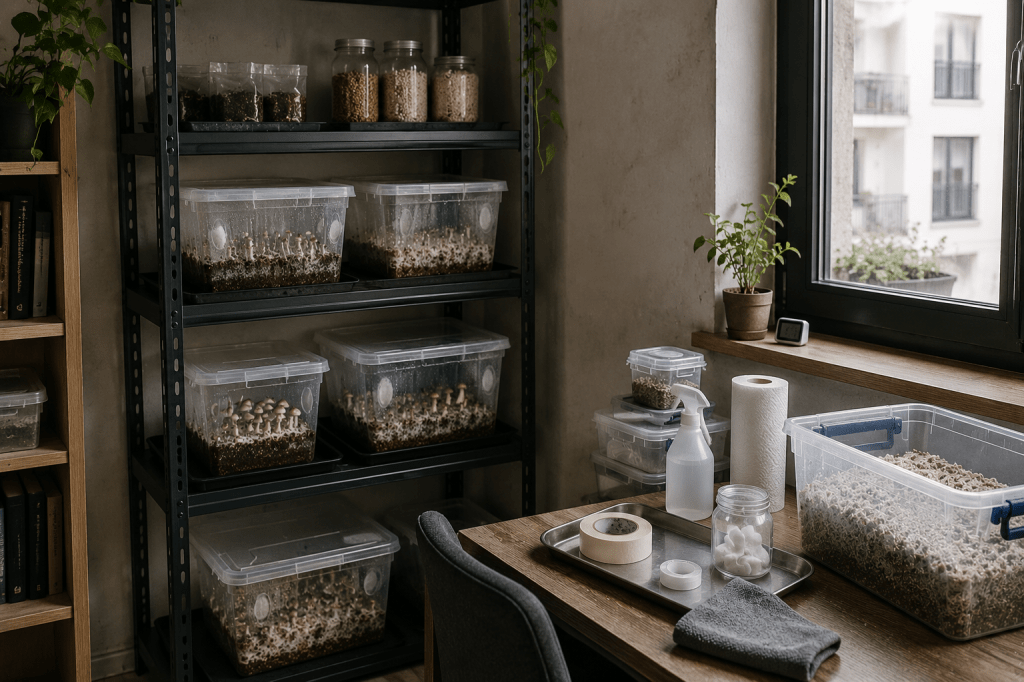
Phase 3: Colonisation container
Monotub
A monotub is a clear storage box used as a combined colonisation and fruiting container. It is the standard apartment cultivation format: self-contained, stackable, concealable in a wardrobe, and requiring no additional fruiting chamber infrastructure once setup correctly.
For apartment use, the practical size range is 30–66L. The 66L is the standard — it produces a meaningful substrate volume (8–12L of bulk substrate) that buffers humidity and temperature well. The 30–40L range is appropriate for first grows or for growers with genuinely constrained wardrobe depth. Below 20L, the substrate mass is too small to maintain stable environmental conditions without active management.
The tub does not need to be a specific brand. Any clear, food-grade, lidded plastic box in the right size range works. Clear walls allow visual inspection without opening. Search 66L clear storage boxes on Amazon.de →
Monotub setup — hole placement, polyfill configuration, substrate depth, and lid management — is covered in full in the monotub setup guide.
Polyfill
Polyfill (polyester fibrefill) is packed into the holes drilled in the monotub sides to provide filtered air exchange during colonisation. It allows gas exchange while blocking airborne contaminants. Standard craft or toy stuffing polyfill works — the requirement is a fibrous, non-absorbent fill that packs firmly without compressing to zero porosity.
Available in craft stores and online. A single bag provides enough for multiple tub setups. Search polyfill / polyester filling on Amazon.de →
Micropore tape
Used to cover grain jar lid ports and filter patches on bags. Micropore tape (medical-grade paper tape) allows gas exchange while providing a barrier against contamination entry. Standard 3M micropore tape in 1.25cm or 2.5cm width is the most commonly used option — available at pharmacies across Europe and on Amazon.de. Search micropore tape on Amazon.de →
Phase 4: Environmental monitoring
Hygrometer
A calibrated hygrometer is the single most diagnostic tool for managing the fruiting environment. Without one, humidity management is guesswork — and humidity guesswork produces inconsistent fruiting, surface contamination, and pin aborts that are attributed to other causes.
For apartment monotub use, a Bluetooth logging model provides the most useful information. Current readings show you the environment now; a log shows what happened between checks — humidity drops during FAE cycles, overnight desiccation, or post-harvest recovery failure.
The Govee H5075 is the most commonly recommended entry-level option: 20-day app logging, Bluetooth, ±3% RH accuracy, approximately €12–15. The ThermoPro TP49 is a reliable analogue option for growers who prefer no app dependency. For multi-tub setups or when data analysis matters more, the SensorPush HT1 provides ±2% accuracy and CSV data export. Full comparison, calibration guide, and placement strategy here.
Phase 5: Fruiting environment management
Spray bottle
Used to mist the interior walls and floor of the fruiting container — not the substrate surface directly. A fine-mist spray bottle that produces an even, dispersed spray is more useful than a jet-stream bottle. Adjustable nozzle bottles in 500ml–1L sizes work well for monotub scale. Search fine-mist spray bottles on Amazon.de →
Sterilise the spray bottle with a dilute bleach solution before first use and allow to dry fully. Residual moisture in an un-sterilised spray bottle can harbour contamination that is introduced directly to the fruiting environment with every mist cycle.
Small USB fan
For manual FAE in a monotub, fanning with a clean hand for 30–60 seconds twice daily is sufficient. A small battery-powered or USB fan held at tub distance makes this faster and more consistent — particularly for growers who find the twice-daily manual routine easy to skip. The fan is not held directly over the tub; it is used to create gentle airflow that displaces CO₂ over 30–60 seconds from the open tub surface. Search small USB fans on Amazon.de →
This is one of the few items on this list where cheap is fine. The fan’s only job is to move air for a short duration — acoustic quality, build longevity, and brand are irrelevant.
What you do not need at apartment scale
Equipment lists in cultivation communities frequently include items that are useful at larger scales but unnecessary or counterproductive at apartment monotub level.
Ultrasonic humidifier. A monotub’s substrate mass maintains internal humidity passively. Adding a humidifier introduces two risks without solving a real problem: over-saturation of the fruiting surface (which creates contamination conditions), and the introduction of airborne water droplets containing whatever organisms are living in the humidifier reservoir. For passive monotub setups, a humidifier is unnecessary. It becomes relevant for grow tent setups running multiple blocks with significant air exchange — which is a different equipment context.
CO₂ monitor. Useful for diagnosing fruiting failures in sealed tent environments. For a manual-FAE monotub setup, a CO₂ monitor tells you that CO₂ is high — but you already have the information you need from observing fruiting body development (elongated stems, slow pinning). It adds cost and complexity without changing what you do about it.
Agar plates and flow hood. Valuable for working with culture, maintaining genetics, and contamination diagnosis. Not necessary for a straightforward grain-to-bulk workflow using commercial liquid culture or spore syringes. A SAB and clean technique handles the inoculation environment adequately at small scale.
Temperature controller. Relevant if you are running a dedicated grow tent or heating cabinet that requires precise temperature regulation. For a monotub in a wardrobe, ambient apartment temperature is sufficient in the 18–23°C range that most European apartments maintain during the heating season.
Prioritised buying order
For a first apartment grow, the order of purchase that minimises cost and complexity while covering the essential variables:
- Pressure cooker (6.5L minimum) — the highest contamination-prevention impact per euro spent. Borrow if possible before buying to confirm the workflow suits you.
- Grain jars — available in supermarkets and hardware stores; no specialist purchase needed.
- Monotub (66L clear storage box) — available from homeware stores, not a specialist item.
- Polyfill + micropore tape — low cost, available online or craft stores.
- Nitrile gloves + isopropyl 70% — consumables, pharmacy or online.
- Still air box (large clear storage box) — same source as monotub, low cost.
- Spray bottle — hardware or kitchen store.
- Hygrometer — buy alongside the spray bottle; you need it from the first fruiting session.
- Small USB fan — optional enhancement, buy once the workflow is established.
The total cost for this setup — excluding the pressure cooker — is typically €30–50 sourced across supermarkets, hardware stores, and Amazon.de. The pressure cooker represents the largest single-item cost: €40–80 depending on capacity and brand.
Summary
Apartment cultivation does not require specialist equipment beyond the pressure cooker and hygrometer. Everything else — the monotub, still air box, polyfill, spray bottle — is made from items available in standard homeware stores. The constraint is not equipment access; it is process discipline: sterilisation time, inoculation hygiene, and consistent FAE and humidity management.
The pressure cooker is where contamination is prevented at the source. The hygrometer is where the fruiting environment is made legible. Everything else is logistics. Prioritising in that order is how apartment-scale grows produce consistent results from a wardrobe shelf.
The Environmental Calibration Sheet covers field capacity moisture testing, hygrometer calibration procedure, humidity target ranges, and FAE timing reference. Free with newsletter subscription. Get the sheet →

Leave a comment