• Grow Tent for Mushroom Cultivation: A Buyer’s Guide

    Most grow tent guides are written for plant cultivation. The criteria they prioritise — light-proofing, PAR reflection, hanging weight for lights — are largely irrelevant for mushrooms. What matters for mushroom cultivation is different: humidity retention, airflow port placement, frame stability for shelving, and zipper quality under extended high-humidity conditions.

    This guide covers the selection criteria that are specific to mushroom cultivation, EU-available tent options across the main size categories, and the configuration considerations that affect whether a tent performs well over time. For the airflow and FAE setup that goes inside the tent, see the grow tent airflow guide.


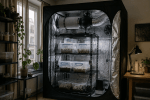
    Why use a grow tent for mushroom cultivation

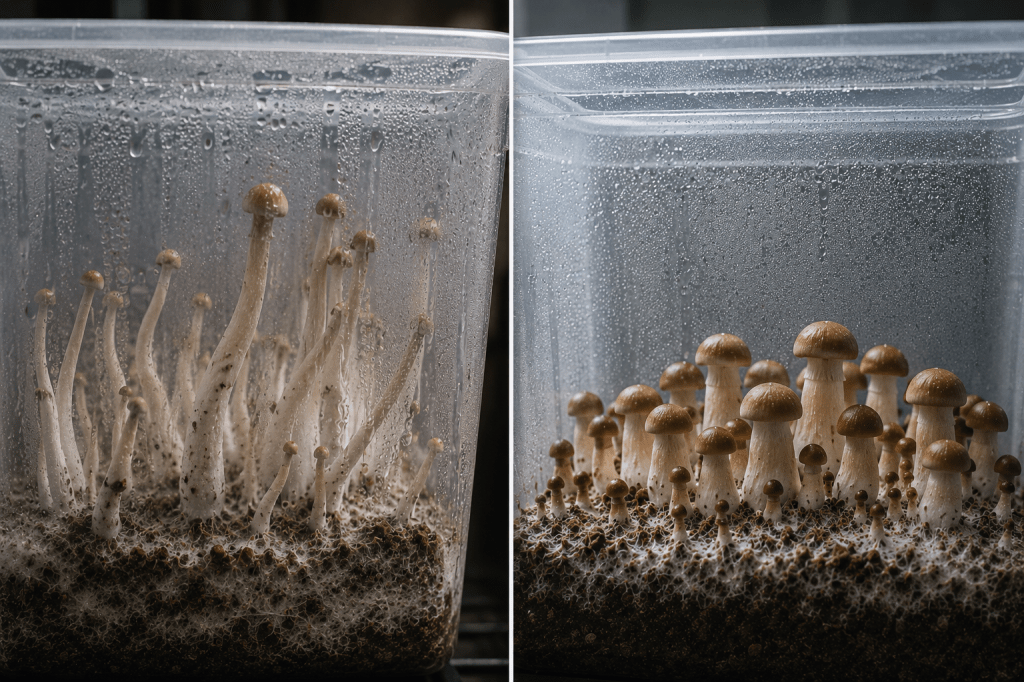
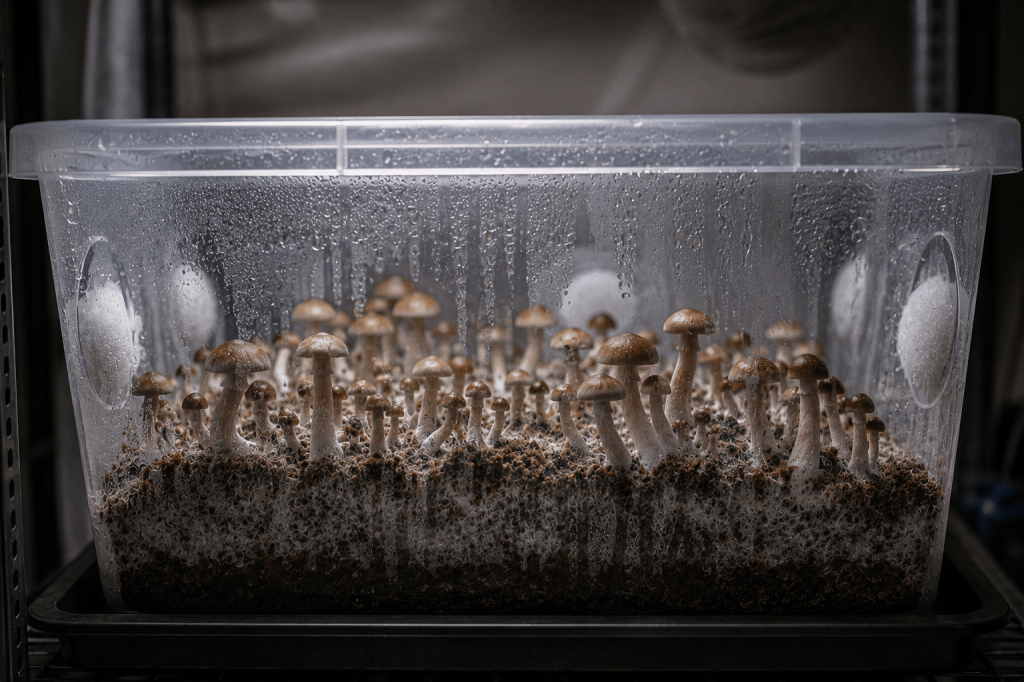
    A grow tent creates a bounded microenvironment that can be managed independently of the surrounding space. For mushroom cultivation, this matters in two directions: it allows you to maintain high humidity (80–95% RH) without humidifying an entire room, and it creates a physical barrier between the fruiting environment and ambient contamination pressure.

    Compared to a monotub, a grow tent scales horizontally — you can run multiple fruiting blocks simultaneously in a shared controlled environment rather than managing each block individually. The tent centralises the environmental control variables (humidity, FAE, temperature) rather than replicating them per container.

    The tradeoff is footprint and infrastructure. A tent occupies a fixed floor area, requires active humidity and FAE equipment, and produces condensation that needs drainage management. For apartment growers, a monotub in a wardrobe is usually the right starting point. A grow tent becomes the appropriate next step when batch size outgrows what a single monotub can produce, or when the cultivator wants more environmental control and is prepared to manage the infrastructure.


    What matters in a grow tent for mushrooms

    Humidity retention

    This is the primary performance variable. A tent that leaks humidity requires a higher-output humidifier to maintain target RH, which means more water cycling through the system, more condensation, and more maintenance. A well-sealed tent holds humidity with a smaller, quieter humidifier and needs less active management.

    The two main humidity leak points are zippers and ducting port sock seals. Zipper quality varies significantly across tent brands and price points. Budget tents frequently have zipper failures within the first few months of cultivation use — the combination of extended high humidity and regular access cycles degrades the zipper teeth and seal. This is the single most common complaint in cultivation tent reviews.

    Port sock seals — the fabric rings that seal around ducting and cables — should close tightly around whatever passes through them. Loose sock seals create humidity channels that drain the interior. On cheaper tents, these seals are often too large for the ducting commonly used in mushroom setups.

    Port placement and count

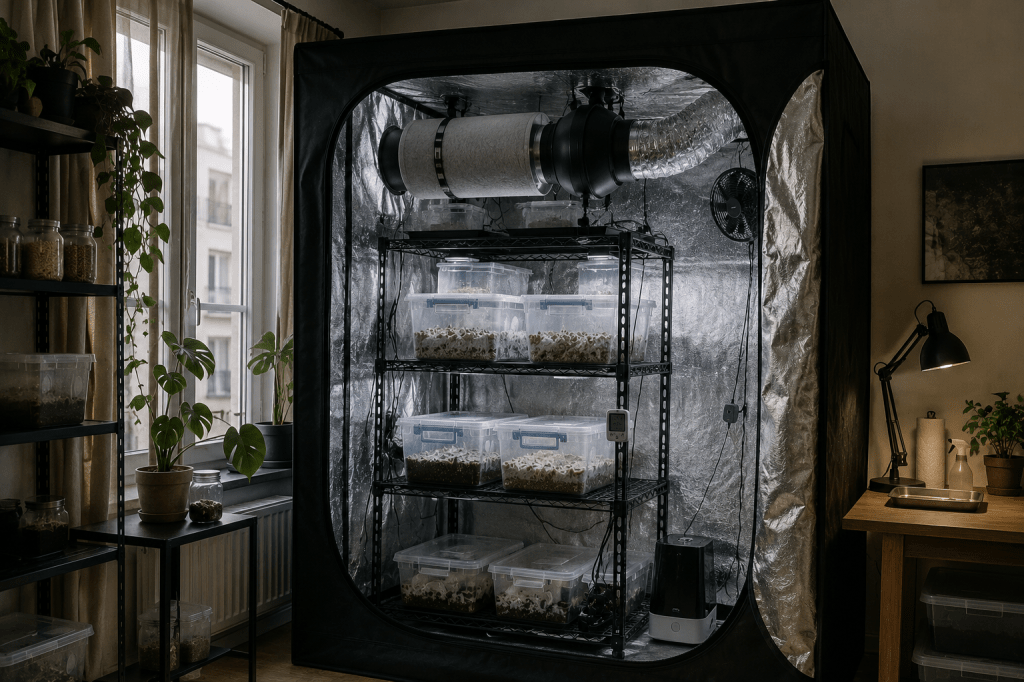
    Grow tent ports serve as entry points for ducting, cables, and air intake. For mushroom cultivation, you typically need: one or two exhaust ports (for inline fan ducting), one or two intake ports, and power cable ports for the humidifier and controller.

    Port placement on the lower tent wall is important for mushroom setups. Intake ports placed low allow fresh air to enter at block level, which is more effective for CO₂ displacement than high-wall intakes. Exhaust ports positioned high allow CO₂-rich air (which is heavier than fresh air) to be drawn out efficiently. The grow tent airflow guide covers port placement and FAE configuration in detail.

    Frame stability

    Grow tents used for mushrooms carry a different load profile than those used for plants. Rather than hanging lights from the top crossbar, the load is typically shelving (a metal wire shelf unit) and a humidifier. These loads are lower and distribute differently — the frame needs to be stable enough to hold shelving without racking, and the base needs to be level enough that condensation drains rather than pools unevenly.

    Corner connectors and pole cross-sections vary between manufacturers. Pressed aluminium connectors are more durable than plastic; thicker pole gauge reduces flex under shelf load. These are not critical at small tent sizes (60–80cm square) but become relevant at 120cm+ where a shelf carrying multiple fruiting blocks imposes real lateral force.

    Interior lining

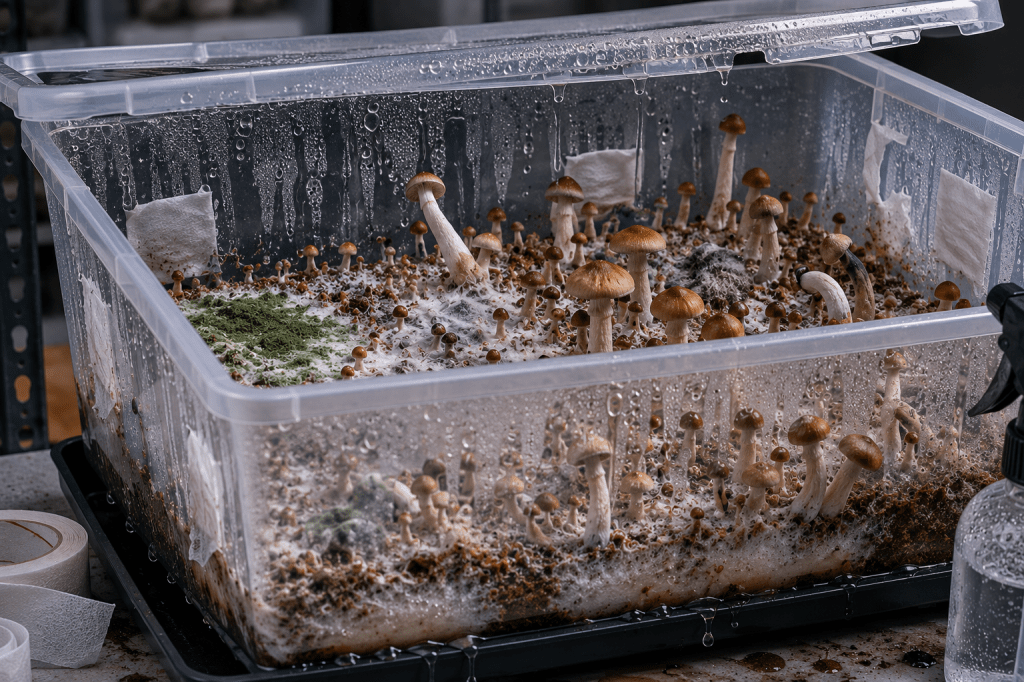
    Tent interiors are lined with reflective mylar, primarily designed to reflect grow light back toward plants. For mushroom cultivation, the reflective interior is not about light — it is about condensation behaviour. Mylar-lined walls encourage condensation to run down to the tray rather than being absorbed. This is relevant for managing internal moisture load and reducing the wet-wall conditions that support contamination in a high-humidity environment.

    Thicker mylar (600D–1680D canvas with heavy foil lining) holds humidity better and resists the micro-tears that eventually develop in thinner tent materials. For mushroom use, higher-density canvas is worth prioritising.

    Removable floor tray

    Cultivation produces spills and condensation drainage. A tent with a removable PVC floor tray is significantly easier to clean between grow cycles than one without. This is a standard feature on mid-range and premium tents; it is sometimes omitted on budget models.


    Size selection

    Tent footprint is the primary decision. Once installed, a tent occupies that floor area permanently — under-sizing creates immediate capacity constraints; over-sizing makes humidity management harder and equipment costs higher.

    60×60cm (small format)

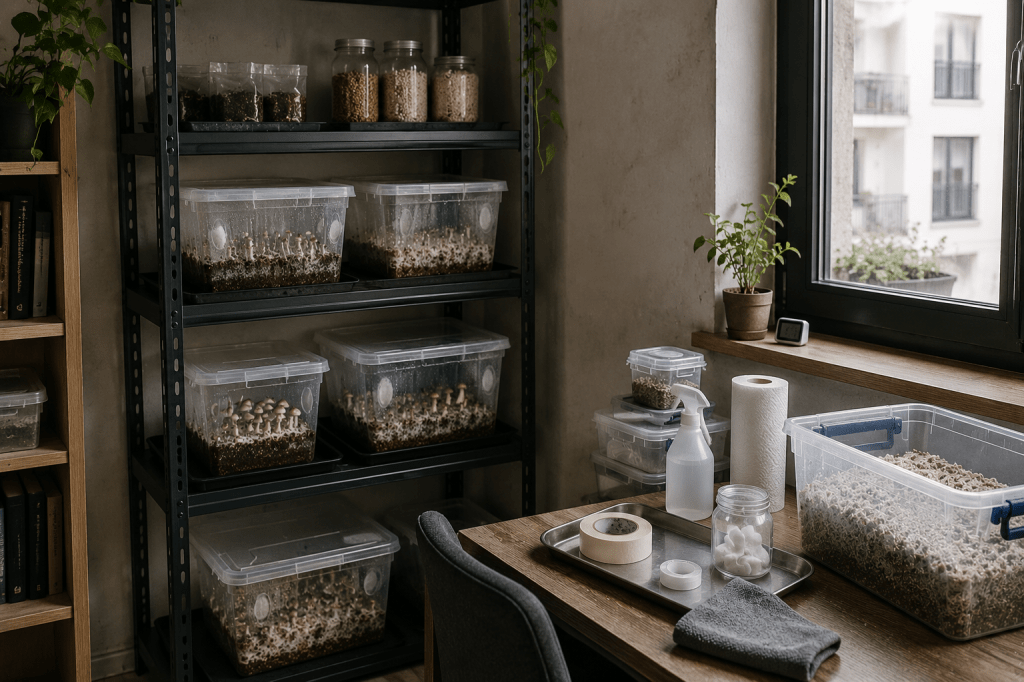
    The smallest practical tent size for cultivation use. At 60×60cm floor area, this fits two to three 5kg fruiting blocks on a single shelf tier, or one shelf and a humidifier. Works in tight spaces — a corner of a room, a large wardrobe, or inside a dedicated cupboard with the door removed.

    At this size, humidity management is relatively straightforward — the small air volume requires a lower-output humidifier and responds quickly to adjustments. The limitation is throughput: two to three blocks per cycle is a meaningful limit if production requirements grow. Search 60×60cm grow tents on Amazon.de →

    80×80cm (standard small)

    A step up in floor area that meaningfully increases block capacity without a proportional jump in footprint. Four to five 5kg blocks fit comfortably on a single shelf tier. This is the size range where a small inline fan (4″) and a compact ultrasonic humidifier provide adequate environmental control without oversizing the equipment.

    For cultivators making the transition from a single monotub to a tent-based setup, the 80×80cm is typically the right first tent: enough capacity to justify the infrastructure, small enough to fit in a residential space, and manageable with entry-level environmental control equipment. Search 80×80cm grow tents on Amazon.de →

    120×60cm (rectangular format)

    The rectangular format offers a practical advantage for shelf-based setups: the longer dimension allows a standard 60cm-deep wire shelf unit to sit flush against one wall with working space on the other side. Six to eight blocks across two shelf tiers is achievable. This format uses floor space efficiently in narrow rooms or alcoves.

    The asymmetry introduces an airflow consideration: FAE needs to reach blocks across the full shelf depth rather than a square footprint. Positioning the exhaust port on the long wall and the intake on the opposite short wall creates a diagonal airflow path that covers the shelf more evenly than a straight-through configuration. Search 120×60cm grow tents on Amazon.de →

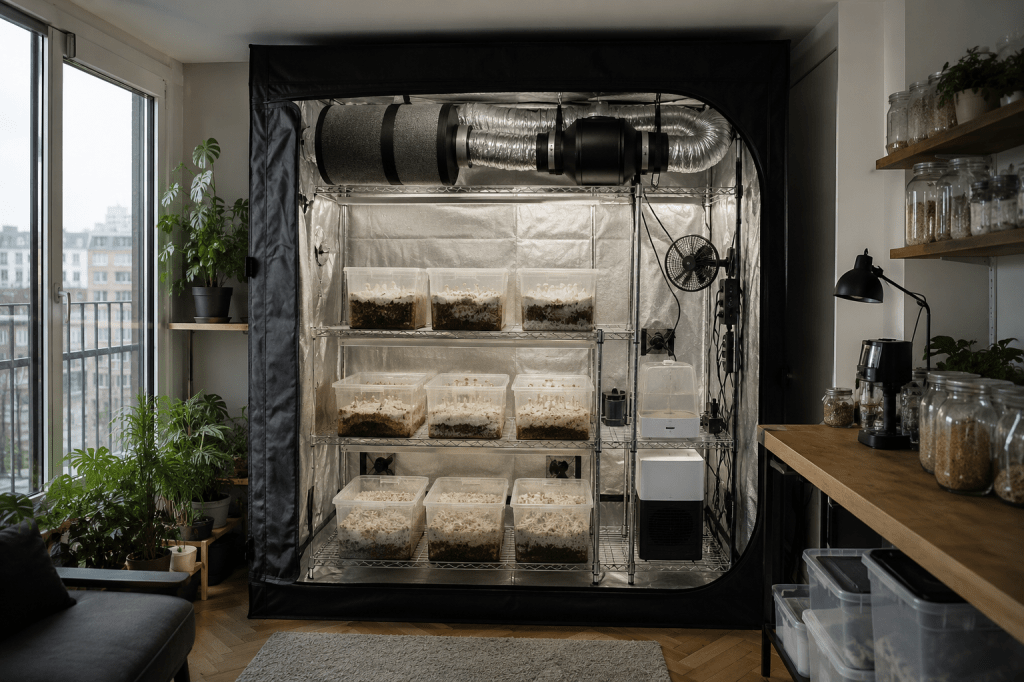
    120×120cm (mid-size)

    The most common size in dedicated home cultivation setups. A full-height shelving unit fits inside, allowing three to four shelf tiers with four to five blocks per tier. Total capacity of 12–20 fruiting blocks depending on block size and shelf configuration.

    At this size, equipment requirements scale up proportionally: a 6″ inline fan, a 3–5L/hr ultrasonic humidifier, and a humidity controller are the standard configuration. The larger air volume takes longer to respond to humidity adjustments and requires more consistent equipment management. This is the size at which an environmental controller (rather than manual monitoring) becomes worth the investment. Search 120×120cm grow tents on Amazon.de →


    EU-available brands

    The grow tent market is dominated by brands that primarily serve the plant cultivation market. Most are available in Europe through Amazon.de and specialist grow shops. The following covers options with consistent EU availability.

    Secret Jardin

    A Belgian brand with strong EU distribution. Secret Jardin tents are well-regarded for build quality, zipper durability, and canvas density — the areas that matter most for sustained mushroom cultivation use. Their Dark Street and Dark Room lines are the most relevant. Price point is mid-to-premium: €80–200 depending on size. Available through Amazon.de and major EU grow shops. Search Secret Jardin on Amazon.de →

    Mars Hydro

    A Chinese brand with wide EU availability and competitive pricing. Mars Hydro tents offer reasonable build quality for the price — generally adequate zipper and canvas quality for mushroom use at the smaller sizes. At 120×120cm and above, zipper durability under sustained humidity is more variable. Price point is budget-to-mid: €40–90 depending on size. Search Mars Hydro on Amazon.de →

    Gorilla Grow Tent

    A US brand available in Europe. The Gorilla line uses heavier-duty canvas (1680D) and thicker pole gauge than most competitors. Build quality is above average at every size. The premium price point (€150–300+) is justified for growers running sustained high-humidity cycles where tent longevity is a real consideration. Available on Amazon.de, typically via import. Search Gorilla Grow Tent on Amazon.de →

    Budget generic tents

    A large number of unbranded or lightly-branded grow tents are available on Amazon.de in the €25–45 range. These work adequately for short grow cycles or as a first tent where the priority is testing the workflow before committing to better equipment. For sustained mushroom cultivation use — where the tent runs at high humidity continuously over months — zipper failure is a common outcome within the first year. Budget tents are better treated as temporary infrastructure than as a long-term investment.


    Size and brand comparison

    SizeBlocks (approx.)Best forRecommended brand
    60×60cm2–3Tight spaces, first tentMars Hydro / Generic
    80×80cm4–5First dedicated setupMars Hydro / Secret Jardin
    120×60cm6–8Narrow rooms, shelf setupsSecret Jardin
    120×120cm12–20Serious home productionSecret Jardin / Gorilla

    Equipment to pair with the tent

    A grow tent requires active environmental equipment to maintain the conditions mushrooms need. The core components for a functional mushroom tent setup:

    Inline fan and ducting. The exhaust mechanism that creates negative pressure inside the tent and drives FAE. A 4″ fan is appropriate for 60–80cm tents; a 6″ fan for 120cm+ formats. Matched carbon filters are standard for odour control but optional for mushroom use. Search inline fans on Amazon.de →

    Ultrasonic humidifier. The humidity source for a tent setup. Ultrasonic models produce a fine cold mist without heating the tent interior. Output capacity should be matched to tent volume: 1–2L/hr for 60–80cm tents; 2–4L/hr for 120cm formats. Search ultrasonic humidifiers on Amazon.de →

    Humidity controller. Automates the humidifier by switching it on and off based on a sensor reading. Prevents both under- and over-humidification. The most commonly used option in EU cultivation setups is the Inkbird IHC-200, which has a simple two-plug socket design (humidifier into the humidity socket, exhaust fan into the dehumidify socket). Search Inkbird IHC-200 on Amazon.de →

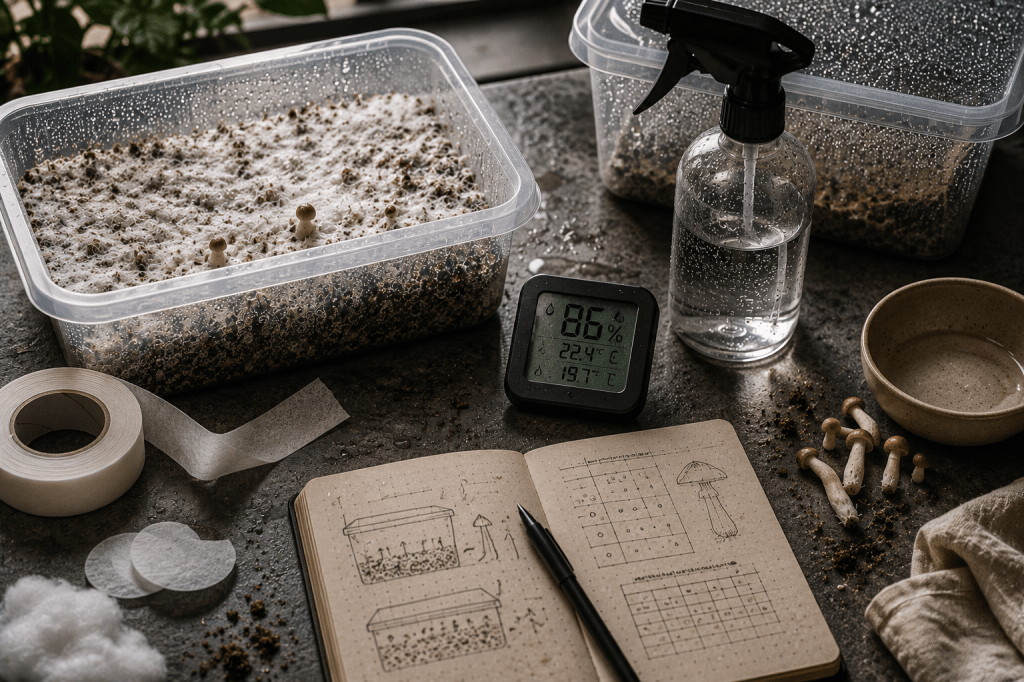
    Hygrometer. A sensor placed at fruiting block height provides a representative reading of the environment where it matters. Logging models allow post-session analysis of humidity stability. For detailed comparison of EU-available options, see the hygrometer guide.

    Wire shelving unit. A freestanding chrome or stainless wire shelf unit sized to the tent interior allows vertical stacking of fruiting blocks. Standard 35–45cm-deep wire units fit inside most tents without clearance issues. Adjustable shelf height allows configuration around block size. Search wire shelving units on Amazon.de →

    The complete configuration — fan speed, humidifier output, humidity controller settings, and sensor placement — is covered in the grow tent airflow and humidity setup guide.


    Common setup mistakes

    Oversizing for the available equipment. A 120×120cm tent with a humidifier rated for a 60cm tent will never reach target humidity. Air volume scales with the cube of tent dimensions — a tent twice as wide has four times the floor area but eight times the volume. Equipment output must scale accordingly.

    Running the exhaust fan at full speed continuously. Maximum FAE is not a target — it is a variable to dial in. Continuous full-speed exhaust in a small tent creates a negative pressure environment that draws in ambient air faster than the humidifier can replace it, resulting in chronic low humidity. FAE speed should be set to the minimum that keeps CO₂ at acceptable levels, not the maximum the fan can produce. The humidity loss diagnostic covers this failure mode.

    Condensation pooling on the floor. A tent producing significant condensation without a floor tray will accumulate standing water, which creates contamination conditions and degrades the tent base. A removable tray allows regular drainage. If the tent does not include a tray, a cut-to-size polythene sheet achieves the same function.

    Not cleaning between cycles. A grow tent accumulates spores, mycelium fragments, and organic debris between cycles. Wiping the interior walls with diluted hydrogen peroxide or IPA between grows reduces the contamination baseline for subsequent runs. This step is frequently skipped and is a consistent variable behind contamination rates that increase over time.


    Summary

    For most EU-based cultivators moving beyond a single monotub, the practical entry point is an 80×80cm tent from Secret Jardin or Mars Hydro, paired with a small inline fan, compact ultrasonic humidifier, and humidity controller. This configuration is manageable in a residential space, affordable, and scales the operation from one to four to five concurrent fruiting blocks.

    The tent is the infrastructure; the equipment inside determines performance. Prioritising zipper quality and canvas density at purchase avoids the most common tent failure mode. Getting the fan-to-humidifier balance right at setup avoids the most common operational failure mode. Full setup configuration guidance is in the airflow guide.


    The Environmental Calibration Sheet includes FAE timing reference, humidity target ranges by cultivation phase, and a hygrometer placement guide. Free with newsletter subscription. Get the sheet →

    Read more: Grow Tent for Mushroom Cultivation: A Buyer’s Guide
  • Essential Equipment for Apartment Mushroom Cultivators

    Apartment cultivation has different constraints than a dedicated grow space, and those constraints shape which equipment is worth buying and in what order. Space is limited, discretion matters, and there is no infrastructure to lean on — no dedicated electrical circuits, no drain, no ventilation system. The equipment needs to be minimal, functional, and physically small enough to live in a wardrobe.

    This guide organises the essential equipment by cultivation phase rather than by price or popularity. The goal is a clear picture of what each item does, when you need it, and what the EU-accessible options are at small scale. For context on how apartment constraints affect the grow environment itself, see Growing Mushrooms in a Small Apartment.


    Phase 1: Sterilisation

    Pressure cooker

    The piece of equipment with the highest impact on contamination outcomes. Grain substrate contains bacterial endospores that survive boiling — only sustained pressure at 121°C destroys them. Without a pressure cooker, sterilisation is incomplete, and contamination rates reflect that directly.

    For apartment cultivation, a 6.5–10L model is the practical range. Large enough for a meaningful batch, small enough to store in a cabinet and use on a standard hob. The WMF Perfect Plus 6.5L handles two to three standard grain jars per run and fits easily in a kitchen cupboard. The WMF Perfect Plus 10L is the step up for growers running weekly batches — five to six jars per run. Search WMF Perfect Plus on Amazon.de →

    For a full breakdown of selection criteria, EU options across all capacity tiers, and operating parameters, see the pressure cooker guide for mushroom cultivation.

    Grain jars

    Standard wide-mouth mason jars (750ml–1L) are the most practical grain container for apartment scale. They withstand repeated sterilisation, seal cleanly with a polyfill port in the lid, and stack in modest storage space. Jar equivalents are available across EU markets — Weck-style and Kilner jars work equally well provided the lid system allows for a polyfill port.

    Grain bags (filter patch poly bags) are an alternative for larger batches. They take more prep but allow larger substrate volumes and are disposable after use — useful for growers who prefer not to maintain a cleaning routine for reused jars. For apartment scale, jars are usually the simpler option. Search wide-mouth jars on Amazon.de →


    Phase 2: Inoculation environment

    Still air box

    Inoculating grain in open apartment air exposes the substrate to the highest ambient contamination load in the space — particularly if a kitchen is nearby. A still air box (SAB) creates a low-turbulence microenvironment that reduces airborne contamination exposure during inoculation.

    A SAB is not a piece of equipment you buy — it is a large clear storage box with two arm-holes cut into one side. Any clear plastic storage box in the 50–80L range works: the larger the interior volume, the longer the still air window before turbulence re-establishes. Total build cost is approximately €10–15. Search large clear storage boxes on Amazon.de →

    For apartment growers, the SAB provides a meaningful contamination reduction without requiring a laminar flow hood (which costs €300–600+ and occupies significant desk space). At small batch size, the SAB is adequate. For growers running regular high-volume grain work, a flow hood is worth considering — but at apartment scale it is rarely necessary.

    Nitrile gloves and isopropyl alcohol

    Gloves prevent skin contamination from the hands during inoculation and harvest. Nitrile is preferred over latex for durability and for growers with latex sensitivity. Powder-free is standard for cultivation use — powder introduces particulate into the inoculation environment. Search powder-free nitrile gloves on Amazon.de →

    Isopropyl alcohol at 70% concentration is the standard surface sterilant. 99% IPA is not preferable — 70% kills more reliably because the water content extends contact time on surfaces. Used for wiping down the SAB interior, gloves, and any tool that enters the inoculation zone. Search isopropyl 70% on Amazon.de →


    Phase 3: Colonisation container

    Monotub

    A monotub is a clear storage box used as a combined colonisation and fruiting container. It is the standard apartment cultivation format: self-contained, stackable, concealable in a wardrobe, and requiring no additional fruiting chamber infrastructure once setup correctly.

    For apartment use, the practical size range is 30–66L. The 66L is the standard — it produces a meaningful substrate volume (8–12L of bulk substrate) that buffers humidity and temperature well. The 30–40L range is appropriate for first grows or for growers with genuinely constrained wardrobe depth. Below 20L, the substrate mass is too small to maintain stable environmental conditions without active management.

    The tub does not need to be a specific brand. Any clear, food-grade, lidded plastic box in the right size range works. Clear walls allow visual inspection without opening. Search 66L clear storage boxes on Amazon.de →

    Monotub setup — hole placement, polyfill configuration, substrate depth, and lid management — is covered in full in the monotub setup guide.

    Polyfill

    Polyfill (polyester fibrefill) is packed into the holes drilled in the monotub sides to provide filtered air exchange during colonisation. It allows gas exchange while blocking airborne contaminants. Standard craft or toy stuffing polyfill works — the requirement is a fibrous, non-absorbent fill that packs firmly without compressing to zero porosity.

    Available in craft stores and online. A single bag provides enough for multiple tub setups. Search polyfill / polyester filling on Amazon.de →

    Micropore tape

    Used to cover grain jar lid ports and filter patches on bags. Micropore tape (medical-grade paper tape) allows gas exchange while providing a barrier against contamination entry. Standard 3M micropore tape in 1.25cm or 2.5cm width is the most commonly used option — available at pharmacies across Europe and on Amazon.de. Search micropore tape on Amazon.de →


    Phase 4: Environmental monitoring

    Hygrometer

    A calibrated hygrometer is the single most diagnostic tool for managing the fruiting environment. Without one, humidity management is guesswork — and humidity guesswork produces inconsistent fruiting, surface contamination, and pin aborts that are attributed to other causes.

    For apartment monotub use, a Bluetooth logging model provides the most useful information. Current readings show you the environment now; a log shows what happened between checks — humidity drops during FAE cycles, overnight desiccation, or post-harvest recovery failure.

    The Govee H5075 is the most commonly recommended entry-level option: 20-day app logging, Bluetooth, ±3% RH accuracy, approximately €12–15. The ThermoPro TP49 is a reliable analogue option for growers who prefer no app dependency. For multi-tub setups or when data analysis matters more, the SensorPush HT1 provides ±2% accuracy and CSV data export. Full comparison, calibration guide, and placement strategy here.


    Phase 5: Fruiting environment management

    Spray bottle

    Used to mist the interior walls and floor of the fruiting container — not the substrate surface directly. A fine-mist spray bottle that produces an even, dispersed spray is more useful than a jet-stream bottle. Adjustable nozzle bottles in 500ml–1L sizes work well for monotub scale. Search fine-mist spray bottles on Amazon.de →

    Sterilise the spray bottle with a dilute bleach solution before first use and allow to dry fully. Residual moisture in an un-sterilised spray bottle can harbour contamination that is introduced directly to the fruiting environment with every mist cycle.

    Small USB fan

    For manual FAE in a monotub, fanning with a clean hand for 30–60 seconds twice daily is sufficient. A small battery-powered or USB fan held at tub distance makes this faster and more consistent — particularly for growers who find the twice-daily manual routine easy to skip. The fan is not held directly over the tub; it is used to create gentle airflow that displaces CO₂ over 30–60 seconds from the open tub surface. Search small USB fans on Amazon.de →

    This is one of the few items on this list where cheap is fine. The fan’s only job is to move air for a short duration — acoustic quality, build longevity, and brand are irrelevant.


    What you do not need at apartment scale

    Equipment lists in cultivation communities frequently include items that are useful at larger scales but unnecessary or counterproductive at apartment monotub level.

    Ultrasonic humidifier. A monotub’s substrate mass maintains internal humidity passively. Adding a humidifier introduces two risks without solving a real problem: over-saturation of the fruiting surface (which creates contamination conditions), and the introduction of airborne water droplets containing whatever organisms are living in the humidifier reservoir. For passive monotub setups, a humidifier is unnecessary. It becomes relevant for grow tent setups running multiple blocks with significant air exchange — which is a different equipment context.

    CO₂ monitor. Useful for diagnosing fruiting failures in sealed tent environments. For a manual-FAE monotub setup, a CO₂ monitor tells you that CO₂ is high — but you already have the information you need from observing fruiting body development (elongated stems, slow pinning). It adds cost and complexity without changing what you do about it.

    Agar plates and flow hood. Valuable for working with culture, maintaining genetics, and contamination diagnosis. Not necessary for a straightforward grain-to-bulk workflow using commercial liquid culture or spore syringes. A SAB and clean technique handles the inoculation environment adequately at small scale.

    Temperature controller. Relevant if you are running a dedicated grow tent or heating cabinet that requires precise temperature regulation. For a monotub in a wardrobe, ambient apartment temperature is sufficient in the 18–23°C range that most European apartments maintain during the heating season.


    Prioritised buying order

    For a first apartment grow, the order of purchase that minimises cost and complexity while covering the essential variables:

    1. Pressure cooker (6.5L minimum) — the highest contamination-prevention impact per euro spent. Borrow if possible before buying to confirm the workflow suits you.
    2. Grain jars — available in supermarkets and hardware stores; no specialist purchase needed.
    3. Monotub (66L clear storage box) — available from homeware stores, not a specialist item.
    4. Polyfill + micropore tape — low cost, available online or craft stores.
    5. Nitrile gloves + isopropyl 70% — consumables, pharmacy or online.
    6. Still air box (large clear storage box) — same source as monotub, low cost.
    7. Spray bottle — hardware or kitchen store.
    8. Hygrometer — buy alongside the spray bottle; you need it from the first fruiting session.
    9. Small USB fan — optional enhancement, buy once the workflow is established.

    The total cost for this setup — excluding the pressure cooker — is typically €30–50 sourced across supermarkets, hardware stores, and Amazon.de. The pressure cooker represents the largest single-item cost: €40–80 depending on capacity and brand.


    Summary

    Apartment cultivation does not require specialist equipment beyond the pressure cooker and hygrometer. Everything else — the monotub, still air box, polyfill, spray bottle — is made from items available in standard homeware stores. The constraint is not equipment access; it is process discipline: sterilisation time, inoculation hygiene, and consistent FAE and humidity management.

    The pressure cooker is where contamination is prevented at the source. The hygrometer is where the fruiting environment is made legible. Everything else is logistics. Prioritising in that order is how apartment-scale grows produce consistent results from a wardrobe shelf.


    The Environmental Calibration Sheet covers field capacity moisture testing, hygrometer calibration procedure, humidity target ranges, and FAE timing reference. Free with newsletter subscription. Get the sheet →

    Read more: Essential Equipment for Apartment Mushroom Cultivators
  • Pressure Cooker for Mushroom Cultivation: Selection and Sterilisation Guide

    Most contamination in grain-based mushroom cultivation traces back to one of two sources: the sterilisation process, or the inoculation process. Between them, sterilisation failure is responsible for more recurring batch losses — and it is also the one most frequently overlooked, because growers assume the process worked and look elsewhere for the cause.

    The pressure cooker is the piece of equipment that makes grain sterilisation viable at small scale. Choosing and using one correctly is not complicated, but the margin for error in the sterilisation step is narrow — and the consequences of getting it wrong are visible only ten to fourteen days later, when contamination spreads across a colonising substrate.

    This guide covers what the pressure cooker is actually doing during sterilisation, what to look for when selecting one for cultivation use, EU-available options at different capacity levels, and the operating parameters that separate successful sterilisation from the appearance of successful sterilisation.


    What sterilisation is doing

    Boiling water reaches 100°C at sea level. At that temperature, many organisms die — but not all. Bacterial endospores, which are the primary contamination risk in grain substrate, are highly resistant to heat. Bacillus and Clostridium species form endospores that survive extended boiling. Endospores in grain substrate that survive heat treatment will germinate after inoculation, producing contamination that appears widespread and early — typically before day seven.

    Pressure increases the boiling point of water. At 15 PSI above atmospheric pressure (approximately 1 bar gauge, 2 bar absolute), water boils at 121°C. This temperature destroys endospores within a defined exposure period. The target in grain sterilisation is sustained temperature throughout the entire substrate mass — not just at the surface, but at the centre of every container in the load.

    This is the reason sterilisation time matters and why load size affects outcomes. The centre of a large grain jar is the last point to reach 121°C, and it is the last point where it is maintained. A 2.5-hour standard sterilisation time for grain accounts for heat penetration to the centre of a standard quart-size container. Larger containers require longer times; overloaded pressure cookers heat unevenly and may not achieve full sterilisation throughout the load.


    Pressure cooker vs pressure canner vs autoclave

    These terms describe equipment along a spectrum of sterilisation capacity. Laboratory autoclaves operate at precisely controlled pressure, temperature, and time, with validated cycles and calibrated instrumentation. They are the reference standard — and outside the reach of most small-scale cultivators.

    Pressure canners are designed for food preservation at home scale. American models from brands like All American and Presto are frequently referenced in cultivation communities, primarily because they were available at scale in the US market and have been used successfully for grain sterilisation for decades. They operate at 15 PSI and are available in large capacities.

    Consumer pressure cookers are kitchen appliances designed for cooking under pressure. Most European models operate at 0.8–1 bar gauge (approximately 12–15 PSI), which is sufficient for grain sterilisation provided time parameters are respected. The distinction between a pressure cooker and a pressure canner is primarily one of design intent and capacity, not achievable temperature — at the pressures most EU models reach, the sterilisation temperature is adequate.

    Electric multi-cookers (Instant Pot and similar) are a separate category. They typically reach lower maximum pressure than stovetop models and are not well-suited to grain sterilisation — the pressure is insufficient and time parameters are not reliably verified.


    Selection criteria

    Capacity

    This is the primary decision variable. Capacity determines how many containers fit per sterilisation run, which determines throughput. The tradeoff is between vessel size, burner compatibility, and cost.

    A 6–7L pressure cooker is the minimum practical size for cultivation use. At this capacity, a typical run holds two to four standard grain jars (750ml–1L). This is workable for small-scale operations where batch size is limited by space, not throughput.

    A 10–12L pressure cooker increases per-run capacity to five to eight containers. This is the range where throughput begins to align with a weekly production schedule. A single sterilisation session can produce enough grain for multiple fruiting setups without requiring consecutive runs.

    Large-format options (15L+) provide commercial-grade throughput. These require a heavy-duty burner and a stable surface. At this scale, weight becomes a handling consideration — a full 15L pressure cooker is not easily manipulated by one person.

    Pressure rating

    The working pressure of a pressure cooker determines the sterilisation temperature achievable. For grain sterilisation, you need a model that reaches at least 0.8 bar gauge (approximately 12 PSI). Most EU models rated for high-pressure cooking meet this threshold.

    Check the manufacturer specification, not the marketing description. The relevant figure is maximum working pressure, listed in bar or PSI. Models specifying 0.8–1 bar at the high pressure setting are in the acceptable range. Models only reaching 0.45 bar (the low setting on many dual-pressure cookers) are not sufficient.

    Gauge vs weight-regulated

    American-style pressure canners typically include a dial gauge that displays current pressure continuously. This allows real-time monitoring and confirmation that the cooker is at pressure during the sterilisation period.

    Most European pressure cookers are weight-regulated — pressure is controlled by a valve or indicator that rocks, hisses, or rises when pressure is reached, rather than displaying a numerical reading. This is a simpler mechanism that is reliable under normal conditions but provides less information. When the pressure indicator activates, you know the cooker has reached its design pressure; you do not have a live readout.

    Weight-regulated EU models work well for grain sterilisation. The tradeoff is that gauge drift — a significant concern in older American dial-gauge models — is less of an issue, but you also have less visibility into whether pressure is being maintained consistently during the run.

    Material and build quality

    Stainless steel is the appropriate material for this application. Aluminium pressure cookers are available and cheaper but have shorter service lives under repeated sterilisation use. A cultivation pressure cooker runs frequently and at sustained high temperatures — build quality affects longevity directly.

    Lid seal condition determines whether pressure holds reliably. Seals degrade over time and require periodic inspection and replacement. For models from established brands, replacement seals are available; for off-brand or unfamiliar models, this should be verified before purchase.


    EU-available options

    The cultivation community’s frame of reference for pressure cookers has historically been US-centric — Presto, All American, and similar brands feature prominently in English-language guides. Many of these models are not readily available in Europe or carry significant import premiums. The following covers EU-accessible options.

    Entry level: 6–7L

    T-fal / Tefal Clipso — Available across the EU on Amazon.de and in major retailers. The Clipso line uses a one-hand locking mechanism and reaches the standard European high-pressure setting (~0.9 bar). The 6L version handles two standard grain jars comfortably. A practical entry point for growers running small batches. Build quality is adequate for regular cultivation use, though not in the same tier as German brands. Search Tefal Clipso on Amazon.de →

    WMF Perfect Plus 6.5L — A step up in build quality. WMF is a well-established German brand with broad EU availability and a long service life. The Perfect Plus line uses a colour-coded pressure indicator and reaches 0.9 bar at the high setting. The 6.5L capacity offers slightly more room than the Tefal equivalent. Replacement seals and parts are widely available. For growers running consistent weekly sterilisation, the build quality difference from entry-level options is material over time. Search WMF Perfect Plus 6.5L on Amazon.de →

    Mid-range: 10–12L

    WMF Perfect Plus 10L — The most straightforward recommendation for growers who expect regular production. The 10L capacity fits five to six standard grain jars. WMF build quality means the lid seal and pressure mechanism remain reliable under frequent use. This is the range where a single sterilisation session covers a full week’s grain preparation. Search WMF Perfect Plus 10L on Amazon.de →

    Fissler Vitaquick 8L — Fissler is the other major German brand in this category. The Vitaquick line is well-regarded for build precision. The 8L sits between the 6.5L and 10L WMF options in capacity. At a comparable price point, the choice between Fissler and WMF is largely one of preference — both perform reliably and have good parts availability across Europe. Search Fissler Vitaquick 8L on Amazon.de →

    High-capacity: 12L+

    WMF Perfect 12L — For growers running larger or more frequent batches. The 12L version is physically large and requires a burner capable of handling the weight and base diameter. At this capacity, a single run can sterilise grain for an entire cluster of fruiting setups. Worth considering if the limiting factor in your operation is sterilisation throughput. Search WMF Perfect 12L on Amazon.de →

    All-American pressure canners — The reference standard in cultivation communities. Available on Amazon.de via import, with the 921 (21-quart / ~20L) and 930 (30-quart / ~28L) being the most referenced sizes. The metal-to-metal seal design, dial gauge, and large capacity make them well-suited to cultivation use. The tradeoff is price — they carry a significant premium in the EU market versus buying locally in the US. For growers who have the budget and want American-style dial gauge visibility, they are worth considering. Search All-American pressure canners on Amazon.de →


    Operating parameters

    The variables that determine whether sterilisation succeeds are pressure, time, load size, and substrate moisture. Each one affects the others.

    Pressure

    Always use the maximum pressure setting. For EU pressure cookers, this is typically the high setting, producing 0.8–1 bar gauge. This is the setting that achieves the 121°C target. Operating at a lower pressure extends sterilisation time significantly — not proportionally — and introduces uncertainty about whether endospore destruction has occurred.

    Time parameters

    Sterilisation time begins when the pressure cooker reaches full pressure — not when it is placed on the heat. Allow 15–25 minutes for the cooker to reach operating pressure before starting the timer. On a typical 10L load, this ramp time is significant.

    Standard minimums for grain substrates:

    • 750ml–1L grain jars: 2.5 hours at full pressure
    • Quart-size jars, densely packed: 2.5–3 hours
    • Larger containers (1.5L+): 3–3.5 hours
    • Grain bags (1–2kg): 3–4 hours, depending on density and bag diameter

    These figures are minimums. Running longer does not harm the substrate. Running shorter introduces contamination risk that is not immediately visible — it appears 7–14 days after inoculation as widespread early colonisation failure. Contamination that appears before day seven and is widespread across the substrate is the diagnostic signature of sterilisation failure.

    Load size and jar arrangement

    Containers must not be packed so tightly that steam cannot circulate between them. Steam circulation is the mechanism through which heat reaches the outer surface of each container — if containers are in direct contact across a large area, heat transfer to those contact zones is limited. Leave space between jars; do not double-stack without a rack between layers.

    A pressure cooker rack (most models include one) keeps containers off the base and allows steam circulation underneath. If the rack is missing, improvised spacers — stainless steel rings, folded foil — maintain the gap.

    Substrate moisture

    Dry grain does not conduct heat evenly. The sterilisation process depends on steam penetrating through and around the substrate. Grain at field capacity moisture — where a firmly squeezed handful releases only a few drops — sterilises more reliably than over-dry grain. Excessively wet grain creates clumping and uneven density, which creates the same problem from the other direction.


    Common sterilisation mistakes

    Starting the timer before full pressure is reached. The most common source of inadequate sterilisation time. The two-hour timer means two hours at operating pressure, not two hours on the heat. Ramp time is separate.

    Gauge inaccuracy. On older dial-gauge models, gauges drift over time. A gauge reading 15 PSI may be producing less. This is a known failure mode in older American pressure canners used for cultivation — the contamination rate increases gradually as the gauge drifts, and growers attribute it to other causes. Verifying a dial gauge periodically with a reference instrument, or replacing it, is standard maintenance for heavy-use cultivation equipment.

    Inoculating hot substrate. Substrate removed from the pressure cooker is still above ambient temperature. Inoculating before the jars have fully cooled to room temperature stresses the culture and creates condensation inside the container. Standard practice is to allow overnight cooling before inoculation.

    Reusing compromised lids or seals. A lid seal that does not form a complete seal produces a cooker that cannot reach or maintain pressure. If the pressure indicator takes unusually long to activate, or if pressure drops during the run, the seal is the first thing to inspect. Replacement seals are inexpensive; a failed sterilisation run is not.

    Overloading the cooker. More containers per run reduces per-run time investment but compromises sterilisation if containers are packed too densely. The minimum water level requirement (most models specify at least 500ml of water) must be maintained regardless of load. Steam requires space to circulate.


    Sterilisation in the context of contamination

    Sterilisation is one process variable in contamination control — the one that addresses what is already in the substrate at inoculation. It does not control what enters during or after inoculation. A perfectly sterilised substrate can still contaminate if inoculation introduces contaminants, or if a physical breach occurs during colonisation.

    The contamination timing matrix is the tool for diagnosing which process variable is responsible. Widespread, early contamination (before day seven) points to sterilisation. Localised contamination near inoculation points in the first week points to the inoculation process. Mid-colonisation contamination points to a physical breach. The full timing chart maps all three phases to their diagnostic signatures and corrective variables.

    Growers experiencing recurring contamination who have already adjusted inoculation technique and environment, and who are still seeing early widespread contamination, almost always have a sterilisation variable that has not been corrected: insufficient time, a faulty gauge, an overloaded run, or a substrate moisture problem. A systematic approach to diagnosing recurring contamination by phase is here.


    Summary

    The pressure cooker performs one specific function in cultivation: destroying heat-resistant endospores in grain substrate by sustaining 121°C throughout the load for long enough to ensure complete sterilisation. Everything else — selection, capacity choice, operating procedure — is in service of that function.

    For most EU-based cultivators, a WMF Perfect Plus (6.5L for small batches, 10L for regular production) or a Fissler Vitaquick provides the pressure rating, build quality, and parts availability needed for reliable cultivation use. The T-fal Clipso is a functional budget option for growers starting out with smaller batch sizes.

    The most common sterilisation failures — insufficient time at pressure, faulty gauge, overloaded load — are correctable once identified. They are also the most commonly overlooked cause of contamination, because the failure appears 10–14 days later and is attributed to other variables. Accurate contamination identification requires timing and location data.


    The Environmental Calibration Sheet includes the contamination pattern recognition matrix, sterilisation time reference, and substrate moisture guide. Free with newsletter subscription. Get the sheet →

    Read more: Pressure Cooker for Mushroom Cultivation: Selection and Sterilisation Guide
  • Grow Tent Airflow Setup for Mushroom Cultivation

    A grow tent introduces a set of airflow challenges that do not exist in smaller, passive fruiting setups. The enclosed volume is too large for natural diffusion to maintain adequate gas exchange across multiple fruiting blocks. Getting the airflow setup right in a grow tent has a disproportionate effect on fruiting performance.

    This guide covers the components of an effective grow tent airflow system and how to configure them for mushroom fruiting specifically — which differs from cannabis cultivation, the most common use case for grow tent design guides.

    Grow tent airflow: the core components

    Inline fan (exhaust): The primary driver of air movement in a grow tent. An inline fan draws air from inside the tent and exhausts it outside. By creating negative pressure inside the tent, it causes fresh air to be drawn in through intake vents. Inline fans are rated in cubic metres per hour (m³/h) or cubic feet per minute (CFM).

    Carbon filter: In mushroom cultivation, a carbon filter is optional — mushroom fruiting does not produce strong odours in most cases — but the connection point is the same as any other exhaust setup.

    Clip fans or oscillating fans: Smaller fans positioned inside the tent to circulate air and prevent dead zones. These fans do not exchange air with the outside; they move the internal air volume.

    Intake vents: Grow tents include mesh-covered vents at the lower sides. These are the passive intake points — when the exhaust fan creates negative pressure, air enters through these vents.

    Humidity controller: An automated controller that reads internal humidity and switches the exhaust fan or a humidifier on and off to maintain a set point. For continuous operation without manual monitoring, a humidity controller is the most important automation addition for mushroom cultivation in a tent.

    Key differences from cannabis grow tent setups

    Most grow tent airflow information is written for cannabis cultivation. These configurations are poorly suited to mushroom cultivation for three reasons.

    Cannabis setups run high, continuous airflow. Mushroom fruiting requires gas exchange but cannot tolerate the moisture loss that comes with very high continuous airflow. A grow tent designed for cannabis, running at full exhaust capacity continuously, will desiccate mushroom fruiting blocks.

    Cannabis setups target low humidity. Cannabis cultivation generally targets 50–70% relative humidity. Mushroom fruiting targets 85–95%. A setup calibrated for cannabis humidity ranges will not produce adequate fruiting conditions without modification.

    Cannabis setups use CO₂ supplementation. Mushroom cultivation does not benefit from CO₂ supplementation; the goal is CO₂ removal. Starting from a cannabis-configured grow tent and adapting it for mushrooms requires reducing airflow, increasing humidity targets, and eliminating any CO₂ supplementation.

    Sizing the inline fan

    The inline fan should exchange the tent’s air volume several times per hour during active fruiting. A common starting point is 6–10 air changes per hour.

    To calculate: multiply the tent’s volume (length × width × height in metres) by the desired air changes per hour. A 60×60×120cm tent has a volume of 0.43 m³. At 10 air changes per hour, the required fan capacity is approximately 4.3 m³/h. A standard inline fan rated at 100 m³/h would be vastly oversized for this space at full power.

    This is why fan speed controllers are useful in mushroom cultivation contexts. A variable-speed controller allows the fan to run at 5–15% of rated capacity, providing adequate gas exchange without the moisture loss that comes from full airflow. Running a fan rated at 100 m³/h at 10% output gives approximately 10 m³/h — a more appropriate rate for a tent of this size.

    Fan positioning for mushroom cultivation

    Exhaust fan position: At the top of the tent, exhausting through the upper ducting port. Hot, CO₂-rich air rises and is most concentrated at the top of the tent. Top exhaust removes the highest-CO₂ air most efficiently.

    Intake position: Lower mesh vents should be partially open to allow passive intake. Fresh air entering at the bottom displaces the CO₂-rich air upward toward the exhaust point. This vertical flow path is more effective than intake and exhaust positioned at the same height.

    Interior clip fans: Position them to move air across the fruiting blocks without directing high-velocity air directly at fruiting body surfaces. Direct, high-velocity airflow on developing fruiting bodies causes localised desiccation. Lower speed, indirect circulation is preferable.

    Intake filtering: Open mesh vents allow airborne contamination to enter. Some cultivators cover intake vents with polyester fibre or micropore tape to provide basic filtration. This slightly reduces intake airflow but reduces contamination pressure in the tent environment.

    Humidity management in a tent

    As the humidity management guide discusses, airflow and humidity are in tension. A tent running continuous exhaust will lose moisture faster than substrate evaporation can replace it. The standard solution in tent-based mushroom cultivation is an ultrasonic humidifier controlled by a humidity controller.

    Humidifier positioning: Place the humidifier inside the tent, near the base, where its output is drawn upward by the airflow and distributed through the tent volume. Avoid positioning the humidifier output directly at fruiting body surfaces, which can cause surface saturation and bacterial contamination.

    Humidity controller setup: For most tent-based setups, a humidity controller switching the humidifier on at 85% RH and off at 92% RH provides a stable range during active fruiting. The exhaust fan runs independently on a timer or variable speed controller for consistent gas exchange.

    Monitoring: Place a hygrometer at fruiting block height inside the tent. A second hygrometer at block level confirms the environment is within target range where it matters — readings at the controller sensor may not reflect conditions across the full tent if circulation is uneven.

    Timer and controller setups

    Exhaust fan on a timer: If a humidity controller is not available, the exhaust fan can be run on an interval timer — on for 15 minutes every two hours — to provide periodic gas exchange without continuous moisture loss.

    Humidity controller switching exhaust fan: The controller switches the exhaust fan off when humidity drops below the set point. This preserves moisture but can allow CO₂ to build if fruiting blocks are producing it faster than the fan cycles can remove it. Monitor pin morphology to confirm gas exchange remains adequate.

    Combined setup: Exhaust fan on a variable speed controller for baseline continuous low airflow, plus a humidity controller managing a humidifier for moisture addition. This is the most reliable configuration for consistent results.

    Troubleshooting common tent airflow problems

    Pins are elongated, caps underdeveloped: CO₂ is too high. Increase exhaust fan speed or frequency. Reduce intake filter restriction if applicable.

    Humidity drops to 70% or below during active fruiting: Airflow is removing moisture faster than it can be replaced. Reduce fan speed, add active humidification, or partially close intake vents to slow the exchange rate.

    Condensation dripping onto blocks from tent ceiling: Increase exhaust rate or reduce ambient temperature differential. Alternatively, position a drip shield above the fruiting blocks to intercept drips.

    Uneven fruiting across blocks: Air circulation is uneven. Reposition clip fans to distribute air more evenly. Rotate block positions between flushes.

    Equipment summary

    A functional grow tent airflow setup for mushroom cultivation at small scale requires: an inline fan (50–125mm depending on tent volume) with variable speed controller; a humidity controller with sensor placed at fruiting block height; an ultrasonic humidifier sized for the tent volume (typically 200–500 mL/h output for tents up to 120×60cm); one or two clip fans for interior circulation; and a hygrometer for monitoring at multiple points.

    Total cost for this equipment at entry-level specifications is typically €60–120, varying by brand and source. More on individual equipment specifications and European availability in our equipment comparison guides.

    Summary

    A grow tent configured for mushroom cultivation requires lower airflow than equivalent setups for other crops, active humidity management to compensate for that airflow, and attention to airflow distribution to prevent both dead zones and localised desiccation.

    The critical adjustments from a standard cannabis-configured tent are: reduce exhaust fan to 5–15% of rated capacity via speed controller, set humidity targets to 85–95% rather than 50–70%, and add active humidification to compensate for moisture loss. With these adjustments, a grow tent provides a controllable, scalable environment for fruiting that outperforms passive single-container setups when running multiple blocks simultaneously.

    Read more: Grow Tent Airflow Setup for Mushroom Cultivation
  • Why Your Fruiting Chamber Loses Humidity (And How to Fix It)

    When relative humidity in a fruiting chamber drops below target range, the immediate instinct is often to mist more frequently or add a humidifier. These responses address the symptom rather than the cause, and frequently introduce secondary problems: surface saturation from over-misting, or humidity overshoot from equipment without precise control.

    Effective troubleshooting starts with identifying where the moisture is going, not with adding more of it. The mechanisms of humidity loss in a fruiting environment are consistent and identifiable; matching the fix to the cause produces more stable outcomes than increasing moisture input indiscriminately.

    The moisture balance in a fruiting chamber

    A fruiting chamber is, from a moisture perspective, a system with inputs and outputs.

    Inputs: Evaporation from the substrate surface, evaporation from perlite or other moisture-retaining material, and any moisture added by misting or active humidification.

    Outputs: Moisture carried out by airflow during ventilation, moisture absorbed into developing fruiting bodies, and any water draining from the substrate.

    When the system is in balance, relative humidity stays within the target range. Humidity drops when outputs exceed inputs — either because outputs have increased or inputs have decreased. Identifying which has changed is the diagnostic starting point.

    Common causes of humidity loss

    1. Ventilation frequency or volume is too high

    The most common cause. Airflow carries moisture out of the fruiting environment. A fruiting chamber that has been working well and begins showing humidity loss after ventilation adjustments has typically tipped the balance between gas exchange and moisture retention.

    Fix: Reduce ventilation frequency or duration. If running manual FAE, reduce fanning sessions from four times daily to two. If running passive exchange with polyfill holes, add polyfill to slightly restrict flow. Monitor both humidity and pin morphology: if humidity recovers but pins show elongation or cap underdevelopment, ventilation has been restricted too far.

    2. Substrate moisture is depleting

    As a fruiting block or bulk substrate progresses through successive flushes, its moisture content decreases. A substrate that maintained good humidity through the first flush may struggle to do so through the second or third as internal moisture depletes.

    Fix: Rehydration between flushes. Soaking a block in water for 6–12 hours before initiating a subsequent flush restores some of the moisture lost during previous fruiting. This extends the productive life of a substrate and restores its capacity as a passive humidity source.

    3. Ambient humidity is very low

    A fruiting chamber is not fully isolated from its environment. In conditions of very low ambient humidity — dry climates, air-conditioned spaces, or heated rooms during winter — the humidity gradient between the interior and exterior of a semi-sealed container creates outward diffusion pressure.

    Fix: Increase sealing of the fruiting environment, reduce hole size or polyfill permeability, or address the ambient environment by running a room humidifier. Moving the setup to a naturally more humid location in the space can also help.

    4. Container geometry creates cold spots

    In some fruiting container designs, temperature differentials within the container cause localised condensation. Moisture condenses on the coldest surface — often the lid or the side nearest an exterior wall — and drips down rather than remaining in the air.

    Fix: Insulate the cold surface, move the container away from cold external surfaces, or adjust temperature management to reduce the differential.

    5. Perlite layer is drying out

    Where perlite is used as a passive moisture buffer, it requires periodic rehydration. Perlite loses moisture to evaporation over time and will eventually dry out if not maintained. A dried perlite layer no longer contributes to humidity and may actually absorb moisture from the substrate and fruiting bodies.

    Fix: Rehydrate the perlite layer by adding water directly to it until saturated but not pooling.

    Misting technique and its limits

    Manual misting is the most accessible intervention for humidity loss, but it has limitations worth understanding.

    Misting raises humidity transiently. Spraying water into the fruiting chamber raises relative humidity immediately. However, unless the moisture source that created the deficit is addressed, humidity will drop again at the same rate.

    Mist walls, not substrate. As described in the humidity management guide, misting directly onto the substrate surface repeatedly increases contamination risk. The target for misting is the interior walls and lid.

    Misting frequency is a proxy for system health. A well-designed fruiting environment should require misting once or twice daily at most during active fruiting. If a setup requires misting every hour, the system has a structural issue that should be addressed directly.

    Diagnosing the cause systematically

    Step 1: Check ventilation settings first. Has anything changed in fan cycling, fanning frequency, or hole coverage? Adjust and observe for 24–48 hours.

    Step 2: Assess substrate moisture. Has the block been through multiple flushes without rehydration? Rehydrate and reassess.

    Step 3: Check ambient conditions. Use a hygrometer to measure ambient RH. If it has dropped significantly, address the ambient environment.

    Step 4: Inspect perlite (if used). Is it dry or only slightly damp? Rehydrate it.

    Step 5: Check for cold spots. Is condensation concentrating in one area? Address positioning or insulation.

    Most humidity loss issues resolve at step 1 or 2.

    When to use active humidification

    For setups running high airflow — Martha tents, large grow rooms, continuous fan operation — passive moisture management cannot keep pace with moisture loss. In these environments, an ultrasonic humidifier on a timer or humidity controller provides stable, automated moisture maintenance.

    The decision point is practical: if manual misting more than twice daily is required and the underlying cause is not addressable, active humidification is the appropriate next step.

    Summary

    Humidity loss in a fruiting chamber is a balance problem. Outputs — primarily ventilation and substrate depletion — are exceeding inputs. Identifying which output has increased or which input has decreased determines the appropriate response.

    The most common causes are over-ventilation and substrate moisture depletion, both straightforward to address. Ambient humidity, perlite maintenance, and cold spot condensation are secondary causes that become relevant when the primary ones have been ruled out.

    Misting is a tool for supplementing moisture, not for compensating for an undiagnosed structural deficit. A stable fruiting environment should require minimal active intervention once the balance is correctly calibrated.

    Read more: Why Your Fruiting Chamber Loses Humidity (And How to Fix It)
  • Fresh Air Exchange vs Passive Air Exchange: What Actually Matters

    “Fresh air exchange” and “passive air exchange” appear frequently in cultivation discussion, sometimes used interchangeably, sometimes as opposites. The distinction matters practically, but it is not always clearly defined.

    Both terms describe the same underlying need: removing CO₂-rich air from a fruiting environment and replacing it with air containing lower CO₂ concentrations. What differs is the mechanism — whether air movement is driven by a fan or pump (active / FAE), or by natural convection and diffusion (passive).

    Understanding the difference helps in evaluating whether a setup is meeting its gas exchange requirements, and in deciding which approach is appropriate for a given cultivation format.

    Why gas exchange is necessary

    Metabolically active mycelium and developing fruiting bodies respire continuously, consuming oxygen and releasing CO₂. In a sealed environment, CO₂ accumulates while oxygen depletes. If this continues unchecked, the fruiting environment becomes unfavourable for pin initiation and fruiting body development.

    The CO₂ threshold that begins to affect fruiting varies by species, but a general figure often cited in cultivation literature is around 1,000–2,000 ppm. Ambient atmospheric CO₂ is approximately 420 ppm. A sealed fruiting chamber with active colonised substrate can exceed 5,000 ppm within hours.

    The practical consequence: mushrooms in high-CO₂ environments either do not pin, pin poorly, or produce distorted fruiting bodies — typically elongated stems with underdeveloped caps. The organism is responding to chemical signals that, in its evolutionary context, indicate it is still buried and not yet exposed to the atmosphere.

    A broader explanation of CO₂ effects on fruiting is in our airflow and fruiting guide.

    Passive air exchange

    Passive air exchange relies on the physical principles of gas diffusion and convection to move air through a growing container without mechanical assistance.

    Diffusion operates at the molecular level. Gas molecules move from areas of higher concentration to areas of lower concentration. In a partially sealed container — one with holes, gaps, or permeable materials — CO₂ naturally diffuses outward over time, and ambient air diffuses inward.

    Convection operates through temperature and density differences. Warm air rises; cool air falls. CO₂ is slightly denser than ambient air; it tends to accumulate at lower elevations. In a container with holes positioned at both the top and bottom, natural convection creates a slow vertical circulation: CO₂-rich air exits through lower holes, ambient air enters through upper holes, or vice versa depending on temperature gradients.

    Polyfill and micropore tape are filtration materials used in passive exchange designs. Holes in container walls are packed with polyfill fibre or covered with micropore surgical tape. These materials allow gas diffusion while providing a barrier against airborne contamination — fungal spores and bacterial particles that would otherwise enter through open holes.

    The effectiveness of passive exchange depends on the size and number of exchange points, the permeability of any filtration material, and the differential between internal CO₂ concentration and ambient. A heavily colonised substrate block in a sealed tub with small holes may exchange gas slowly enough that CO₂ builds faster than it diffuses out.

    Fresh air exchange (FAE)

    FAE in cultivation contexts typically refers to active, mechanically driven air exchange. A fan moves air through or across the fruiting environment, replacing the internal atmosphere more rapidly than passive diffusion achieves.

    Direct FAE introduces ambient air into a fruiting environment continuously or on a timed cycle. Small computer fans — 80mm or 120mm — are commonly used in small-scale setups. They draw air in through one opening and exhaust through another, creating a defined airflow path.

    Indirect FAE relies on fans positioned near the fruiting environment rather than directly introducing air into it. In Martha tent configurations, a fan circulates air within the tent environment; the fruiting blocks within the tent experience this circulation as gas exchange.

    The advantage of active FAE over passive exchange is throughput: a small fan can exchange the air volume of a fruiting chamber many times per hour, maintaining CO₂ concentrations close to ambient regardless of how much CO₂ the substrate produces. The trade-off is moisture loss.

    What the setup determines

    Different cultivation formats are suited to different exchange approaches, and the choice is not arbitrary.

    Monotubs are designed around passive exchange. The standard monotub design — a large plastic storage container with holes drilled in the sides and filled with polyfill — relies on diffusion and convection to maintain adequate gas exchange. The design works because the relatively large substrate volume provides substantial CO₂ buffering, and the tight-fitting lid limits moisture loss. Most monotub cultivators do not use fans.

    When a monotub underperforms on gas exchange — producing distorted fruiting bodies or poor pinning — the adjustment is typically increasing hole size, adding holes, or reducing polyfill density rather than introducing active ventilation.

    Martha tent setups integrate active FAE as a design requirement. The tent environment is too large and too open for passive exchange to maintain CO₂ at appropriate levels across multiple fruiting blocks. Fans are necessary. Humidity is then managed actively to compensate for moisture loss from fan operation.

    Shotgun fruiting chambers operate on aggressive passive exchange — many holes on all sides create high passive airflow through pressure differentials. They excel at gas exchange but sacrifice humidity retention significantly, requiring regular misting to compensate.

    Manual FAE

    Between fully passive and fully active is manual FAE: the cultivator opens the container, fans the air manually, and closes it again on a scheduled basis. This is common in monotub cultivation and represents a reasonable middle point.

    Manual FAE is effective when performed consistently. A 30-second fanning session 2–4 times daily exchanges the air in a standard monotub adequately during active fruiting. The substrate provides enough moisture to restore humidity between sessions.

    The limitation is consistency. A cultivation system that depends on manual intervention performs well when the intervention happens and poorly when it doesn’t. For cultivators who travel or have irregular schedules, passive systems or automated active systems are more reliable.

    What actually determines performance

    The key variable is not which approach is used but whether CO₂ concentration in the fruiting environment stays below the threshold that affects the species being cultivated. Both passive and active exchange can achieve this. Both can fail to achieve it if the design is inadequate for the substrate volume and activity level.

    Indicators of adequate exchange: pins initiate within the expected timeframe for the species; fruiting bodies show appropriate stem-to-cap proportions; no characteristic elongation or cap underdevelopment.

    Indicators of inadequate exchange: pinning delay beyond typical timelines; thin, elongated stems with small, poorly developed caps; abortions at early pin stages.

    If a setup is showing these indicators, increasing exchange capacity — by whatever method the setup allows — should be the first intervention before adjusting other variables.

    CO₂ measurement

    The most direct way to assess whether gas exchange is adequate is to measure CO₂ concentration directly. Affordable NDIR CO₂ sensors are available in the €30–80 range with accuracy sufficient for cultivation purposes. A reading consistently above 2,000 ppm during fruiting suggests exchange is inadequate; a reading in the 600–1,200 ppm range during active fruiting suggests the exchange design is working.

    Without a meter, pin morphology and development timelines remain the best proxies, as described above.

    Summary

    Fresh air exchange and passive air exchange describe the same need — CO₂ removal from the fruiting environment — achieved through different mechanisms. Active FAE uses fans; passive exchange uses diffusion and convection through designed openings.

    Neither approach is universally superior. The appropriate choice depends on the cultivation format, substrate volume, species requirements, and the cultivator’s preference for active versus passive management. What matters is that CO₂ concentration stays within the range that supports the species being cultivated — and that fruiting body morphology confirms this is happening.

    Read more: Fresh Air Exchange vs Passive Air Exchange: What Actually Matters
  • How to Control Fruiting Chamber Humidity Without a Humidifier

    A common point of confusion for new cultivators is the role of humidifiers in mushroom fruiting. Commercial cultivation operations and Martha tent setups visible on hobbyist forums often include ultrasonic humidifiers as standard equipment, which can give the impression that active humidity control is necessary for all fruiting environments.

    It is not. For most small-scale setups — monotubs, fruiting boxes, single blocks — substrate moisture is the primary humidity source, and maintaining it does not require active equipment. Understanding where fruiting humidity actually comes from makes the system much easier to manage.

    Where fruiting humidity comes from

    In a closed or semi-closed fruiting environment, relative humidity is driven by two sources: evaporation from the substrate surface and evaporation from any perlite or moisture-retaining material in the chamber base.

    Substrate moisture is the dominant variable. A well-hydrated colonised block or bulk substrate continuously releases water vapour into the surrounding air. In a sealed or semi-sealed environment, this evaporation raises and maintains relative humidity without any additional intervention. The substrate is, in effect, a passive humidifier.

    Perlite — a silica-based mineral that absorbs and slowly releases water — is used in some fruiting chamber designs precisely for this reason. A layer of water-saturated perlite in the base of a fruiting chamber provides a secondary evaporation source that buffers humidity fluctuations.

    What the substrate cannot do is compensate for large, continuous air volumes that carry moisture away faster than evaporation can replace it. This is where active humidification becomes relevant: in high-airflow setups where the balance between ventilation and humidity retention has been resolved in favour of ventilation.

    Relative humidity targets by stage

    Humidity requirements shift across the cultivation cycle.

    Colonisation: Most species colonise effectively across a relatively wide humidity range. The substrate itself maintains internal moisture during colonisation regardless of ambient humidity, provided it was prepared at the correct field capacity. External humidity during colonisation is less critical than substrate moisture and is often managed simply by keeping the growing container closed or loosely covered.

    Pinning initiation: The transition to fruiting conditions typically involves a humidity increase, both to signal environmental change and to support the development of forming primordia. Most commonly cultivated species initiate pins best at 90–95% relative humidity. High surface moisture — condensation on the substrate surface — can suppress pinning by blocking gas exchange at the surface; the target is humid air rather than wet surfaces.

    Active fruiting: Developing fruiting bodies lose moisture through their surfaces. Sustained humidity in the 85–95% range during development supports full cap development and prevents premature veil tearing. Drops below 80% during active fruiting can cause caps to crack, curl, or dry prematurely.

    Between flushes: After harvesting, the substrate rests and recovers. Humidity maintenance during this period is less critical. Many cultivators reduce active management between flushes, maintaining a closed or semi-closed environment without additional intervention.

    Maintaining humidity without equipment

    Keep the container closed or semi-closed. The most straightforward humidity management strategy for a monotub or fruiting box is maintaining a microclimate within a closed or partially closed container. The substrate provides moisture; the container retains it. Ventilation holes or gaps — covered with polyfill or micropore tape — allow CO₂ to escape while limiting moisture loss.

    Monitor and adjust ventilation. The relationship between airflow and humidity is direct: more airflow removes more moisture. If humidity is consistently low, reducing ventilation frequency or partially blocking ventilation holes will raise it. The trade-off — elevated CO₂ — should be monitored via pin morphology as described in our airflow and fruiting guide.

    Mist the chamber walls, not the substrate. Manual misting is the primary intervention available without a humidifier. The technique that most consistently produces good outcomes is misting the inner walls and lid of the fruiting chamber rather than the substrate surface directly. This adds moisture to the air and maintains surface humidity without saturating the substrate.

    Misting directly onto the substrate surface repeatedly creates conditions for bacterial contamination — particularly bacterial blotch — on maturing fruiting bodies. The substrate is best maintained at field capacity through initial preparation rather than ongoing surface wetting.

    Use perlite as a moisture buffer. A 2–3cm layer of water-saturated perlite in the base of a fruiting chamber adds surface area for evaporation without requiring active management. Perlite is inexpensive, reusable, and effective. For cultivators running multiple fruiting chambers without active equipment, this is among the more practical additions.

    Measuring humidity without a digital hygrometer

    Digital hygrometers are inexpensive enough that using one is simply better than estimating. Instruments with ±3% accuracy are available for under €10 and remove the need for guesswork. A hygrometer placed inside the fruiting chamber gives direct readings of the environment the fruiting bodies are experiencing.

    More on selecting and calibrating hygrometers for cultivation use in our hygrometer guide.

    For cultivators who do not yet have a hygrometer, proxy indicators include:

    Condensation pattern: Light condensation on the interior walls of a sealed or semi-sealed container indicates high relative humidity — typically above 85%. Heavy, continuous condensation dripping onto the substrate surface may indicate excessive moisture accumulation; moderate condensation that evaporates during ventilation intervals is generally favourable.

    Cap surface condition: Drying or cracking of developing caps, particularly at the edges, indicates humidity has dropped below the target range. This symptom typically appears before visible quality loss if addressed promptly.

    When active humidification becomes relevant

    For the majority of small-scale fruiting setups — a single monotub, a fruiting box, or a few small blocks — passive humidity management is adequate. The substrate provides sufficient moisture; the container retains it; manual misting compensates for what ventilation removes.

    Active humidification becomes useful or necessary in specific situations:

    High-airflow setups. Martha tent configurations running fans continuously move enough air to deplete substrate-sourced humidity faster than it can be replaced. These setups benefit from active humidification to compensate.

    Multiple blocks fruiting simultaneously. Running a large number of fruiting bodies at once, particularly in an open environment rather than individual closed containers, can require active moisture addition to maintain target humidity across the full fruiting area.

    Low-ambient-humidity environments. In dry climates or during winter heating seasons, ambient humidity outside the fruiting chamber may be low enough that even a semi-closed container struggles to retain moisture.

    Species with narrow humidity tolerances. Lion’s mane (Hericium erinaceus) is frequently cited as requiring more precise humidity management than many other species. The characteristic icicle-like teeth development is sensitive to humidity drops, and the fruiting body’s high surface-area-to-mass ratio makes it more susceptible to desiccation. Active humidification is worth considering for this species in non-humid environments.

    Field capacity: the foundation

    All passive humidity management depends on substrate moisture being correct from the outset. A substrate prepared at incorrect field capacity — too dry or too wet — will produce humidity problems that cannot be effectively managed after the fact.

    Field capacity describes the moisture level at which a substrate holds water without excess draining or pooling. The standard test: a handful of prepared substrate, squeezed firmly, should release only a few drops of water. If water streams out freely, the substrate is too wet. If no water is released, it is likely too dry.

    Over-wet substrate creates conditions for anaerobic bacteria and competes with gas exchange at the surface. Under-wet substrate depletes moisture quickly during fruiting, requiring frequent intervention and often producing lower yields before substrate exhaustion.

    Getting field capacity right at preparation reduces the variables requiring active management during fruiting significantly.

    Summary

    Humidity management in small-scale fruiting environments is primarily a substrate and container management problem, not an equipment problem. Substrate prepared at correct field capacity, held in a closed or semi-closed container, produces and maintains the humidity environment that most cultivated species require.

    Manual misting — targeted at chamber walls rather than substrate surfaces — is sufficient supplementation for most setups. Perlite buffering adds passive stability. A basic hygrometer confirms that the environment is within target range.

    Active humidification addresses situations where passive management cannot keep pace with moisture loss: high-airflow setups, large-scale operations, or particularly sensitive species. For the majority of cultivators running one or a few containers, it is optional rather than essential.

    Read more: How to Control Fruiting Chamber Humidity Without a Humidifier
  • Why Mushroom Fruiting Fails Without Proper Airflow

    When a fruiting attempt fails, most growers look first at temperature, then substrate quality, then contamination. Airflow is usually the last variable examined — if it’s examined at all.

    This ordering is understandable. Airflow is invisible. Its effects unfold slowly. And the symptoms it produces — stalled pins, aborted primordia, dense mycelium that won’t fruit — closely resemble the symptoms of other problems.

    But across a range of cultivation setups, inadequate gas exchange is one of the most consistent failure points in fruiting. Understanding why requires looking briefly at what mushrooms are actually doing when they form.

    What mushrooms need from the atmosphere

    Mycelium and developing fruiting bodies have different atmospheric requirements. During colonisation, the fungal network is metabolically active but relatively tolerant of elevated CO₂ levels. Some cultivators deliberately retain higher CO₂ during colonisation to suppress primordia formation until a substrate is fully run.

    Fruiting changes this relationship. Once a colonised block or monotub is exposed to fruiting conditions, the fungal system begins responding to environmental cues — light, temperature drop, and critically, a reduction in CO₂ concentration.

    Elevated CO₂ signals to the mycelium that it is still buried, still subterranean, still in an environment where fruiting would be premature. Falling CO₂ signals exposure. From the organism’s perspective, exposure means an opportunity to sporulate.

    This is why airflow matters: it physically removes CO₂ from the fruiting environment and allows the organism to respond accordingly.

    What happens when CO₂ stays elevated

    CO₂ above approximately 1,000–2,000 ppm consistently produces observable effects on fruiting body morphology and behaviour. Specific thresholds vary by species, but the general pattern is well documented.

    Pin formation is suppressed or delayed. The mycelium receives no trigger to initiate primordia. A colonised block may sit in fruiting conditions for two or three weeks without pinning, while appearing otherwise healthy.

    Pins that do form show abnormal morphology. Long, thin stems with small, underdeveloped caps — sometimes called “leggy” fruiting bodies — are characteristic of high-CO₂ environments. The organism elongates in an attempt to reach atmospheric conditions with lower CO₂ concentrations, a growth pattern visible in naturally occurring fungi emerging through soil.

    Abortions increase. Pins that initiate may abort before maturity, particularly if CO₂ fluctuates rather than remaining consistently low. Aborted pins appear as small, darkened, dense masses that stop developing and eventually dry in place.

    Yield is suppressed. Even where fruiting does occur, inadequate gas exchange generally reduces total yield per flush and reduces the number of flushes before the block exhausts.

    CO₂ sources in a fruiting environment

    Understanding where CO₂ comes from helps in managing it. In a sealed or semi-sealed fruiting chamber, CO₂ accumulates from two sources.

    Fungal metabolism. Actively growing mycelium and developing fruiting bodies both respire, consuming oxygen and releasing CO₂. A fully colonised substrate block produces measurable CO₂ continuously during active growth phases.

    Microbial activity in the substrate. Pasteurised or partially sterilised substrates contain background microbial communities that also respire. In bulk substrates — straw, wood chips, coco coir — this contribution can be significant.

    In a sealed fruiting chamber with no ventilation, CO₂ from these sources accumulates rapidly. Within a few hours, concentrations can reach levels that inhibit pinning.

    How to assess airflow in your setup

    Most small-scale cultivators do not have access to CO₂ meters, though these instruments have become inexpensive enough that they are worth considering for anyone running consistent setups. A basic NDIR CO₂ sensor accurate to ±50 ppm costs well under €50 and removes guesswork from the equation.

    Without a meter, assessment relies on indirect indicators.

    Pin morphology is the most reliable proxy. Long, thin-stemmed fruiting bodies with underdeveloped caps suggest CO₂ is too high during development. Healthy fruiting bodies should show proportionate stem-to-cap ratios appropriate for the species.

    Pinning delay relative to expected timelines is another indicator. If a substrate that typically pins within 5–7 days of fruiting initiation consistently takes 14 or more days, gas exchange is a reasonable suspect after other variables have been ruled out.

    The balance with humidity

    A persistent challenge in fruiting chamber design is that airflow and humidity work in opposition. Airflow removes CO₂ effectively but also removes moisture from the air, lowering relative humidity. Humidity maintenance typically involves reducing air movement, which allows CO₂ to build.

    This tension does not have a universal solution. Different cultivation formats resolve it differently.

    Monotubs with passive holes rely on pressure differentials and natural convection to exchange air slowly while retaining humidity through substrate moisture and the microclimate within the tub. The design works but requires careful calibration of hole placement and polyfill quantity.

    Martha tent setups with ultrasonic humidifiers and fans run near-continuous airflow while compensating for humidity loss with active moisture addition. This decouples the two variables but introduces equipment complexity and the risk of over-saturation.

    Shotgun fruiting chambers (SFGCs) — four-sided perlite-lined boxes with holes on all sides — move a large volume of air but struggle to maintain high humidity without misting. They are effective for gas exchange but require frequent intervention to maintain the moisture environment most species require.

    Ventilation frequency and technique

    For cultivators managing ventilation manually — fanning a monotub or fruiting box several times per day — frequency and technique both matter.

    Frequency: Most cultivators working with gourmet species in similar conditions find that 2–4 ventilation intervals per day is sufficient during early pinning. During rapid fruiting body development, more frequent exchange may accelerate growth. During the period between flushes when substrate is resting, ventilation needs decrease.

    Technique: The goal is to exchange the air volume within the fruiting chamber, not simply to create turbulence at the surface. In a monotub, this means fanning until the interior air — including the dead zones at the corners — has been replaced. Ten to fifteen seconds of active fanning is typically sufficient for a standard 66-litre tub.

    Species differences

    Not all cultivated species have identical CO₂ tolerance. This variation is worth noting because cultivation advice is often written with a single species in mind.

    Oyster mushrooms (Pleurotus spp.) are generally considered more sensitive to CO₂ than many other commonly cultivated species. They abort readily and show strong morphological responses to elevated gas levels. Growers working with oysters typically err on the side of more aggressive ventilation.

    King oysters (Pleurotus eryngii) and lion’s mane (Hericium erinaceus) are often cited as particularly responsive to gas exchange conditions. Lion’s mane in particular shows clear visual differences between well-ventilated and poorly ventilated conditions — the characteristic “teeth” development is suppressed in high-CO₂ environments, producing a smooth, undifferentiated mass instead.

    Shiitake (Lentinula edodes) has somewhat higher CO₂ tolerance than oysters, particularly during early colonisation, but still benefits from consistent fresh air exchange during fruiting.

    Practical adjustments

    For cultivators experiencing the symptoms described above, the intervention protocol is straightforward.

    Increase air exchange first. If running a passive system, increase hole size or polyfill permeability. If running a manual ventilation routine, increase frequency. If running active ventilation, adjust fan cycling or speed.

    Monitor the response over 3–5 days. Fruiting body morphology should improve within a flush if CO₂ was the primary variable. Pin initiation should accelerate and cap development should normalise.

    If increasing airflow creates humidity loss that the system cannot compensate for, address humidity separately rather than restricting airflow to retain moisture. The two variables require independent management. Linking them — reducing airflow to save humidity — consistently produces worse outcomes than managing each directly.

    Summary

    Airflow in fruiting environments is not a secondary consideration. CO₂ accumulation suppresses pinning, distorts fruiting body morphology, and reduces yield across a range of cultivated species. The physiological basis for this is straightforward: the organism uses atmospheric CO₂ as a signal for its developmental state.

    Managing gas exchange requires understanding the balance between CO₂ removal and humidity retention. These variables are in tension in most small-scale setups, and resolving that tension — through system design rather than compromise — is one of the more meaningful optimisations available to the cultivator.

    Understanding contamination alongside airflow gives a more complete picture of fruiting chamber management. Inadequate gas exchange and contamination pressure often occur together: stalled, stressed pins in a high-CO₂ environment are more vulnerable to bacterial and fungal contamination than healthy, developing fruiting bodies in a well-ventilated chamber. More on contamination identification in our mushroom contamination identification guide.

    Read more: Why Mushroom Fruiting Fails Without Proper Airflow
  • Timing is one of the two most diagnostic variables in contamination analysis. When contamination becomes visible — relative to inoculation — indicates where in the cultivation process something failed. Combined with location, timing narrows the cause to a specific process variable.

    This reference maps contamination timing across three phases to their most probable causes, what to look for, and what to adjust.


    How to use timing as a diagnostic tool

    The logic is straightforward: contamination can only enter through an existing pathway. Those pathways are finite and correspond to specific stages. Sterilisation failure produces evidence early and throughout the substrate. Inoculation contamination produces evidence early at localised points. Physical breach produces evidence mid-colonisation. Environmental and hygiene factors produce evidence at the fruiting stage.

    If the timing is known, the list of probable causes is short.


    Phase 1: Days 0–7 (Early colonisation)

    Pattern A: Widespread contamination across the substrate

    Most probable cause: Sterilisation or pasteurisation failure.

    The substrate contained viable contaminant spores when inoculation occurred. Contaminants that survived the sterilisation process are now colonising at the same time as the desired mycelium, or outcompeting it.

    What to check:

    • Pressure cooker time and pressure (15 PSI, minimum 2.5 hours for grain)
    • Gauge accuracy — gauges drift over time and may read incorrectly
    • Load size — overloaded pressure cookers heat unevenly
    • Container size — large jars require longer sterilisation than smaller ones
    • Substrate moisture content — too dry means uneven heat distribution

    Corrective action: Extend sterilisation time. Verify gauge accuracy with a second gauge. Reduce load size per run. Do not proceed with inoculation until sterilisation variables are confirmed.

    Pattern B: Localised contamination near inoculation points

    Most probable cause: Inoculation contamination — syringe, liquid culture, or grain spawn.

    Contamination introduced directly into the substrate at inoculation, or through the inoculation environment.

    What to check:

    • Syringe or liquid culture quality — test on agar before using on grain
    • Still air box or flow hood condition and technique
    • Needle sterilisation between inoculation points
    • Port seal integrity

    Corrective action: Test inoculum on agar plates before the next run. Review inoculation environment. Flame-sterilise needles between points.


    Phase 2: Days 7–21 (Active colonisation)

    Most probable cause: Physical breach — something entered from outside the growing environment.

    The substrate was clean after inoculation but something created an entry point during the colonisation period.

    What to check:

    • Bag integrity — micro-tears at fold points and along the base
    • Filter patch condition — wet filters lose filtration properties
    • Jar lid and port seal — fully tightened, polyfill packed firmly
    • Condensation drip pathways — condensation from lid or walls dripping onto substrate
    • Contamination at a specific, repeated location across batches — indicates a consistent physical breach at that point

    Corrective action: Inspect containers at the point of contamination. Replace bags or jars with compromised seals. Address condensation pathways. If the same location contaminates across multiple batches, that specific point is the entry.

    Note on timing overlap: Contamination that appears at days 10–14 from sterilisation failure that was minor (not complete failure) can overlap with physical breach timing. Location disambiguates: widespread distribution points back to sterilisation; localised points to breach.


    Phase 3: Fruiting stage (after pinset)

    Pattern A: Surface contamination or cobweb growth during fruiting

    Most probable cause: FAE imbalance — insufficient fresh air exchange, high CO₂, surface humidity accumulation.

    What to check:

    • FAE frequency and duration
    • Surface moisture — water pooling on substrate or pins
    • Condensation drip from lid
    • Internal CO₂ levels (indirect: elongated stems, lack of pinning, aborted pins)

    Corrective action: Increase FAE. Reduce misting. Address lid condensation. [See: Trichoderma vs Cobweb Mold — identifying which is present and how to respond.]

    Pattern B: Contamination on or near pins and fruiting bodies

    Most probable cause: Contact contamination — harvest hygiene, water splash, spent pin material.

    What to check:

    • Harvest technique — gloves, sanitised tools
    • Spent substrate cleared between flushes
    • Misting method — direct misting onto developing pins vs walls and floor of the fruiting chamber

    Corrective action: Remove spent pins and abort sites between flushes. Use gloves for harvest. Avoid direct misting onto fruiting bodies.


    The contamination timing matrix

    PhaseTimingLocationProbable Entry Point
    Early0–7 daysWidespreadSterilisation failure
    Early0–7 daysAt inoculation pointSyringe/spawn contamination
    Mid7–21 daysLocalised surfacePhysical breach
    Mid7–21 daysWidespreadSterilisation (delayed)
    FruitingPost-pinsetSurface/cobwebFAE imbalance
    FruitingPost-pinsetOn pins/fruitContact contamination

    The full contamination pattern recognition matrix — with entry points, corrective actions, and all nine timing/location combinations — is included in the Environmental Calibration Sheet. Get the sheet →


    Using this chart across batches

    A single contaminated batch is a data point. Multiple contaminated batches with consistent timing and location are a pattern — and patterns have identifiable causes.

    Record the following for each batch: date of inoculation, date contamination was first visible, location of contamination, and substrate/spawn source. Three batches with this data is enough to identify a recurring variable.

    [See: Why Your Substrate Keeps Contaminating — systematic approach to recurring contamination.]
    [See: How to Identify Mushroom Contamination — visual identification and full diagnostic framework.]


    The Environmental Calibration Sheet includes the full contamination pattern recognition matrix alongside four other cultivation diagnostic frameworks. Get the sheet →

    Read more: Contamination Timing Chart: What Stage Tells You About Cause
  • Common Monotub Contamination Mistakes

    The monotub is one of the most forgiving cultivation formats for environmental management — large substrate mass buffers temperature and humidity, and the design allows for relatively passive gas exchange. But it is also a format where small setup mistakes compound across a longer colonisation period and produce contamination that is harder to attribute to a single cause.

    Most monotub contamination traces back to one of a small set of repeatable mistakes. This covers the most common ones by phase.


    Setup mistakes

    Substrate too wet. Excess moisture in bulk substrate is the single most common source of monotub contamination. A substrate packed at the wrong moisture level creates anaerobic pockets and supports bacterial growth. The field capacity test: a firmly squeezed handful should release only a few drops. If water streams freely, the substrate is too wet.

    Grain spawn ratio. Standard guidance is 20–30% grain spawn by volume of bulk substrate. Dropping below this ratio extends colonisation time and increases contamination risk proportionally. A higher ratio — towards 30% — is particularly useful in environments with ambient contamination pressure.

    Mixing technique. Not mixing spawn evenly through the substrate means colonisation proceeds unevenly. Pockets of substrate that are colonised later remain vulnerable for longer. Thorough mixing shortens overall colonisation time.


    Hole placement and polyfill

    The holes in a monotub serve two functions: fresh air exchange and humidity buffering. Their placement and fill material affect both contamination risk and fruiting conditions.

    Hole position. Holes positioned too low in the tub allow direct contact between substrate and the outside environment during colonisation. Standard positioning is in the upper third of the tub sides, above the substrate level.

    Polyfill function. Polyfill provides filtration for air entering through the holes. It must be packed firmly enough to function — loose polyfill allows unfiltered air through. Polyfill that becomes wet loses filtration properties.

    Lid management during colonisation. During colonisation, the lid should remain closed or nearly closed to maintain humidity. Excessive FAE during colonisation dries out the surface and can crack the substrate, creating contamination pathways. The lid-crack FAE approach is a fruiting-stage variable, not a colonisation variable.


    Contamination during colonisation

    Healthy colonisation: white, dry mycelium spreading evenly through the substrate, with a clean, slightly earthy smell.

    Green patches indicate Trichoderma. Isolate and discard immediately — do not wait to monitor. [See: Trichoderma vs Cobweb Mold — identification and response.]

    Wet, discoloured patches with a sour smell indicate bacterial contamination, typically tracing to substrate moisture level or sterilisation. [See: Why Your Substrate Keeps Contaminating — sterilisation failure variables.]

    Uneven colonisation with a dry, cracked surface indicates FAE too high during colonisation, or substrate moisture too low. Not contamination itself, but creates entry points.


    Fruiting stage mistakes

    Premature fruiting conditions. Introducing light and increased FAE before the substrate is fully colonised can trigger premature pinning in uncolonised zones. These premature pins typically abort and leave necrotic organic matter on the surface — a contamination substrate.

    Surface moisture management. Monotubs produce significant condensation on the tub walls and lid. When condensation from the lid drips back onto the substrate surface, it creates moisture accumulation that supports contamination. Tilting the lid slightly to direct condensation to the tub sides reduces this pathway.

    Spent pin removal. Aborted pins and spent substrate left on the surface between flushes are the primary vector for fruiting-stage contamination. Remove spent pins and abort sites between flushes, and clean the surface layer with gloved hands or a sanitised tool.

    Misting frequency. Monotubs rarely need direct misting — the large substrate mass retains humidity well. Over-misting pools water on the surface. If the internal walls are visibly wet and the substrate surface looks moist, additional misting is adding moisture, not maintaining it.


    Pattern: contamination appears only in certain areas

    If contamination appears consistently in the same location across runs — the same corner, near a specific hole — that location is the entry point: physical breach, condensation pathway, or insufficient polyfill coverage.

    If contamination appears across the full substrate early in colonisation, the substrate itself or the spawn is the source. [See: How to Identify Mushroom Contamination — timing and location as diagnostic variables.]


    Summary

    Most monotub contamination comes from a short list of causes: substrate moisture too high, insufficient spawn ratio, polyfill failure, lid condensation drip, or spent material not cleared between flushes.

    Identifying which is responsible requires two variables: when the contamination appeared and where it is located. Those two data points, mapped against your process, identify the cause more reliably than any single corrective action applied without diagnosis.


    The Monotub Quick Reference section of the Environmental Calibration Sheet covers hole placement, polyfill function, lid crack as FAE variable, humidity buffering, substrate depth, and contamination isolation. Get the sheet →

    Read more: Common Monotub Contamination Mistakes