• Why Your Substrate Keeps Contaminating

    Contamination that happens once is a loss. Contamination that happens repeatedly across multiple batches is a process problem — and process problems have identifiable causes.

    The mistake most growers make with recurring contamination is treating each batch as an isolated event. They adjust one variable, run another batch, and if it contaminates again, assume they have bad luck or a contaminated environment. The actual cause is usually still there, unchanged, because it was never correctly identified.


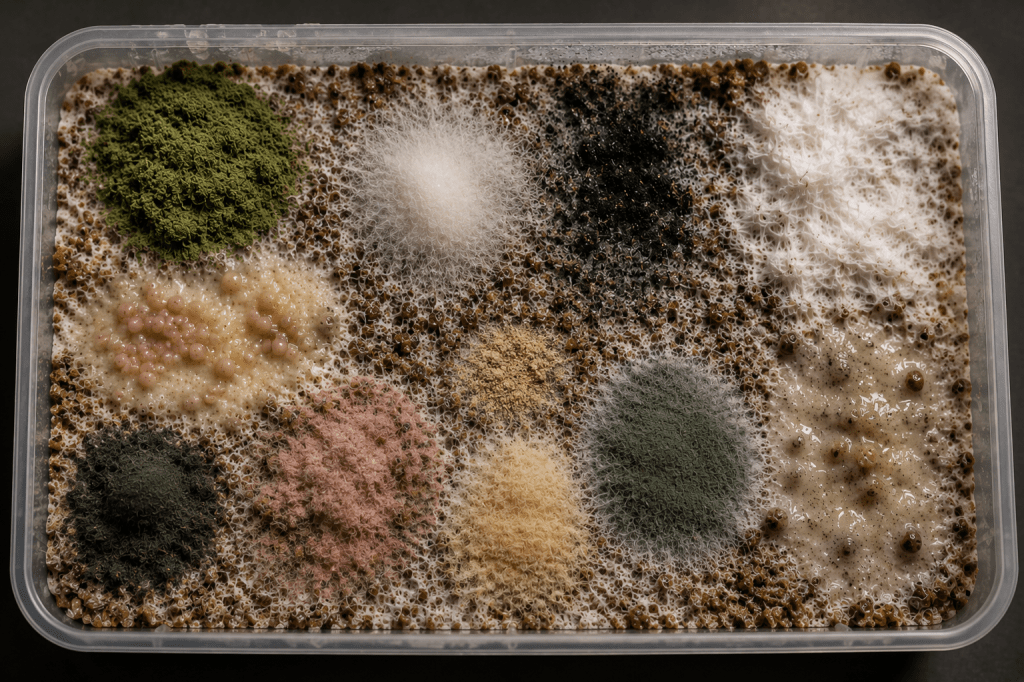
    Stage 1: Sterilisation failures (contamination days 0–7, widespread)

    The most common cause of early, widespread contamination is incomplete sterilisation or pasteurisation. The substrate still contained viable contaminant spores when inoculation occurred.

    The most frequent sterilisation failure is insufficient time at pressure. 15 PSI for 2.5 hours is the standard minimum for grain substrates. Most contamination attributed to “bad luck” in the first week traces back to shorter times, insufficient pressure due to a faulty gauge, or overloading the pressure cooker so heat distribution was uneven.

    Large grain jars (quart-size and above) require longer sterilisation times than smaller containers. The centre of the jar is the last point to reach sterilisation temperature. Substrate that is too dry does not conduct heat evenly — field capacity moisture, where a handful squeezed firmly releases only a few drops, is the target.


    Stage 2: Inoculation failures (contamination days 0–14, localised)

    Contamination that appears in the first two weeks near inoculation points indicates the contamination source was the inoculation process itself.

    A contaminated syringe or liquid culture introduces contaminants directly into the substrate. Signs: contamination appears specifically at or near inoculation points, not distributed across the substrate. Testing liquid culture on agar plates before using it on grain is the standard verification step.

    Inoculation performed in open air exposes the substrate to ambient contaminants. A still air box significantly reduces contamination rates for growers without laminar flow hoods. Contamination rates that are inconsistent — some jars contaminate, others from the same batch do not — typically indicate inoculation environment is the variable.

    A needle that contacts non-sterile surfaces between inoculations transfers contamination. Flame-sterilising the needle between inoculations is standard practice.


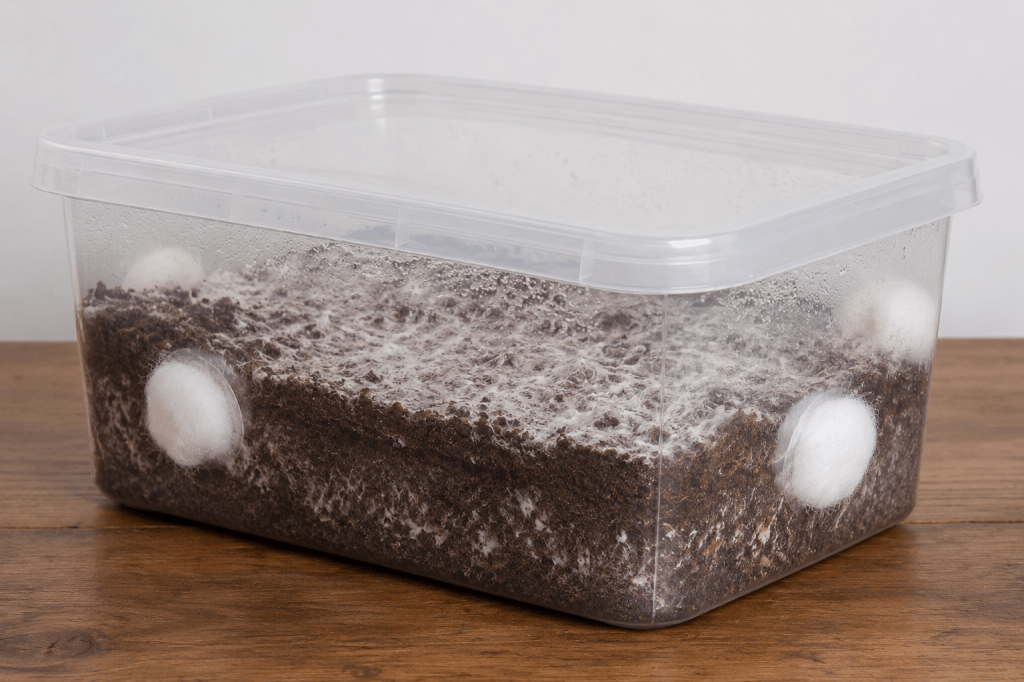
    Stage 3: Physical breach (contamination days 7–21, localised surface)

    Contamination appearing during active colonisation — after the first week but before fruiting — usually indicates something entered from outside the container.

    Grain bags develop micro-tears that are not visible to the naked eye, particularly at fold points and along the base where substrate weight creates stress. A bag that contaminated at the same point on consecutive batches has a structural weak point.

    Filter patch bags are a common point of entry if the filter becomes wet or if the substrate creates a moisture pathway to the filter. Jar lids that are not fully tightened or polyfill ports that are inadequately packed allow air exchange that bypasses filtration.


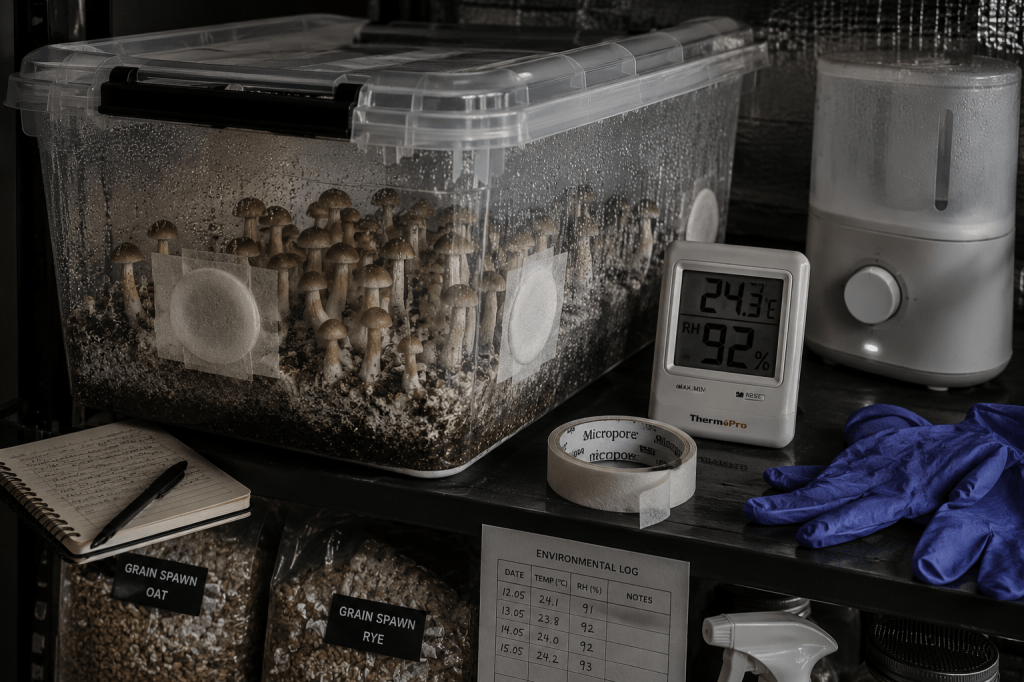
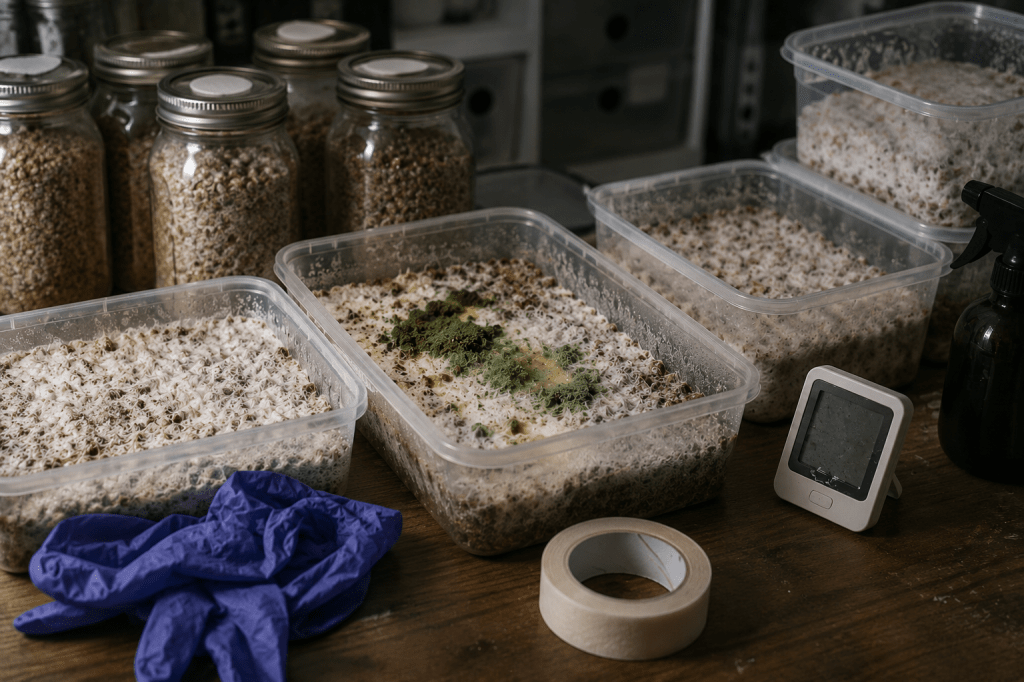
    Stage 4: Fruiting environment (contamination at or after pinset)

    Contamination appearing after pins form involves a different set of variables. The substrate is open to the environment, physical contact occurs, and moisture management shifts.

    Insufficient FAE is the primary driver of late-stage contamination. High CO₂ levels combined with high humidity create conditions that favour Trichoderma and cobweb mould over mushroom development. [See: Trichoderma vs Cobweb Mold — identification and response.]

    Water pooling on the substrate surface or on developing pins is a contamination pathway. Harvesting without gloves, using unwashed tools, or leaving spent substrate on the surface between flushes are consistent sources of fruiting-stage contamination. [See: Common Monotub Contamination Mistakes — fruiting stage variables.]


    Diagnosing recurring contamination systematically

    If contamination is recurring, work through these questions in order:

    1. When does it appear? Days 0–7 → sterilisation. Days 0–14 at inoculation points → inoculation. Days 7–21 → physical breach. Fruiting stage → environment and hygiene.

    2. Where does it appear? Widespread → sterilisation failure. Localised surface → breach or inoculation. At pins or fruit → FAE, moisture, hygiene.

    3. Is the pattern consistent? Same timing, same location across multiple batches points to the same cause. Inconsistent patterns suggest multiple variables or an environmental source.

    4. What changed between a clean run and a contaminated run? Any change in substrate source, sterilisation time, inoculation environment, or container type is a candidate cause.

    The contamination matrix in the Environmental Calibration Sheet provides a printable reference for this diagnostic process — timing and location mapped to entry points and corrective actions. Get the sheet →


    The most common recurring contamination scenario

    The most common pattern: contamination appears in the first week, widespread across the substrate, consistently across batches. The grower has adjusted inoculation technique, changed syringes, and cleaned the growing environment. The contamination continues.

    The cause is almost always sterilisation. The adjustment that resolves it is extending pressure cooking time, verifying pressure gauge accuracy, or reducing load size per run.

    Sterilisation is the step most growers assume is sufficient and the step most frequently responsible for persistent contamination.


    The Environmental Calibration Sheet maps contamination patterns to their entry points across all cultivation phases. Free with newsletter subscription. Get the sheet →

    Read more: Why Your Substrate Keeps Contaminating
  • Trichoderma vs Cobweb Mold: How to Tell the Difference

    Cobweb mould and Trichoderma are the two most common causes of misdiagnosis in mushroom cultivation. They can look similar in early stages — both white, both filamentous — but they are fundamentally different organisms with different implications for the grow.

    Misidentifying Trichoderma as cobweb mould leads to the most costly mistake in cultivation: doing nothing while a batch becomes a total loss.


    What Trichoderma looks like

    Trichoderma is a fast-growing mould that starts white and turns green as it sporulates. In the very early stages — before spore production — it can appear as a white, slightly fuzzy patch that is easy to dismiss or misidentify.

    The green colouration typically develops within 24–48 hours of the white stage. Once visible, it spreads rapidly and produces spores that disperse through the growing environment. This is the point at which a contaminated container becomes a risk to other containers in the same space.

    Key characteristics:

    • Starts white, turns green or blue-green as it matures
    • Dense, compact texture — not loose or web-like
    • Does not collapse when misted
    • Grows in a defined patch that expands outward
    • Strong, musty smell

    What cobweb mould looks like

    Cobweb mould (Cladobotryum and related species) is a naturally occurring fungus that colonises mushroom grows, particularly in high-humidity environments. It is not a contaminant in the same sense as Trichoderma — it does not destroy a batch on its own.

    It appears as a fine, white, web-like growth — loose and irregular, resembling a thin layer of spider’s web across the substrate surface. It spreads across the top of the substrate rather than into it.

    Key characteristics:

    • Fine, loose, web-like texture
    • Collapses visibly when misted — this is the definitive test
    • Spreads across the surface rather than growing in a defined patch
    • Does not produce green colouration
    • Associated with low FAE and high humidity

    The definitive test: misting

    When in doubt, mist the growth lightly and observe. Cobweb mould collapses immediately under moisture. The fine filaments mat down and become nearly invisible. Healthy mycelium and Trichoderma do not collapse.

    This is the single most reliable field test and should be the first response when unidentified white growth appears.


    What each one means for your grow

    If it is cobweb mould:

    Cobweb mould is manageable. It indicates that fresh air exchange is insufficient or humidity is too high. Increase FAE, reduce surface humidity slightly, and mist the affected area to collapse the growth. It typically resolves without further intervention once environmental conditions are corrected.

    It does not require discarding the substrate.

    If it is Trichoderma:

    The batch is a loss. Trichoderma competes aggressively with mushroom mycelium and, once established, cannot be removed. Do not attempt to cut out the contaminated area — the mycelium of the mould extends beyond the visible surface growth.

    Remove the container from the growing environment without opening it. Trichoderma spores spread easily and will colonise other substrates in the same space. Bag the container before removing it if possible.

    After removal, audit the batch against the timing of appearance. [See: How to Identify Mushroom Contamination — using timing and location to find the entry point.]


    Why misidentification is common

    The window during which Trichoderma and cobweb mould look similar is short — typically 12–24 hours — but it is exactly the period at which growers are most likely to decide to monitor rather than act.

    The logic seems reasonable: white growth that resembles mycelium could be healthy. But the misting test resolves the question immediately, and the cost of waiting — a full batch loss plus potential spread to other containers — is high.

    Default to the misting test on any unidentified white growth. The test takes ten seconds.


    Other white growths that cause confusion

    Overlay: Dense, thick white mycelium that forms a continuous layer over the substrate surface, blocking pins. Not contamination — a cultivation variable related to CO₂ levels and humidity. Texture is much denser than cobweb mould and does not have the web-like appearance.

    Aerial mycelium: Healthy mycelium growing upward off the substrate surface. Common in certain conditions. White, filamentous, but grows in a pattern consistent with the mycelium colony — not patchy or irregular.

    Bacterial blotch: Can appear as white or off-white wet patches. Slimy texture distinguishes it from mould growth.


    Summary

    TrichodermaCobweb Mould
    ColourWhite → greenWhite only
    TextureDense, compactFine, web-like
    Misting responseNo changeCollapses
    Spread patternExpanding patchSurface layer
    ActionRemove batchAdjust FAE/RH
    OutcomeBatch lossManageable

    The misting test is definitive. Use it immediately on any unidentified white growth.


    The full Contamination Pattern Recognition matrix — including entry point identification by timing and location — is included in the Environmental Calibration Sheet. Get the sheet →

    Read more: Trichoderma vs Cobweb Mold: How to Tell the Difference
  • How to Identify Mushroom Contamination

    Most growers who lose a batch to contamination describe it the same way: they saw something off, hoped it would resolve, and two days later the substrate was a loss. The failure usually isn’t the contamination itself — it’s not recognising what it is, where it came from, or how early it was detectable.

    This guide covers the visual signs of contamination, how timing and location narrow the diagnosis, and what the pattern is actually telling you about your process.


    What contamination looks like

    Contamination in mushroom cultivation almost always has a visible signature. Colour and texture are the two primary indicators.

    Colour

    Green or blue-green growth is the most common and most recognisable sign. This is typically Trichoderma — a fast-spreading mould that produces characteristic green spores. It spreads quickly and visibly, often appearing as a concentrated patch that expands outward.

    Black or dark grey growth usually indicates Aspergillus or similar moulds. These tend to appear as small, powdery spots.

    Pink or red discolouration is often bacterial contamination — Bacillus species are a frequent cause. Bacterial contamination tends to produce a wet, slimy texture rather than a dry mould surface.

    Yellow or orange patches can indicate several things: certain bacterial contaminants, metabolic byproducts from the mycelium under stress, or early-stage mould. Colour alone is not always conclusive — texture provides the second data point.

    Texture

    Healthy mycelium is white, dry, and branching. Its surface has a fibrous, aerial quality. Contamination typically looks different in one of two ways: either it produces a powdery or fuzzy surface texture distinct from mycelium, or it produces a wet, slimy, or discoloured patch.

    Cobweb mould (Cladobotryum) is a common source of confusion. It resembles healthy mycelium — white, fine, filamentous. The distinguishing characteristic is density and response to humidity: cobweb mould forms loose, irregular webs that collapse visibly when misted. Healthy mycelium does not collapse. [See: Trichoderma vs Cobweb Mold — how to tell the difference.]

    Smell

    Contaminated substrate frequently smells sour, ammonia-like, or like rotting organic matter. Healthy colonising mycelium has a clean, slightly mushroom-like or earthy smell. If a container smells wrong before you open it, that information is diagnostic — trust it.


    Timing as a diagnostic variable

    When the contamination appears matters as much as what it looks like. Timing narrows down the probable entry point significantly.

    Day 0–7 after inoculation

    Contamination appearing in the first week almost always points to one of two causes: the sterilisation or pasteurisation process failed, or the inoculation itself introduced contaminants.

    Widespread contamination across the substrate in the first week is particularly indicative of sterilisation failure — the substrate was not fully sterilised before inoculation, and contaminants that survived are now competing with the mycelium. This is not bad luck. It is a process variable.

    Localised contamination in the first week, particularly near the inoculation point, points to the inoculation process: a contaminated syringe, liquid culture, or grain spawn.

    Day 7–21

    Contamination appearing during active colonisation usually indicates a physical breach — a small tear in a bag, a gap in a lid, a poorly-sealed port. Condensation dripping onto the substrate surface from an unsterile source is another common cause at this stage.

    Fruiting stage

    Contamination appearing after pins form typically involves different variables: inadequate fresh air exchange, surface moisture accumulation, or hygiene during harvest. At the fruiting stage, the substrate is more vulnerable — the canopy is broken, moisture is actively managed, and physical contact occurs. [See: Common Monotub Contamination Mistakes for fruiting-stage specific failures.]


    Location as a diagnostic variable

    Where contamination appears provides a second axis of diagnosis.

    Localised surface spots

    A single spot or a small cluster on the surface points to a localised entry — an inoculation point, a physical breach, a condensation drip. The contamination hasn’t spread from a widespread source; something entered at that specific point.

    Widespread across the substrate

    Contamination distributed throughout the substrate, or appearing in multiple disconnected locations simultaneously, is a stronger indicator of sterilisation failure. The contamination was already present in the substrate when inoculation occurred.

    At or near pins and fruiting bodies

    Contamination concentrated at developing pins or on the surface of fruiting bodies indicates post-colonisation entry. FAE management, surface humidity, and harvest hygiene are the primary variables here.


    The timing × location matrix

    Combining these two variables — timing and location — produces a reliable diagnostic framework. The contamination pattern matrix maps nine combinations of timing (early / mid / fruiting) and location (surface / widespread / pins and fruit) to their most probable entry points and corrective actions.

    The full matrix is included in the Environmental Calibration Sheet, a printable reference that consolidates this and four other diagnostic frameworks on a single page. [Get the Environmental Calibration Sheet →]


    What to do when you find it

    Isolate immediately. A contaminated container should be removed from the growing environment without opening it. Trichoderma in particular produces spores that disperse easily and can colonise other containers in the same space.

    Diagnose before discarding. Before binning the substrate, look at it. When did contamination appear? Where is it located? Is it widespread or localised? This information directly informs what to adjust in your next run. A contaminated batch you learn nothing from is wasted twice.

    Do not try to salvage. At the first sign of green mould, the batch is a loss. Removing visible contamination does not remove the underlying mycelium of the contaminant — it will return.

    Audit your process against the timing. [See: Why Your Substrate Keeps Contaminating — a systematic look at process variables by contamination stage.]


    Recurring contamination

    If contamination is appearing consistently across multiple batches, it is not random. Recurring contamination has a cause that is repeatable — which means it also has a fix that is findable.

    The most common sources of recurring contamination are: inadequate sterilisation time or pressure, contaminated spawn or inoculation tools, and physical breaches in the growing environment that are not being identified or addressed.

    [See: Why Your Substrate Keeps Contaminating — process variables behind recurring failures.]
    [See: Contamination Timing Chart — batch-level diagnostic reference.]


    Summary

    Identifying contamination accurately requires three data points: what it looks like (colour and texture), when it appeared (timing relative to inoculation), and where it appeared (location in or on the substrate).

    Each combination points toward a specific failure mode in the cultivation process. Contamination is not random — it is a pattern with an entry point. Identifying that entry point is how batches improve over time.


    The Environmental Calibration Sheet includes the full Contamination Pattern Recognition matrix alongside four additional diagnostic frameworks. Free with newsletter subscription. Get the sheet →

    Read more: How to Identify Mushroom Contamination
  • Small Apartment Mushroom Setup: Growing Without a Dedicated Grow Room

    Most mushroom cultivation guides assume you have a spare room, a closet you can dedicate to growing, or at minimum some tolerance for a visible setup. If you’re in a small apartment — renting, short on space, or sharing with others who don’t want mushrooms colonizing the living room — the calculus is different. This guide covers how to run a functional, compact, low-footprint grow in an apartment context without compromising results.

    The Core Constraint: Space vs. Environment

    Small apartment grows are fundamentally an optimization problem. You’re trading some yield potential and batch size for discretion and space efficiency. The good news: the biology doesn’t care about your floor plan. A well-managed small tub in a wardrobe corner will outperform a neglected large setup every time.

    The two variables that apartment constraints affect most are fresh air exchange (FAE) and humidity management. In a dedicated grow room you can dial in ambient conditions with equipment. In an apartment, you’re working with ambient room conditions and compensating with your container design. Understanding this difference is what makes small setups succeed or fail.

    Choosing the Right Setup Size

    For apartment grows, the realistic options by footprint are:

    • Mini monotub (6–15L): A small clear storage box with polyfill holes. Fits on a shelf, inside a wardrobe, or under a desk. Produces modest yields but requires minimal space and is easily hidden. Best for growers who want a low-commitment first grow.
    • Standard monotub (50–66L): The most common apartment setup. Fits inside a wardrobe or on a large shelf. Requires about 40–50 cm of depth and 60–70 cm of width. Produces enough for personal use from 2–3 flushes.
    • Martha tent (small): A compact greenhouse tent (60×60×140 cm) with an ultrasonic humidifier and small fan. Produces more than a monotub but requires a corner of a room and visible equipment. Less discreet, more controllable.

    For most apartment growers, a standard monotub inside a wardrobe is the best balance of yield, discretion, and simplicity. The wardrobe provides darkness during colonization, some thermal buffering, and keeps the setup out of sight.

    Temperature Management Without a Dedicated Space

    Apartments in Europe tend to run 18–23°C during the winter heating season and fluctuate more during summer. This range works reasonably well for cultivation, but the challenge is consistency. Mycelium is tolerant of temperature variation in short windows but stalls or stresses if temperature swings beyond 5°C within a single day.

    Practical strategies for apartment temperature management:

    • Inside a wardrobe or cabinet: The enclosed space buffers against rapid ambient temperature changes. Even a thin wardrobe with a closed door maintains a more stable microclimate than open shelving.
    • Near an interior wall: Interior walls in apartments hold heat more evenly than exterior walls, which can cool rapidly overnight. Placing your tub against an interior wall reduces temperature variation.
    • Small seedling heat mat (under the tub, off during fruiting): A low-wattage heat mat can raise colonization temperatures 2–5°C above ambient. This is especially useful in cooler months. Remove or turn off during the fruiting phase — you want a slight temperature drop to trigger pins.

    Avoid placing the tub near windows in summer or near cold exterior walls in winter. Both create the kind of temperature extremes that stress mycelium and open windows for contamination.

    Humidity in an Apartment Context

    Apartments in Northern and Central Europe often run 35–55% ambient relative humidity, which is lower than what fruiting mushrooms prefer (80–95%). This doesn’t mean you need a humidifier — it means your fruiting chamber design needs to compensate.

    For a monotub: the bulk substrate itself is a massive humidity reservoir. A properly hydrated 10-liter substrate block releases moisture slowly throughout colonization. The tub design (lid on, polyfill holes) maintains high internal humidity without any active humidification during colonization. During fruiting, misting the walls of the tub 1–2 times daily — not directly onto the mycelium surface — maintains the surface moisture pins require.

    If your apartment is particularly dry (below 35% RH, common in winter with central heating), consider placing a small open container of water near the tub — not inside it — to raise ambient humidity in the surrounding microclimate. A wardrobe with a glass of water inside runs noticeably higher ambient humidity than an open room.

    Tracking ambient humidity helps you understand when to mist more or less. A basic digital hygrometer placed near (not inside) the tub gives you actionable data. For model comparisons and placement strategy, see our guide to mushroom hygrometers.

    Fresh Air Exchange Without a Ventilation System

    FAE is the variable apartment growers most frequently underestimate. In a dedicated grow room, a small inline fan and carbon filter handle CO₂ continuously. In an apartment, you’re doing this manually — and that’s fine, as long as you do it consistently.

    For a monotub, passive FAE through polyfill holes handles CO₂ during colonization. During fruiting, fanning the open tub for 30–60 seconds, once or twice a day, drops CO₂ sufficiently to maintain pinning. Use a clean hand or a small battery-powered fan held at tub distance — not a full-size room fan pointed directly into the tub, which desiccates the surface.

    If you’re in a small apartment with low ceiling height or limited ventilation, open a window briefly while fanning to refresh room air before introducing it to the tub. This helps ensure you’re not recirculating stale air with elevated CO₂ from your own respiration. In a bedroom, fanning after you’ve been out for a few hours gives the room air a chance to equilibrate.

    Contamination Risk in Shared Living

    Apartments, especially shared ones, have higher baseline contamination pressure than dedicated grow spaces. Kitchen activity, cooking steam, and general foot traffic all introduce airborne spores and mold pressure into the environment. This doesn’t make growing impossible, but it does mean certain practices matter more.

    • Don’t open the tub in the kitchen. Kitchens have the highest airborne contamination load in most homes. Do any tub inspection or fanning away from cooking areas.
    • Time your inoculations for when the apartment is calm. Less foot traffic, less ambient contamination. Early mornings before cooking or late evenings work well.
    • Wipe down the wardrobe interior with isopropyl before starting a grow. Dust and organic material that accumulates in enclosed spaces can harbor competitor molds. A quick wipedown before introducing your tub reduces baseline contamination pressure.
    • Keep colonization sealed. The single most important contamination prevention step is simply not opening the tub during colonization. The polyfill holes handle FAE; you don’t need to open the lid to check on it.

    For a full breakdown of the environmental mistakes that lead to contamination, see Why Most Beginner Mushroom Grows Fail.

    Realistic Yield Expectations

    A well-run standard monotub (66L) in an apartment produces 20–60g dry per flush, with 2–3 viable flushes. That’s 40–180g dry per complete grow cycle, which for most personal-use growers is more than adequate. A mini monotub (10–15L) produces roughly a quarter of that.

    These numbers assume optimal substrate hydration, healthy grain spawn, and consistent environmental management. Beginners often see lower yields on their first grow — less from the equipment and more from learning the FAE and misting rhythm. The second grow consistently outperforms the first once those rhythms are established.

    For a complete walkthrough of environment setup and equipment selection that applies directly to apartment grows, see Beginner Indoor Mushroom Cultivation. For monotub-specific setup instructions, Monotub Setup Explained covers every step.


    Continue Reading

    Read more: Small Apartment Mushroom Setup: Growing Without a Dedicated Grow Room
  • Mushroom Growth Stages: What’s Actually Happening at Each Phase

    Mushroom cultivation is often described as a waiting game, but what you’re actually waiting for is a precise sequence of biological events. Understanding what’s happening at each growth stage — and what conditions trigger the transition between them — is what separates growers who consistently fruit from those who stall out mid-cycle. This guide covers every major stage, from spore germination through the final flush.

    Stage 1: Spore Germination

    Everything begins with a spore — a microscopic, single-celled reproductive unit encased in a protective coat. When conditions are right (adequate moisture, warmth, and a compatible substrate), the spore absorbs water and germinates, extending a thin tube of cells called a germ tube. This is the biological starting point of the entire grow.

    For cultivated species like Psilocybe cubensis, germination typically occurs within 12–24 hours under ideal conditions (25–28°C, high humidity, dark environment). Spore-to-grain inoculation — where a spore syringe is injected into a sterilized grain medium — is the most common method for home cultivators. The grain provides both a sterile inoculation target and the initial nutritional base for early mycelium.

    Germination rates vary by spore age, storage conditions, and inoculation volume. Fresh spores from a reliable vendor, stored at refrigerator temperature, should germinate reliably. Spores older than 12–18 months or stored improperly may show dramatically reduced germination rates.

    Stage 2: Mycelium Colonization

    Once germination begins, the germ tube branches and extends into a network of thread-like structures called hyphae. The collective mass of these hyphae is the mycelium — the vegetative body of the fungus, analogous to roots in a plant. Mycelium grows by secreting enzymes that break down surrounding organic matter into absorbable nutrients.

    During colonization, the mycelium works outward from each inoculation point, digesting substrate and expanding in all directions. In a grain jar, this appears as white, fluffy growth spreading through the grain over 7–14 days. In a bulk substrate (coco coir/vermiculite mix), visible mycelium spreads across the surface and through the interior over 10–18 days.

    Two distinct mycelium growth patterns appear during this stage:

    • Tomentose mycelium: Fluffy, cotton-like growth. Most common during early colonization and considered healthy, though it doesn’t always pin readily.
    • Rhizomorphic mycelium: Rope-like, stranded growth with a more structured appearance. Generally associated with stronger pinning potential. Develops as the mycelium matures and prepares for fruiting.

    The transition from tomentose to rhizomorphic growth is not universal — it depends on genetics, substrate composition, and CO₂ levels. Some strains stay predominantly tomentose throughout and still fruit well. The key metric is full colonization, not growth pattern.

    Stage 3: Consolidation

    After the surface of the substrate is fully colonized with white mycelium, experienced growers often wait an additional 3–7 days before initiating fruiting. This consolidation period allows the mycelium to fully penetrate the substrate interior, strengthen its hyphal network, and accumulate metabolic reserves.

    Signs of consolidation: the mycelium surface may take on a denser, more mat-like appearance. Some growers observe patches of yellowish secretion on the surface — this is metabolic exudate (sometimes called “mycelium sweat”) and is a normal sign of a healthy, active mycelial network preparing for fruiting. This secretion is not contamination.

    Rushing from full colonization to fruiting without allowing this consolidation phase often results in smaller pins, fewer pins, or uneven fruiting across the substrate surface.

    Stage 4: Pinning (Primordia Formation)

    Pinning is the most visually dramatic stage — and the most sensitive. Pins (primordia) are the earliest stage of fruiting body development: tiny, white nodules that emerge from the substrate surface in response to environmental cues. This is where most beginner grows either succeed or stall.

    The key triggers for pinning are:

    • CO₂ reduction: Elevated CO₂ suppresses pinning. Introducing fresh air exchange (through fanning) drops CO₂ and signals to the mycelium that surface conditions are favorable for reproduction.
    • Temperature drop: A modest reduction from colonization temperature (dropping from 24°C to 20°C, for example) mimics the transition from soil warmth to cooler surface air — a natural fruiting cue.
    • Light exposure: Mushrooms don’t photosynthesize, but they do use light as a directional cue. Indirect light for 8–12 hours per day helps orient pin development and can improve pinset density.
    • High surface humidity: The surface must remain moist throughout. Pins form on the mycelium surface and will abort if the outer layer desiccates.

    Primordia first appear as small white dots or bumps on the substrate surface. Within 24–48 hours of initiation, these develop into recognizable pin shapes with distinct caps and stipes. The density of the pinset — how many pins form — depends on genetics, substrate quality, and how cleanly the environmental cues were introduced.

    Stage 5: Fruiting Body Development (Maturation)

    Once pinned, fruiting bodies grow rapidly. A pin can develop into a mature mushroom in as little as 3–5 days under optimal conditions. During this phase, the stipe (stem) elongates and the cap (pileus) expands. Inside the cap, gills develop — the spore-producing surface that gives the mushroom its characteristic fan-like internal structure.

    The cap begins as a tight, hemispherical shape with a protective membrane — the veil — stretched between the cap edge and the stipe. As the cap expands, the veil stretches. Most cultivators harvest just before or as the veil begins to tear. At this point, potency is at or near peak and spore drop has not yet begun.

    Maintaining stable humidity during maturation is critical. Fluctuations cause caps to crack or develop irregular surfaces. Misting the walls of the fruiting chamber (rather than directly onto the mushrooms) keeps ambient humidity high without waterlogging the developing caps.

    Stage 6: Harvest

    Harvest timing matters more than most beginners realize. The optimal window is just before veil break — when the cap is still convex and the membrane between the cap edge and stem is intact but beginning to show tension. At this stage, the mushroom has reached maximum size and potency without releasing spores.

    To harvest, twist and pull gently at the base of the stipe — don’t cut, as this leaves a stump that can rot and introduce contamination into the substrate before the next flush. After the first flush, remove any aborts (small pins that stopped developing) from the surface as well. These can also rot and carry bacteria or competing molds into subsequent flushes.

    Stage 7: Rehydration and Subsequent Flushes

    After harvest, the substrate has given up significant moisture through evaporation and into the fruiting bodies themselves. Before pinning will reliably occur again, the substrate needs to be rehydrated. This is done through a process called dunking: submerging the entire substrate block in cold water for 4–12 hours to allow it to absorb moisture back to near field capacity.

    After dunking, re-expose the substrate to fruiting conditions — lower CO₂, light, moderate temperature — and a second pinset will typically emerge within 5–10 days. Most substrates support 2–3 strong flushes before yields drop significantly. After the third flush, nutritional reserves are largely depleted and the risk of contamination increases.

    Understanding the growth cycle end-to-end is what allows you to diagnose problems in real time. If pins aren’t forming after full colonization, the answer is almost always in the environmental variables covered above — CO₂, humidity, or temperature. For a deeper look at why these grows fail and how to fix them, see Why Most Beginner Mushroom Grows Fail. For complete equipment and environment setup guidance, Beginner Indoor Mushroom Cultivation walks through the full system.


    Continue Reading

    Read more: Mushroom Growth Stages: What’s Actually Happening at Each Phase
  • Monotub Setup Explained: A Beginner’s Complete Guide

    The monotub is the single most popular cultivation method for home growers — and for good reason. It scales well, requires minimal intervention once set up, and produces reliable flushes without advanced sterile technique. But most beginners either overbuild it or underthink it. This guide covers the actual mechanics: what a monotub is, how to set one up correctly, and which variables actually matter.

    What Is a Monotub?

    A monotub is a large, lidded plastic storage container used as a self-contained fruiting chamber. The core idea: mix colonized grain spawn with a bulk substrate (usually coco coir and vermiculite), load it into the tub, and let the mycelium finish colonizing in a semi-controlled environment before triggering fruiting conditions.

    Unlike PF tek jars that need to be birthed and placed in a separate fruiting chamber, the monotub is an all-in-one system. The tub itself is both the colonization vessel and the fruiting chamber. That simplicity is why it works so well for beginners dealing with limited space or equipment.

    Why Monotubs Work for Beginners

    Most beginner failures happen at the fruiting stage — not because the mycelium is weak, but because the environment is wrong. Temperature swings, inadequate fresh air exchange, or improper humidity all compound into failed pins or aborts. The monotub addresses this by creating a stable microclimate with a large substrate mass that buffers against external fluctuations.

    A larger substrate volume also means more nutritional reserves, which translates to heavier and more consistent flushes compared to small PF tek cakes. For most growers, a single monotub outperforms a dozen small cakes with far less active management.

    The monotub works because it removes you from the equation. Once environment is dialed in, mycelium does the rest.

    What You Need to Build a Monotub

    The Container

    Use a clear or translucent plastic storage tub — 50 to 110 liters depending on your ambitions. Ikea Samla and Sterilite tubs are commonly used in Europe due to their tight-fitting lids. Avoid tubs with opaque walls; you need to monitor mycelium growth and contamination without opening the lid.

    Drill or cut four to six holes (roughly 5 cm in diameter) along the upper sides of the tub — two per long wall, one per short wall. These will be stuffed with polyfill for passive fresh air exchange (FAE). Placement matters: holes too low let CO₂ pool at substrate level; holes too high reduce surface-level air movement.

    Bulk Substrate

    The standard bulk substrate for monotubs is a 50/50 mix of coco coir and coarse vermiculite, hydrated to field capacity. Field capacity means the substrate holds moisture without water dripping when squeezed firmly in your fist. This ratio creates a substrate that retains humidity, has good structure for pinning, and resists contamination through high water activity and pH.

    For a 66-liter tub, plan on roughly 8–10 liters of dry coco coir brick expanded with hot water, mixed with an equal volume of coarse vermiculite. Pasteurize the mix (not sterilize) by bringing it to 70–82°C for 1–2 hours — this kills competitor molds while leaving beneficial microbial communities that help suppress contaminants.

    Grain Spawn

    Grain spawn is colonized grain — rye berries, wheat berries, or oats — fully run with mycelium. You can buy colonized grain jars from reputable vendors, or produce your own if you have the sterile technique for it. For a 66-liter tub, 2–3 liters of grain spawn is the typical inoculation rate (roughly a 1:3 to 1:5 spawn-to-substrate ratio).

    Higher spawn rates colonize faster and reduce contamination risk but increase cost. Lower spawn rates stretch your spawn further but extend the colonization window. For beginners, err toward higher spawn ratios.

    Polyfill for FAE

    Polyfill stuffed into the tub holes provides passive fresh air exchange — it allows CO₂ to diffuse out and O₂ to enter while blocking particulates that carry contamination. Use the same polyester fiber found in craft stores or pillow stuffing. Pack it firmly enough to resist insects and drafts, but not so tightly that airflow is blocked entirely.

    Step-by-Step Monotub Setup

    1. Prepare the tub. Drill FAE holes, wipe interior surfaces with isopropyl alcohol (70%), and let dry completely.
    2. Hydrate and pasteurize your bulk substrate. Mix coco coir and vermiculite, add boiling water to field capacity, cover, and let cool to room temperature (12–18 hours).
    3. Mix spawn into substrate. In a clean environment, break up grain spawn and mix thoroughly into the cooled substrate. Distribute evenly to reduce colonization time and hotspots.
    4. Load the tub. Pour the spawn/substrate mix in, level it to a depth of 7–10 cm. Avoid packing it down — loose structure promotes pinning.
    5. Colonize in darkness. Seal the lid, stuff polyfill in the holes, and leave in a dark space at 21–24°C. Check through the tub walls for signs of contamination. Do not open the lid during colonization.
    6. Trigger fruiting. Once the surface is fully covered in white mycelium (10–18 days typically), introduce fruiting conditions: drop temperature to 18–21°C, increase indirect light (12 hours/day), and fan briefly once or twice daily.

    Humidity and FAE: The Most Misunderstood Variables

    Most beginner guides say “keep humidity at 90–95%” without explaining why, or how, or when this actually matters. During colonization, humidity within a sealed tub is naturally high — the substrate holds moisture and the lid traps it. You don’t need to spray or mist during this phase. Opening the lid during colonization introduces contamination risk with essentially zero benefit.

    During fruiting, pins form in response to high surface humidity, a drop in CO₂ (from fanning), and light cues. The surface should never dry out — it should look visibly moist but not pooled with standing water. If the surface is cracking or lightening in color, mist lightly and fan immediately after.

    FAE matters more than most beginners realize. Elevated CO₂ suppresses pinning and promotes leggy aerial mycelium. Fanning the tub once or twice a day — just 30–60 seconds — drops CO₂ and cues the mycelium to fruit. Without this, many tubs stall at the rhizomorphic growth stage without ever pinning. For accurate monitoring, see our guide to choosing a mushroom hygrometer.

    Common Monotub Mistakes

    • Opening the lid too often during colonization. Every time you open it, you introduce unfiltered air. The polyfill holes exist precisely so you don’t need to.
    • Substrate too wet. Water pooling at the bottom creates anaerobic zones where bacterial contamination thrives. Always test field capacity before loading.
    • No FAE holes, or holes that are blocked. A completely sealed tub leads to CO₂ buildup, which stalls colonization and prevents pinning.
    • Temperature too high. Above 26°C, contamination species gain competitive advantage. Keep colonization temperatures moderate.
    • Harvesting too late. Caps that have fully opened and begun dropping spores are past peak potency and affect subsequent flushes. Harvest just before or as the veil breaks.

    For a broader look at environmental mistakes that derail beginner grows, see Why Most Beginner Mushroom Grows Fail. If you’re comparing cultivation methods, Indoor Mushroom Cultivation Systems covers the full range of options.


    Continue Reading

    Read more: Monotub Setup Explained: A Beginner’s Complete Guide
  • Best Hygrometer for Mushroom Cultivation: What the Specs Actually Mean

    Humidity is the single most commonly mismanaged variable in indoor mushroom cultivation. Most beginners mist on a schedule, estimate by feel, and adjust based on how the substrate looks. The result is a system operating blind — humidity swings that cause pinning failures, surface contamination, and aborts that get attributed to bad luck or genetics.

    A calibrated hygrometer doesn’t fix these problems on its own. But it removes the guesswork from a variable that is genuinely measurable and controllable. This guide covers what to look for in a hygrometer for cultivation use, where cheaper sensors fail, and which specific options make sense across different setup scales.

    Why accuracy ratings matter more than price

    Most hygrometers sold under €15 advertise ±3–5% RH accuracy. In a fruiting chamber targeting 88–92% RH, that means a displayed reading of 90% could reflect an actual environment anywhere from 85% to 95%. That’s the difference between healthy primordia development and the onset of bacterial blotch.

    The high-humidity range that mushroom cultivation requires — 85–95% RH — is also outside the calibrated range of many budget sensors. Hardware store hygrometers are typically rated for 30–70% RH. They drift significantly over weeks of exposure to fruiting chamber conditions, and the drift is not consistent or predictable.

    Key specs to evaluate before buying:

    Accuracy: Look for ±2% RH or better for cultivation use. Sensors rated ±3% are workable for monitoring trends; sensors rated ±5% introduce too much uncertainty at the margins of the target range.

    RH operating range: Confirm the sensor is rated to operate accurately at high humidity. Some lower-cost sensors specify accuracy only up to 85% RH — they still display a number above that threshold, but the number is unreliable.

    Response time: How quickly the sensor updates when humidity changes. Most sensors update every 10–60 seconds. Faster response is more useful for active management; slower response is adequate for monitoring stable environments.

    Data logging: Logging models record timestamped readings over hours or days. This is substantially more useful for diagnosing environmental instability than a single current reading — humidity dips at 3am are invisible without a log.

    Sensor calibration and field verification

    No hygrometer should be trusted out of the box without verification. The standard field method: place two sensors in the same closed environment for 30 minutes. If they agree within ±2%, both are within spec. If they diverge by more than 3%, at least one is off — run the test with a third sensor to identify which.

    A saturated sodium chloride salt solution produces 75% RH at equilibrium at room temperature — a useful fixed reference point for calibration. Detailed calibration procedure and a printable reference card are in the cultivation calibration sheet.

    For setups running multiple fruiting chambers, calibration across sensors matters: if one sensor reads 3% higher than another, the environmental management decisions for each chamber are based on incomparable data.

    Entry-level options (under €20)

    Govee H5075 — consistently performs within ±3% in independent testing at high humidity. Bluetooth connectivity, 20-day app logging with min/max records. Widely available across Europe. Around €12–15. The most commonly recommended entry-level option for cultivation use.

    Inkbird IBS-TH2 — Bluetooth-enabled, Home Assistant compatible for those running home automation. Slightly lower accuracy consistency than Govee at high RH in independent comparisons, but adequate for single-container setups. Around €8–12.

    ThermoPro TP49 — basic standalone, no wireless, displays current/min/max. No app required. ±3% RH rated accuracy. Around €8–10. Suitable as a second sensor for cross-verification or for cultivators who do not want app dependency.

    Mid-range: logging and higher accuracy (€20–60)

    ThermoPro TP357 — ±2% RH rating, large backlit display, magnetic back for container mounting. Around €20. The clearest step up from entry-level for cultivators who do not need wireless connectivity.

    Govee H5179 — WiFi connectivity without a gateway, app alerts when RH drops below a set threshold. Useful for tent setups where passive monitoring is impractical. Around €25–35.

    SensorPush HT1 — performs closer to ±2% RH across the full high-humidity range in independent testing. Bluetooth with optional WiFi gateway. 20-day logging at 1-minute intervals, CSV export. Around €45–55. The most analytically useful option in this price range for cultivators who want to diagnose instability patterns.

    Which hygrometer for which setup

    SetupRecommendedWhy
    Single tub, no logging neededThermoPro TP49Reliable baseline, no app required
    Single tub, want loggingGovee H5075Bluetooth + app logging at low cost
    Multi-tub or tent, remote alertsGovee H5179WiFi alerts, no gateway needed
    Serious setup, data analysisSensorPush HT1Best accuracy + CSV export in mid range

    Placement and interpretation

    Where the sensor is placed determines what it measures. A sensor mounted on the wall of a fruiting chamber reports wall-level humidity, which may differ from humidity at the substrate surface by several percentage points depending on airflow and temperature gradients.

    For most monotub setups, placing the sensor at mid-height inside the container gives a representative reading. For grow tent setups running multiple blocks, a second sensor at fruiting block height confirms the environment where it matters — the controller sensor mounted higher may not reflect conditions at block level if circulation is uneven. This is covered in more detail in the grow tent airflow setup guide.

    Hygrometer readings are most useful interpreted alongside airflow behaviour. A reading of 87% in a setup running continuous exhaust has a different implication than 87% in a passive monotub — in the first case, the system may be losing humidity faster than it can be restored; in the second, 87% may represent equilibrium. The relationship between humidity and airflow is discussed in the fruiting chamber humidity loss diagnostic and the passive humidity management guide.

    Frequently asked questions

    What humidity level should I target for mushroom fruiting?

    Most commonly cultivated species require 85–95% RH during fruiting. Below 80%, primordia development slows significantly. Above 98% with inadequate airflow, surface condensation accumulates and creates conditions for bacterial contamination. Species-specific tolerances vary — lion’s mane is particularly sensitive to humidity drops during fruiting body development.

    How do I know if my hygrometer is accurate?

    Cross-reference two sensors in the same environment for 30 minutes. If they agree within ±2%, both are within spec. The saturated salt calibration method (sodium chloride = 75% RH at equilibrium) provides a fixed reference point. Full procedure in the calibration sheet.

    Do I need a hygrometer with data logging?

    For diagnosing instability, yes. A current reading tells you the environment now; a log tells you what happened between checks. If fruiting performance is inconsistent and the current reading looks fine, a humidity log often reveals the cause — drops during ventilation cycles, overnight desiccation, or post-harvest recovery failure.

    Related guides

    Read more: Best Hygrometer for Mushroom Cultivation: What the Specs Actually Mean
  • What Current Research Suggests About Psilocybin, Meditation, and Cognitive Flexibility

    Recent neuroscience research has increasingly explored how altered states may affect cognition, emotional processing, and cognitive flexibility. Among the most discussed areas is the interaction between psilocybin and mindfulness practices.

    While research remains early-stage, several studies suggest that mindfulness-based practices may influence how participants interpret and process altered cognitive states. Rather than framing psilocybin as a shortcut to insight, researchers are increasingly examining how context, attention, and emotional regulation shape subjective experiences.


    The Default Mode Network: A Common Reference Point

    Much of the current neuroscience discussion around psilocybin centres on the default mode network (DMN) — a set of brain regions active during self-referential thought, mind-wandering, rumination, and the construction of what researchers sometimes call the “narrative self.”

    Several neuroimaging studies, including work published by Robin Carhart-Harris and colleagues at Imperial College London, have documented that psilocybin significantly reduces activity and functional connectivity within the DMN. This reduction correlates with subjective reports of ego dissolution and altered self-perception in study participants.

    Independently, research on experienced meditators has found that long-term meditation practice is associated with reduced DMN activity and improved capacity to disengage from self-referential processing. Practitioners of mindfulness-based techniques show measurable differences in DMN connectivity compared to non-meditators, though the magnitude of these effects varies considerably across studies.

    The overlap between these two lines of research — both pointing to DMN modulation through different mechanisms — has generated significant interest. However, correlation in effect profile does not imply shared mechanism, and researchers have cautioned against conflating functionally similar outcomes with equivalent underlying processes.


    Psilocybin and Neuroplasticity: What the Research Actually Shows

    A 2021 study published in Neuron by researchers at Yale University found that psilocybin promoted structural and functional neural plasticity in animal models — specifically, increases in dendritic spine density and synaptic plasticity markers following a single administration. The researchers proposed that this transient increase in neuroplasticity might partially explain the sustained changes in cognition and mood reported in some human trials.

    This research has been widely cited in popular coverage, sometimes in terms that significantly outpace the evidence. Important caveats apply: animal studies do not directly translate to human outcomes; the mechanisms underlying observed structural changes are not fully understood; and the relationship between dendritic spine density and subjective cognitive experience remains an area of active investigation rather than established science.

    Human neuroimaging research on psilocybin has found evidence of increased global functional connectivity — meaning that brain regions that do not typically communicate strongly show increased correlation in activity during psilocybin states. Some researchers have proposed that this increased connectivity may underlie the cross-modal and associative thinking patterns commonly reported during psilocybin experiences. Whether these connectivity changes persist meaningfully beyond the acute period, and under what conditions, remains an open empirical question.


    Cognitive Flexibility: Definitions and Research Context

    Cognitive flexibility — the capacity to shift between different concepts, perspectives, or mental frameworks — is a construct studied extensively in cognitive psychology and neuroscience. It is typically measured through tasks requiring category switching, reversal learning, or set-shifting under controlled laboratory conditions.

    A 2020 study published in Psychopharmacology examined cognitive flexibility outcomes following psilocybin administration in healthy participants. The study found improvements in some measures of cognitive flexibility compared to placebo conditions, though effect sizes were modest and the researchers noted significant individual variability. The authors highlighted the need for larger, pre-registered replication studies before conclusions could be drawn about reliable effects.

    Mindfulness practice has a somewhat more established literature on cognitive flexibility. Meta-analyses of mindfulness-based intervention research — including a 2018 review in Psychological Bulletin — have found moderate effects on attentional control and cognitive flexibility measures. However, this research is itself subject to significant methodological heterogeneity and publication bias concerns that limit strong conclusions.


    Context, Set, and Setting in Research Design

    One of the more methodologically significant findings in psilocybin research is the degree to which outcomes appear to be modulated by contextual factors — what researchers term “set and setting”: the participant’s psychological state and expectations (set) and the physical and social environment in which the substance is administered (setting).

    The COMPASS Pathways Phase 2b trial, published in NEJM in 2022, administered psilocybin in a standardised therapeutic support context and found significant reductions in depression scores at three weeks in the 25mg group compared to placebo. The structured therapeutic context — including preparatory sessions, therapist presence, and integration support — was integral to the study design.

    Research examining the specific role of meditation practice in psilocybin contexts remains more limited. A 2022 study by Smigielski et al. examined psilocybin administered during a meditation retreat and found that meditation practice appeared to enhance certain dimensions of the subjective experience and subsequent psychological outcomes. The authors proposed that meditation may facilitate a more structured engagement with altered cognitive states, though the study was small and exploratory in design.

    This work suggests that the relationship between psilocybin and mindfulness is not simply additive — it may be interactive, with meditation skills shaping how altered states are processed rather than simply occurring in parallel.


    Emotional Processing: Research Findings and Limitations

    Several clinical trials have examined psilocybin’s effects on emotional processing in the context of treatment-resistant depression, end-of-life anxiety, and alcohol use disorder. The Johns Hopkins studies on psilocybin-assisted therapy for major depressive disorder (Davis et al., 2021) found significant and durable reductions in depression scores at one and four weeks, with a large open-label sample.

    These results are notable, though interpretation requires care: open-label studies are subject to expectancy effects, self-selection bias, and the absence of blinding makes placebo-controlled comparison difficult. Psilocybin’s distinctive subjective effects make double-blind design particularly challenging — most participants can identify whether they received an active dose, which complicates placebo control.

    Mindfulness-based cognitive therapy (MBCT) has an established evidence base for reducing depressive relapse in patients with recurrent depression, with multiple randomised controlled trials and meta-analyses supporting its efficacy. Whether the emotional processing mechanisms overlap with those implicated in psilocybin research, or whether the two approaches operate through complementary pathways, is an active area of theoretical and empirical inquiry.


    Research Limitations and Open Questions

    Several structural limitations affect the current state of psilocybin research and should inform how findings are interpreted:

    • Sample sizes: Most psilocybin studies involve relatively small samples (often 20–60 participants), limiting statistical power and generalisability
    • Blinding challenges: The distinctive perceptual effects of psilocybin make true double-blind design difficult, introducing expectancy effects that are hard to control
    • Self-selection bias: Research participants who volunteer for psilocybin studies tend to have pre-existing positive orientations toward the substance, which may not represent the broader population
    • Replication: Many findings come from single studies without independent replication; the field is actively working on pre-registered replication efforts
    • Mechanism uncertainty: The precise neurobiological mechanisms underlying observed behavioural and psychological changes remain incompletely understood
    • Long-term data: Most studies examine outcomes over weeks to months; data on long-term effects beyond one year remain limited

    These limitations do not invalidate the research findings, but they do indicate that the field is at an early stage and that confident conclusions about the therapeutic potential of psilocybin — alone or in combination with meditation — are premature. Ongoing large-scale trials, including the MAPS and COMPASS programmes, are collecting the larger datasets needed for more definitive assessments.


    Broader Cognitive Research Context

    Psilocybin research exists within a broader landscape of interest in pharmacological and non-pharmacological interventions for cognitive enhancement, mental health treatment, and wellbeing. Ketamine-assisted therapy has received regulatory approval in several jurisdictions for treatment-resistant depression. MDMA-assisted therapy for PTSD has advanced through Phase 3 trials. Mindfulness-based interventions have been incorporated into clinical guidelines for depression and anxiety in several European countries.

    The intersection of psychedelic pharmacology and contemplative practice represents one of the more novel research areas within this landscape. Its scientific maturity is uneven: some questions — such as acute neuroimaging signatures of psilocybin states — have relatively robust data behind them; others — such as optimal integration protocols combining psilocybin with meditation — are at the hypothesis-generation stage.


    Continue Reading


    Weekly Fungal Systems Briefing

    Join the weekly fungal systems briefing for research summaries, cultivation systems analysis, and European mushroom industry updates.

    Read more: What Current Research Suggests About Psilocybin, Meditation, and Cognitive Flexibility
  • Why Most Beginner Mushroom Grows Fail: 5 Environmental Mistakes to Avoid

    Most beginner mushroom grows fail for the same handful of reasons — and none of them are exotic. Contamination, inconsistent humidity, inadequate airflow, temperature drift, and poor sterile technique account for the overwhelming majority of failed attempts. Understanding each of these failure points as an environmental systems problem rather than a beginner’s luck problem changes how you approach indoor cultivation from the start.

    This article breaks down the five most common environmental mistakes, explains the underlying mechanisms, and outlines practical corrections grounded in cultivation principles rather than guesswork.


    1. Inadequate Sterile Technique — The Root of Most Contamination

    Contamination is the leading cause of failure in indoor mushroom cultivation. The most common contaminants — Trichoderma, Cobweb mold, and green Penicillium species — colonise substrates faster than mycelium under conditions that favour their growth: warm, moist environments with ambient airborne spore load.

    The core mistake is underestimating how many contamination sources exist in a typical household. Door openings, HVAC systems, clothing, breath, and unsterilised surfaces all introduce competing organisms. Beginners frequently focus on sterilising their substrate while neglecting the inoculation environment itself.

    Sterile Workflow Checklist

    • Wipe work surfaces with 70% isopropyl alcohol before and after each session
    • Work near a still-air environment or inside a still-air box (SAB)
    • Wear nitrile or latex gloves — change between substrate and inoculation steps
    • Wear a face mask to reduce breath contamination
    • Sterilise tools (scalpels, syringes, jars) before use — flame sterilise metal tools until glowing, allow to cool
    • Limit session duration in open air — extended exposure increases contamination risk
    • Use micropore tape over jar lids for filtered gas exchange without open air exposure

    Equipment consideration: A pressure cooker rated to 15 PSI is the minimum standard for substrate sterilisation. At 15 PSI and 121°C for 90–120 minutes, most heat-resistant spores and bacteria are eliminated. Boiling alone (100°C) is insufficient — it does not reach sterilisation temperature. Sterile nitrile gloves and micropore tape are inexpensive inputs that eliminate several of the most common contamination vectors.


    2. Inconsistent or Inaccurate Humidity Management

    Most cultivated species require relative humidity (RH) between 85–95% during fruiting. Below 80%, primordia development slows significantly and pins may abort. Above 98% with inadequate airflow, surface condensation accumulates, creating anaerobic patches that encourage bacterial contamination.

    The mistake most beginners make is estimating humidity by feel or by misting frequency alone, without measurement. Two identical-looking setups in different rooms, seasons, or with different tub sizes can have RH values that differ by 15–20 percentage points. Without a calibrated instrument, you are operating blind.

    Environmental Monitoring Approach

    A digital hygrometer with temperature display placed inside your fruiting environment is the minimum instrumentation for serious cultivation. Entry-level models in the €8–20 range provide accurate readings within 2–3% RH and log min/max values, which reveals humidity swings you’d otherwise miss. For multi-tub setups, dedicated data loggers with Bluetooth connectivity allow remote monitoring without opening the fruiting environment.

    Misting schedules should be adjusted to maintain target RH, not to a fixed daily frequency. In winter, central heating dramatically reduces ambient RH; in summer, high ambient humidity may reduce the need for supplemental misting. Season, room, and tub design all interact. Measurement removes the uncertainty from this variable.

    Equipment consideration: A heat mat with adjustable thermostat combined with a hygrometer allows you to manage both temperature and humidity as a system rather than separately — essential during colder months when substrate temperature falls below optimal range (21–26°C for most species).


    3. Insufficient Airflow and CO₂ Accumulation

    Mushrooms respire: they consume oxygen and produce carbon dioxide. In a sealed or near-sealed container, CO₂ accumulates rapidly. Elevated CO₂ levels above approximately 1,000–2,000 ppm (compared to ambient ~400 ppm) signal to developing fruiting bodies that conditions are subterranean — which promotes elongated, thin-stemmed growth and inhibits cap development.

    In practical terms: if your mushrooms are developing long, thin stems with small or absent caps, CO₂ accumulation is a primary suspect. In a fully sealed tub with no fresh air exchange (FAE), this becomes limiting within hours of initial pinning.

    Airflow System Basics

    • Passive FAE: Drill 6mm holes in tub sides (4–6 holes on each side), stuffed with polyfill or polyester filter material. This creates passive gas exchange without active fans or electricity
    • Fan-assisted FAE: A small USB fan positioned to indirect-flow air across (not directly onto) the substrate — reduces boundary-layer CO₂ without desiccating the surface
    • Shotgun fruiting chambers (SGFC): Perforated on all six sides with perlite at the base for passive humidity; suited to single-tub beginner setups
    • Frequency: For tubs without passive FAE, manually fan 2–3 times daily during fruiting — open lid, fan 10–15 seconds, close immediately

    The balance between humidity retention and adequate airflow is the central technical challenge in fruiting chamber design. Solutions that address only one variable at the expense of the other tend to fail: high airflow with no humidity compensation causes pinning failure; high humidity with no airflow causes surface contamination and developmental abnormalities.


    4. Temperature Drift Outside the Optimal Range

    Substrate temperature — not ambient room temperature — is the variable that matters. Substrate can run 1–3°C cooler than ambient in winter or warmer when mycelium is actively metabolising. Most cultivated species have a colonisation optimum around 24–26°C and a fruiting optimum slightly cooler, around 20–24°C. Outside these bands, both colonisation speed and fruiting efficiency degrade noticeably.

    In European climates, winter presents the more consistent challenge. Rooms that fall to 17–18°C at night dramatically slow mycelial growth and can arrest pinning entirely. Beginners who set up in October or November and see no activity for three weeks are often experiencing thermal limitation, not contamination or technique failure.

    Equipment consideration: A heat mat positioned below a grow tub, combined with a digital thermostat controller, allows substrate temperature to be maintained within 1–2°C of target regardless of ambient room temperature. This is especially relevant in stone-floor apartments or unheated storage rooms common in northern European settings.

    Monitor substrate temperature with a probe thermometer for at least 24 hours before concluding a grow is stalled — temperature, not time, governs colonisation speed.


    5. Choosing the Wrong Container for Your Conditions

    Tub selection is underestimated as an environmental variable. The geometry and material of your fruiting chamber influence heat retention, humidity stability, airflow dynamics, and ease of maintenance. Beginners often start with whatever container is available — which may be technically usable but environmentally suboptimal.

    Clear-sided tubs allow light from multiple angles, which can interfere with directional pinning and make it difficult to observe the substrate interior without disturbing the environment. Opaque or semi-opaque polypropylene monotubs with drilled FAE holes are a standard solution: stable, inexpensive, and compatible with passive and active airflow approaches.

    Lid design matters: airtight lids require manual FAE; lids with integrated filters provide passive exchange but may require humidity supplementation. Matching your container design to your level of active maintenance capacity — how often you can check and mist — is a practical criterion beginners rarely consider at the selection stage.

    Beginner Setup Recommendations

    A reliable beginner indoor setup for a single grow cycle typically requires:


    Environmental Control Is the Discipline

    Most beginner failures are not random. They trace back to specific environmental variables that were unmeasured, mismanaged, or misunderstood as individual problems rather than as an interconnected system. Humidity affects airflow outcomes. Temperature affects contamination rates. Container design affects both. Sterile technique interacts with all of them.

    Approaching your grow environment with the same rigour you’d apply to any controlled process — measuring, adjusting, and iterating — changes the outcome profile significantly. The instrumentation required to do this at a basic level costs less than most grow substrates.


    Continue Reading


    Weekly Fungal Systems Briefing

    Join the weekly fungal systems briefing for research summaries, cultivation systems analysis, and European mushroom industry updates.

    Read more: Why Most Beginner Mushroom Grows Fail: 5 Environmental Mistakes to Avoid
  • How Psilocybin Species Adapt to Different Natural Environments

    Psilocybin-containing fungi are not a taxonomic group — they are a pharmacological one. Over 200 species across multiple genera have been confirmed to contain psilocybin or psilocin, distributed across a wide range of habitats, climate zones, and ecological niches. Understanding how different species adapt to their natural environments illuminates both their ecological roles and the specific substrate and climate conditions that indoor cultivation attempts to replicate.


    The Ecology of Saprophytic Fungi

    Most psilocybin-containing species are saprophytic — they obtain nutrients by decomposing dead organic matter. This places them in the decomposer guild of their ecosystems, where they play functional roles in nutrient cycling, particularly in the breakdown of lignocellulosic material in wood, straw, and leaf litter.

    Saprophytic fungi compete with bacteria and other fungi for available substrate. The competitive pressure that psilocybin species face in moist, humid environments with abundant decaying organic material may have shaped the chemical compounds they produce, though the precise adaptive function of psilocybin production remains an open research question.


    European Grassland Species: Psilocybe semilanceata

    Psilocybe semilanceata — the liberty cap — is the most widely distributed psilocybin species in Europe. It grows in nutrient-poor, unimproved grasslands: pastures that have not been treated with synthetic fertilisers, upland meadows, and boggy margins. It is associated with the roots of grasses and fruits after the first cold rains of autumn when temperatures fall between 8–12°C.

    Its concentration in Atlantic-influenced European regions — the UK, Ireland, Scandinavia, the Alps, and the Pyrenees — reflects its adaptation to cool, damp temperate climates with high autumn rainfall. Continental European climates with dry summers and cold winters that interrupt the moisture regime it requires support it only marginally.


    Dung-Inhabiting Species: Psilocybe cubensis

    Psilocybe cubensis is the most widely cultivated psilocybin species globally. In nature, it grows on bovine dung in subtropical and tropical environments — the Gulf Coast of the United States, Central America, South America, Southeast Asia — where it encounters warm temperatures (20–30°C), high humidity, and abundant nutrient-rich substrate.

    Its natural association with cattle dung reflects its adaptation to partially-digested plant material: high in nitrogen, moisture-retentive, and rich in the microbiota that partially breaks down cellulose. Indoor cultivation replicates this environment using grain-based substrates or bulk coir and straw mixes.

    P. cubensis does not naturally occur in Europe. Its global prominence in cultivation is a product of human selection: it is robust, productive, and tolerates a wider range of cultivation conditions than more sensitive species.


    Wood-Inhabiting Species: Psilocybe cyanescens and Psilocybe azurescens

    Psilocybe cyanescens — the wavy cap — has spread significantly in Europe over the past several decades, associated with the increasing use of wood chip mulch in urban landscaping and garden beds. It is now documented in the UK, Germany, Switzerland, and Scandinavia, appearing in autumn on wood chip substrate in parks, gardens, and roadsides.

    Its expansion represents an opportunistic ecological adaptation to a substrate type created by human activity. P. cyanescens colonises hardwood chips and persists as mycelium through summer before fruiting in cool, wet autumn conditions.

    Psilocybe azurescens, native to the Pacific Northwest coast of North America, is among the most potent psilocybin species by concentration. It is adapted to cool, marine-influenced coastal temperate forests and grows on sandy soils containing decaying wood and debris. It has been introduced to several European locations.


    Sclerotia-Forming Species: Psilocybe tampanensis

    Psilocybe tampanensis produces both mushroom fruiting bodies and sclerotia — compact masses of hardened mycelium that function as dormancy-resistant storage organs. The sclerotia (marketed commercially as psilocybin truffles in the Netherlands) allow the organism to survive unfavourable conditions — drought, cold, nutrient depletion — before resuming growth when conditions improve.

    This adaptation reflects the unpredictable moisture and temperature conditions of subtropical environments, where extended dry periods alternate with high-humidity rainfall. The sclerotia strategy provides a survival mechanism that fruiting-body-only species lack.


    Climate Patterns and Habitat Requirements

    Across psilocybin species, several ecological patterns are consistent:

    • Moisture dependence: All known species require high ambient moisture for growth and fruiting, absent from arid environments except where localised moisture creates suitable microhabitats
    • Temperature tolerance: Different species span different ranges, but none fruit well above 30°C or under frost. Fruiting is typically triggered by temperature drops following moisture availability
    • Substrate specificity: Species show characteristic associations with particular substrate types — grass roots, cattle dung, wood chips, sandy soils — reflecting adaptations to specific nutrient profiles and competing microbial communities
    • Seasonal fruiting: Temperate-zone species fruit predominantly in autumn; tropical and subtropical species may fruit year-round given sufficient moisture

    Indoor Cultivation as Environmental Simulation

    Understanding the natural habitat requirements of psilocybin species clarifies the logic behind indoor cultivation parameters. The humidity targets, temperature ranges, substrate compositions, and CO₂ management protocols in indoor cultivation are derived from the ecological conditions each species evolved in. Deviations produce predictable responses: lower RH reduces fruiting body development; temperatures outside the optimum slow colonisation; elevated CO₂ suppresses cap development.

    This ecological framing — understanding cultivation as environmental simulation rather than a mechanical procedure — provides a more robust conceptual foundation for troubleshooting and optimisation than following procedural steps without understanding the underlying biology.


    Continue Reading


    Weekly Fungal Systems Briefing

    Join the weekly fungal systems briefing for research summaries, cultivation systems analysis, and European mushroom industry updates.

    Read more: How Psilocybin Species Adapt to Different Natural Environments