

Mushroom cultivation is often described as a waiting game, but what you’re actually waiting for is a precise sequence of biological events. Understanding what’s happening at each growth stage — and what conditions trigger the transition between them — is what separates growers who consistently fruit from those who stall out mid-cycle. This guide covers every major stage, from spore germination through the final flush.
Stage 1: Spore Germination
Everything begins with a spore — a microscopic, single-celled reproductive unit encased in a protective coat. When conditions are right (adequate moisture, warmth, and a compatible substrate), the spore absorbs water and germinates, extending a thin tube of cells called a germ tube. This is the biological starting point of the entire grow.
For cultivated species like Psilocybe cubensis, germination typically occurs within 12–24 hours under ideal conditions (25–28°C, high humidity, dark environment). Spore-to-grain inoculation — where a spore syringe is injected into a sterilized grain medium — is the most common method for home cultivators. The grain provides both a sterile inoculation target and the initial nutritional base for early mycelium.
Germination rates vary by spore age, storage conditions, and inoculation volume. Fresh spores from a reliable vendor, stored at refrigerator temperature, should germinate reliably. Spores older than 12–18 months or stored improperly may show dramatically reduced germination rates.
Stage 2: Mycelium Colonization
Once germination begins, the germ tube branches and extends into a network of thread-like structures called hyphae. The collective mass of these hyphae is the mycelium — the vegetative body of the fungus, analogous to roots in a plant. Mycelium grows by secreting enzymes that break down surrounding organic matter into absorbable nutrients.
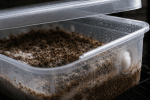
During colonization, the mycelium works outward from each inoculation point, digesting substrate and expanding in all directions. In a grain jar, this appears as white, fluffy growth spreading through the grain over 7–14 days. In a bulk substrate (coco coir/vermiculite mix), visible mycelium spreads across the surface and through the interior over 10–18 days.
Two distinct mycelium growth patterns appear during this stage:
- Tomentose mycelium: Fluffy, cotton-like growth. Most common during early colonization and considered healthy, though it doesn’t always pin readily.
- Rhizomorphic mycelium: Rope-like, stranded growth with a more structured appearance. Generally associated with stronger pinning potential. Develops as the mycelium matures and prepares for fruiting.
The transition from tomentose to rhizomorphic growth is not universal — it depends on genetics, substrate composition, and CO₂ levels. Some strains stay predominantly tomentose throughout and still fruit well. The key metric is full colonization, not growth pattern.
Stage 3: Consolidation
After the surface of the substrate is fully colonized with white mycelium, experienced growers often wait an additional 3–7 days before initiating fruiting. This consolidation period allows the mycelium to fully penetrate the substrate interior, strengthen its hyphal network, and accumulate metabolic reserves.
Signs of consolidation: the mycelium surface may take on a denser, more mat-like appearance. Some growers observe patches of yellowish secretion on the surface — this is metabolic exudate (sometimes called “mycelium sweat”) and is a normal sign of a healthy, active mycelial network preparing for fruiting. This secretion is not contamination.
Rushing from full colonization to fruiting without allowing this consolidation phase often results in smaller pins, fewer pins, or uneven fruiting across the substrate surface.
Stage 4: Pinning (Primordia Formation)
Pinning is the most visually dramatic stage — and the most sensitive. Pins (primordia) are the earliest stage of fruiting body development: tiny, white nodules that emerge from the substrate surface in response to environmental cues. This is where most beginner grows either succeed or stall.
The key triggers for pinning are:
- CO₂ reduction: Elevated CO₂ suppresses pinning. Introducing fresh air exchange (through fanning) drops CO₂ and signals to the mycelium that surface conditions are favorable for reproduction.
- Temperature drop: A modest reduction from colonization temperature (dropping from 24°C to 20°C, for example) mimics the transition from soil warmth to cooler surface air — a natural fruiting cue.
- Light exposure: Mushrooms don’t photosynthesize, but they do use light as a directional cue. Indirect light for 8–12 hours per day helps orient pin development and can improve pinset density.
- High surface humidity: The surface must remain moist throughout. Pins form on the mycelium surface and will abort if the outer layer desiccates.
Primordia first appear as small white dots or bumps on the substrate surface. Within 24–48 hours of initiation, these develop into recognizable pin shapes with distinct caps and stipes. The density of the pinset — how many pins form — depends on genetics, substrate quality, and how cleanly the environmental cues were introduced.
Stage 5: Fruiting Body Development (Maturation)
Once pinned, fruiting bodies grow rapidly. A pin can develop into a mature mushroom in as little as 3–5 days under optimal conditions. During this phase, the stipe (stem) elongates and the cap (pileus) expands. Inside the cap, gills develop — the spore-producing surface that gives the mushroom its characteristic fan-like internal structure.
The cap begins as a tight, hemispherical shape with a protective membrane — the veil — stretched between the cap edge and the stipe. As the cap expands, the veil stretches. Most cultivators harvest just before or as the veil begins to tear. At this point, potency is at or near peak and spore drop has not yet begun.
Maintaining stable humidity during maturation is critical. Fluctuations cause caps to crack or develop irregular surfaces. Misting the walls of the fruiting chamber (rather than directly onto the mushrooms) keeps ambient humidity high without waterlogging the developing caps.
Stage 6: Harvest
Harvest timing matters more than most beginners realize. The optimal window is just before veil break — when the cap is still convex and the membrane between the cap edge and stem is intact but beginning to show tension. At this stage, the mushroom has reached maximum size and potency without releasing spores.
To harvest, twist and pull gently at the base of the stipe — don’t cut, as this leaves a stump that can rot and introduce contamination into the substrate before the next flush. After the first flush, remove any aborts (small pins that stopped developing) from the surface as well. These can also rot and carry bacteria or competing molds into subsequent flushes.
Stage 7: Rehydration and Subsequent Flushes
After harvest, the substrate has given up significant moisture through evaporation and into the fruiting bodies themselves. Before pinning will reliably occur again, the substrate needs to be rehydrated. This is done through a process called dunking: submerging the entire substrate block in cold water for 4–12 hours to allow it to absorb moisture back to near field capacity.
After dunking, re-expose the substrate to fruiting conditions — lower CO₂, light, moderate temperature — and a second pinset will typically emerge within 5–10 days. Most substrates support 2–3 strong flushes before yields drop significantly. After the third flush, nutritional reserves are largely depleted and the risk of contamination increases.
Understanding the growth cycle end-to-end is what allows you to diagnose problems in real time. If pins aren’t forming after full colonization, the answer is almost always in the environmental variables covered above — CO₂, humidity, or temperature. For a deeper look at why these grows fail and how to fix them, see Why Most Beginner Mushroom Grows Fail. For complete equipment and environment setup guidance, Beginner Indoor Mushroom Cultivation walks through the full system.

Leave a comment